Only just noticed the blatant advertising Larry.
Good on ya.

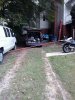
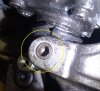
Another angle, and plenty of working space:
Last edited:

Only just noticed the blatant advertising Larry.
Good on ya.
Geeee, Larry, you were not joking
Another angle, and plenty of working space:
Nope. That was when I rebuilt the forks. New bushings and seals, springs were okay, fluid level 1/4" above specs.Geeee, Larry, you were not joking
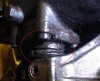
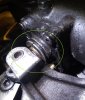
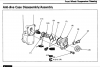
This is going to be a bit of work to resolve, since the rounded bolt is what holds the lower part of the left caliper bracket to the anti-dive piston rod. The lower caliper bracket has a "Y" shape, so the threaded part of the rounded off bolt goes into the other side of the "Y". So if you can't break the bolt loose, drilling out the head isn't going to help because the bolt will still be going across the "Y", just without a head.All this will be easiest with the fork removed from the bike. You will need to replace the bolt when you get it out.
good idea John, I always forget that on these two-piston calipers the caliper and mounting bracket are two separate parts.slide the caliper off it’s pins and hang it (min stress on hose/banjo).

No, to both of these. Your initial goal is simple, get access to the 4 bolts holding the anti-dive in the fork. The upper-right one is the only problem, the other 3 are easily accessible without removing anything, so we're describing how to get access to the upper right one. The caliper bracket is in the way, so by removing the top mounting bolt (which hopefully isn't rounded off as well) you'll be able to rotate the bracket downward so its no longer in the way. Then you may be able to access the 4th bolt, or maybe not, the brake rotor may be in the way. If you can get good access to the 4th bolt with the wheel still on the bike, then remove the bolt and leave the wheel on the bike. If the brake rotor is making that difficult, then remove the front wheel so the rotor is no longer in the way.- try to remove the bolt holding the caliper to the anti dive using the (hopefully non-stripped) other end?
- remove the fork outer tube?
Bottom line is that the wheel and forks have to come off the bike at some point to be refilled properly. Rather than attempt this repair in a makeshift way working around things just bite the bullet, remove the wheel and fork tubes and do the refurb in your apartment. I know most condo and apartment buildings around here have rules prohibiting mechanical work being done in the garage. Stripping off the parts and then doing the nitty gritty work in your appt. minimises the time spent in the common garage area.You need to do a proper suspension fluid level service after fixing the anti-dive, so pull the fork now. Drop the wheel , slide the caliper off it’s pins and hang it (min stress on hose/banjo). Once off the bike, clean the fork slider and brake bracket and get some penetrant on that bolt’s threads (as noted, on the other side of the bracket).
Here is a Dropbox link to a manual for the 1100: https://www.dropbox.com/s/ys9os2aojtk7e6x/ST1100 Service Manual.pdf?dl=0It seems the OP is working without the huge benefit of having the Honda Service Manual to guide him through removal procedures of the various components he is working on. I suggest he get one.
I think your approach is very sensible, but just wanted to clarify one thing in case you're confused about it. What is stripped out on your bike is not the stop ring, its a bolt that isn't shown in the anti-dive parts diagram. The bolt is a 5mm diameter hex (allen) drive head that goes through parts 2, 3, and 10. It goes in from the left side of the "Y" at the bottom of the caliper bracket and threads into the right side of the "Y" on the bracket.as I realistically lack the judgement to know how to minimize risk (eg something going wrong in the process of trying to remove that stripped stop ring)