
KrazyKooter
John
A couple of weeks ago I purchased a few farkles and thought I would share how the install goes. As of right now, the only thing I have to attach to the shelf is a Garmin Streetpilot 2820. This article may be too basic for those who have already installed some farkles, but this is meant to help people who may not have very much confidence to tackle the job. So, here goes.
The first step is to remove the windshield. Unscrew the covers with a Phillips screwdriver.

After removing the covers, use an 8mm wrench to remove the bolts that attach the windshield.

Next, there are 4 Phillips head screws in the dash that must be removed, 2 on each side.

The next step is to remove the pop rivets on the top. This is where the screws for the Migsel will be mounted. There are two more pop-rivets below and to the sides that need to be removed, but I didn't take a picture of the lower ones.

Now you should be able to slightly peel back the top. The metal threaded pieces from the kit fit inside the slots fairly snugly. I didn't take a picture of them before I put them in and I wasn't able to remove them. Sorry for the out-of-focus picture on this one.

There are several screws that come with the shelf, but the ones that are used to mount the shelf are the two hex screws.

Here is the Migsel mounted. The Migsel comes with only 1 ram ball. I had an extra ram ball from when I purchased my MCL risers.

Next, put the screws in the dash back in, then the pop-rivets. Then re-install the windshield. Here are some pics of the Migsel after the install. There are three places to mount the ram balls. Since the kit includes only one ram ball, there are also two plugs for the other holes. In the picture below, I have a plug in the middle hole.

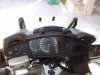
With the 2820 installed.


The first step is to remove the windshield. Unscrew the covers with a Phillips screwdriver.
After removing the covers, use an 8mm wrench to remove the bolts that attach the windshield.
Next, there are 4 Phillips head screws in the dash that must be removed, 2 on each side.
The next step is to remove the pop rivets on the top. This is where the screws for the Migsel will be mounted. There are two more pop-rivets below and to the sides that need to be removed, but I didn't take a picture of the lower ones.
Now you should be able to slightly peel back the top. The metal threaded pieces from the kit fit inside the slots fairly snugly. I didn't take a picture of them before I put them in and I wasn't able to remove them. Sorry for the out-of-focus picture on this one.
There are several screws that come with the shelf, but the ones that are used to mount the shelf are the two hex screws.
Here is the Migsel mounted. The Migsel comes with only 1 ram ball. I had an extra ram ball from when I purchased my MCL risers.
Next, put the screws in the dash back in, then the pop-rivets. Then re-install the windshield. Here are some pics of the Migsel after the install. There are three places to mount the ram balls. Since the kit includes only one ram ball, there are also two plugs for the other holes. In the picture below, I have a plug in the middle hole.
With the 2820 installed.
Attachments
-
 166.7 KB Views: 785
Last edited:
 :
: