In theory, it should "pop off". But in reality, there are a few time and wear related things that will prevent it from falling off once you remove the last fastener.
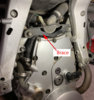
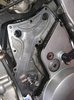
One is the adhesion between the old gasket (the one that looks like a gigantic O-ring) and the metal surfaces. Another is that unlike a typical connection of two metal parts, there is at least one small tubular piece that fits into either side of the assembly (water pump & front crankcase cover) to keep the two parts precisely aligned and prevent any side to side movement. You can see it at the end of the arrow in the picture below. We'll need to check with Larry (
@Igofar ) to find out if there is only the one shown in the picture, or if perhaps there is a second one somewhere (not shown in the picture) that remained attached to the water pump cover when I removed it.
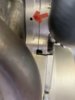
Best suggestion I can offer is to take a large flat-blade screwdriver, stuff it into the long vertical gap on the right side of the water pump cover - between the water pump cover and the front crankcase cover - and
very gently wiggle the screwdriver in an attempt to move the water pump cover
forward (not sideways). Second best suggestion I can offer is to tap the upper left corner of the water pump cover with a rubber mallet, or by placing a block of wood against it and tapping the block of wood with a hammer.
What both of the above actions try to achieve is to move the water pump cover directly forward (again, not sideways, because of that little tube at the end of the arrow) and break the adhesion between the old rubber gasket and the two metal castings.
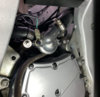
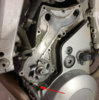
Lastly, take a close look at the picture below, note all of the fastener holes, and double-check to make sure you removed every fastener. It's easy to overlook one fastener that might still be in place holding the cover on, especially if you have not done the job before.
Michael
Watch out for this little tube, which is there to prevent sideways movement

")
 57.1 KB Views: 33