Started bike for the first time since winterizing it in October. I have a knocking sound coming from #1 cylinder. It's valve adjustment time. Yay me. I already have the plastics removed. The local motorcycle shop is saying it will cost $800-$900 for the adjustment. I laughed and hung up the phone. Need tips on doing the adjustment. I entered valve adjustment in the search and nothing came up. I am just a little intimidated by doing the valve adjustment. A couple years ago I had a Kawasaki Ninja 2 cylinder motorcycle and did a valve adjustment on that. That one was pretty easy to do. I'm also going to change out the thermostat and do a bunch of other stuff while I have all the fairings off. Tips and techniques are greatly appreciated.

Valve adjustment
- Thread starter jamalc6996
- Start date
st11ray
2006 ST1300
Article [13] - ST1300 - Valve Adjust, Left Side | ST1300 Articles
While performing the 48,000 mile valve check, I discovered one valve out of tolerance on the left side of the bike. Data from the prior two checks indicated the valve was moving tighter at a rate of 0.01/mm per 16,000 miles...and yes, it had moved out of spec by the time the 48,000 mile check...
Kevcules
Site Supporter
Well.....There are a lot of fairings to remove , that's for sure as you saw. ")
I'm attaching a valve worksheet which is helpful.
Pretty straight forward if you've done it before. Remove the two valve covers being careful not to tear the gasket. Pay attention when putting the covers back on as there is a rubber blanket up farther that can get caught on the lip of the valve cover on installation.The engine must be cold. Remove the two caps on the front of the engine to see the crank position and the bolt head that you will turn CCW to find TDC on the compression stroke to start the first check on cylinder 1. Four valves per cylinder. (then follow the worksheet instructions)
I was just in there checking my valves and replacing the thermostat recently. I replaced a couple of hoses and clamps. Tightened a few also.
Serviced my forks and fluid replacement. I replaced my plastic Tee fitting (known weak part that fails) with a brass coupling and double clamped the ends because the barbed fittings were so long. Probably unnecessary as I tried to remove one of the small hoses after I slid it on and it wouldn't move without any clamps on it.
Checking the clearances is fairly easy, but I haven't had to replace any shims yet.....that may be fun. There are some vids on youtube.
Good luck
Attachments
-
2.1 MB Views: 31
-
 135.2 KB Views: 35
 -
 106.4 KB Views: 37
 -
 129.2 KB Views: 35
- Joined
- Feb 11, 2006
- Messages
- 9,685
- Location
- Jacksonville
- Bike
- GL1800 R1200RT NC700
- 2024 Miles
- 008131
- STOC #
- 6651
A service manual is all you need.......... but:
Within this forum look in: ST Forums > Articles. This is one path to some threads.
Google search 'ST-Owners.com valve adjustment' is another path: https://www.google.com/search?client=firefox-b-1-d&q=st-owners.com+valve+adjustment
Within this forum look in: ST Forums > Articles. This is one path to some threads.
Google search 'ST-Owners.com valve adjustment' is another path: https://www.google.com/search?client=firefox-b-1-d&q=st-owners.com+valve+adjustment
what part of the state are you in?Started bike for the first time since winterizing it in October. I have a knocking sound coming from #1 cylinder. It's valve adjustment time. Yay me. I already have the plastics removed. The local motorcycle shop is saying it will cost $800-$900 for the adjustment. I laughed and hung up the phone. Need tips on doing the adjustment. I entered valve adjustment in the search and nothing came up. I am just a little intimidated by doing the valve adjustment. A couple years ago I had a Kawasaki Ninja 2 cylinder motorcycle and did a valve adjustment on that. That one was pretty easy to do. I'm also going to change out the thermostat and do a bunch of other stuff while I have all the fairings off. Tips and techniques are greatly appreciated.
CYYJ
Michael
Hi Jamal:Tips and techniques are greatly appreciated.
I did a valve adjustment on my ST 1300 this winter - at the same time, I also replaced the thermostat and a number of coolant hoses and clamps.
The process of checking valve clearance is very well documented here in the forum - there are some excellent articles that explain the process in detail, and some downloadable worksheets to assist you. I highly recommend the Microsoft Excel valve clearance worksheet, I found it very helpful.
Here are some "general suggestions" I have for you, based on my experience:
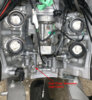
1) If you are going to be replacing the thermostat (implies removing the radiator), then take the front wheel off, take the rad off, and take that whole cover off the front of the engine (clutch cover). It is one heck of a lot easier to turn the engine over and line up the timing marks when you don't have to look through the little holes in the clutch cover! You will need to buy and replace a gasket if you take the cover off, but it is not expensive.
2) Do the valve adjustment before you start the re-assembly of the thermostat area, this because it is easiest to get at the right side cam chain tensioner if you have easy access to the area where the thermostat was removed from.
3) Don't be in a hurry to get the valve adjustment done if it is the first time you are doing it. It took me about 4 hours to do one side of the engine, and 4 hours to do the other side. I'm sure it will be faster next time around, but it is a complex task and there are lots of opportunities to screw up if you try to rush things. I note that you are in Wisconsin, which means you have another 3 months before riding season begins, so no need to rush.
Michael
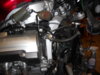
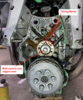
Location of Right Bank Cam Chain Tensioner
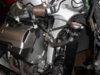
Access Holes for Cranking Engine, Timing Marks
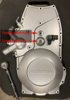
Engine Cranking Bolt, Timing Marks (with cover removed)
(Much, much easier than working through those two little round holes)
- Joined
- Aug 6, 2007
- Messages
- 4,216
- Age
- 49
- Location
- Grant, MN (aka Stillwater)
- Bike
- ST1100 & ST1300
- STOC #
- 6145
Not sure how it is done on a Kawasaki motorcycle but on the Kawasaki V Twin in my John Deere Tractor and Zero Turn, it is an adjustment process. With the Honda ST bikes it is a shim replacement process. You can order individual shims from the Honda Dealer but it is almost easier to just get a Hot Cams shim kit and have it on hand for the check in the event you need to change some out. As others mentioned, take your time, it isn't hard.
Good advice above. Be sure to get the Honda factory shop manual, a shim kit, and a decent set of feeler gauges.
I did an exhaust shim this past fall. Used all the great info from the forum. Still it was nerve racking and intimidating to say the least. You are pretty deep into the engine and have to be extremely careful to mark things so they go back together the same way they came apart. When I put the bike back together I honestly did not know if it would start or not. But to my surprise it did... 
Agree with all the above Greg. I had to do a bunch of exhaust shims. Measure, take notes, repeat, a lot. Not unlike my memory of doing a timing belt a few years ago..I did an exhaust shim this past fall. Used all the great info from the forum. Still it was nerve racking and intimidating to say the least. You are pretty deep into the engine and have to be extremely careful to mark things so they go back together the same way they came apart. When I put the bike back together I honestly did not know if it would start or not. But to my surprise it did...
Regarding starting, or not, my concern was a loud explosion.
Regarding the shim kit, doesn't John O. have one to loan out for the cost of shipping?
Since its rare to need more than a couple shims, and many times you don't need any, seems like buying a shim kit is an unnecessary expense. In the past I just traded them at the local shop where I bought tires, supplies, etc. and they did it for free. Even if you have to buy a couple they're a few bucks each, but I haven't bought them lately so that price may have gone up a bit.
Since its rare to need more than a couple shims, and many times you don't need any, seems like buying a shim kit is an unnecessary expense. In the past I just traded them at the local shop where I bought tires, supplies, etc. and they did it for free. Even if you have to buy a couple they're a few bucks each, but I haven't bought them lately so that price may have gone up a bit.
I did the math , I ordered my shim, wait for one week. Shim came in, put everything back together. checked the clearance-- it got tighter-- I did the math wrong ( somehow) took it all back apart. ordered new shim, waited one week. Then it was correct....
Ah, I'm used to SoCal where there's a motorcycle shop on every block, not exactly, but you get the idea. Also, the shims are universal, you can buy them from any dealer or independent shop, they're not Honda specific.
- Joined
- Feb 11, 2006
- Messages
- 9,685
- Location
- Jacksonville
- Bike
- GL1800 R1200RT NC700
- 2024 Miles
- 008131
- STOC #
- 6651
To peer into the inspection hole and line up the camshaft/crankshaft timing marks I used a small mirror taken from a discarded cosmetic makeup kit my wife was no longer using. It’s easy to see the marks with a flashlight and mirror.
Shimming 1300 valves was more intimidating than it actually turned out to be. I followed the service manual and took encouragement from threads like this.
Shimming 1300 valves was more intimidating than it actually turned out to be. I followed the service manual and took encouragement from threads like this.
I never knew the 1300 had chains instead of a belt.
Indeed chains and not a belt.chains instead of a belt.
CYYJ
Michael
Both the ST 1100 and the ST 1300 use the 7.48 diameter shims. The other size might be for dirt bikes, I don't know.Which size is for the 1300?
Michael
John OoSTerhuis
Life Is Good!
+1 7.48mm for both STs
John
John
It almost seems that there are more need-mechanicall-help threads and posts about 1300s than 1100s, despite the age range difference. Am I imagining it, or is it true, and an indication of the 1100s' reliability?