
Subtitle: How I thought my ST might be toast!
During my initial call to @Igofar on the White Courtesy Phone, I learned that my forks and front axle were misaligned. I had read some posts on the subject, but I’ll admit I didn’t understand the phenomenon. Moreover, I wasn’t fully comprehending the process.
During the call, Larry explained the process. Honestly, I didn’t understand his explanation and wasn’t sure I could do it, but he assured me I could. While I was awaiting the parts to replace the SMC and rebuild my brake calipers, I thought I’d try and take a stab at aligning my forks/axle.
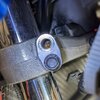
When I want to loosen the pinch bolts on the right fork, I discovered that one of them on the lower steering stem was missing! (See the first picture below.) Sadly, it was even worse than I knew because the top half of the bolt had broken off! Talk about an “Oh Crap” moment.
I suspect that I had been riding the bike this way since Sept 2019 after a nearby Honda dealer had serviced the forks. Until I went to try the fork/axle alignment, I had no reason to go near the pinch bolts. I was both angry and embarrassed. Now I had to address a problem I should have to and it was something I felt that I should have noticed sooner.
Because the remainder of the bolt was deep inside the steering stem, I decided I needed to call the White Courtesy Phone again. I was thinking that I might have figured he’d tell me that I had to replace the steering stem and bearings, and I was not looking forward to that. That process seemed like advanced Rocket Surgery – lol.
Larry talked me off the ledge and told me not to worry. He theorized that an impact air wrench had been used to tighten the bolt and too much torque had been applied causing the bolt to snap. The break looked clean, and Larry was confident that I could remove the remaining portion of the bolt.
If first tried drilling into the broken bolt using the extractor I had on hand. Per his instructions, I applied heat (with my heat gun), penetrating oil (part acetone, part ATF), an inserted my extractor. Frustratingly, the extractor promptly broke (see picture two).
My extractor was too weak, and now I made the bad situation worse. Although I tried half a dozen more of Larry’s suggestions, it became clear that I was not going to get the broken piece out. That’s when he said I would need to replace the steering stem. I had another “Oh Crap” moment. At this point, I thought my bike had become salvage. Needless to say, I was quite despondent. Quickly, Larry said, “Let me call you right back.”
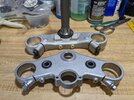
Several minutes later, he called back and that he spoke with a guy who works on ST’s and who had a used top bridge and lower steering stem in good condition from a decommissioned Police bike. It will come as no surprise to many that the guy Larry called was @Aniwak a.k.a. John Sibley. Larry negotiated a reasonable price with John, and soon, I would have a very nice donor steering stem and top bridge. (see before and after pictures of the donor parts.) Much appreciated @Aniwak! However, he said the bearings and races would need to be replaced. Good grief!
While I was waiting for the parts and tools needed to replace the steering, Larry began coaching me on the process to R&R the bearings and races. Although I understood most of his explanation about the removal process, I wasn’t sure how I was going to install the new bearing races. The Service Manual says to remove the race from the stem using a chisel (yikes). Moreover, the Service Manual details the removal and installation of the races into the steering tube with equipment that is virtually unobtainable in the USA. Furthermore, I had never done anything like this before.
After watching several online videos, Larry’s instructions began to make a lot more sense to me. Because all of the drivers and presses used in the videos to seat the races into the head pipes were for tapered bearings, Larry said I’d need to make my own press using washers and a long bolt or a threaded rod. I will admit, I did not like the sound of that. Had I known that the ST-Riders had a steering stem loaner kit (see post #42 in this link), I wouldn’t have worried so much. Alas, I did not.
Eventually, I came across a 52-piece, non-tapered bearing driver set on Amazon (see below). The variety of metric sizes (18mm to 65mm) looked like the solution to my “washer” dilemma. Each driver/disk had a 12mm opening for the driver handle, so I also ordered a 12mm threaded rod from Amazon. Until the set arrived, I was concerned that the relatively low cost of the set ($50) might not work. Fortunately, the driver set was much sturdier than expected. A picture of the press I fashioned is posted below.
**** The driver set would also come in handy to help me replace the front wheel bearings. (see the picture of the tool and driver) I had to replace the wheel bearings because I believe the axle was over-torqued by the dealer. The inner races of both bearings were so tightly pressed against the spacer/distance collar, the bearing would not move independent of the spacer. Drat! Another problem I have to fix. ****
After the steering stem socket arrived, I was able to remove the steering stem from my bike. (see attached pictures.) The races in the steering pipe punched right out with a drift. Before I seated the new races into the steering tube, I thought I’d practice using a set of cold chisels to remove the race on my damaged steering stem. To my surprise, I was able to remove the race and dust seal! I was ecstatic, and I began to think I might just be able to pull this job off.
Of course, it wasn’t that easy. No matter what I did (heat, penetrating oil, tiny screwdrivers) I could not get the race to budge on the donor part. The bike was fighting me again! This prompted yet another call to the White Courtesy Phone.
Again, Larry reassured me everything would be all right, donned his thinking cap, and brainstormed some solutions with me. Initially, I sought out a local shop that had an ARC welder. According to Larry, the ARC welder could get the race hot enough to slide off. After making several fruitless calls, I visited a local auto repair shop that my wife and I have used in the past. The owner is a motorcycle guy, so I hoped he might be willing to help me.
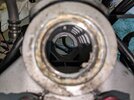
Sure enough, he was willing and able to help me. Instead of using his ARC welder, he offered to “crack” the race off. Subsequently, he pulled out a 3 in. grinder to score a diagonal line into the race about 2-4mm deep. Then he took a chisel, inserted it into the cut he made, and struck the chisel with his hammer. Viola! The bearing cracked and I was able to slide it off with my fingers! (see the picture below.)
I was able to seat the new race and dust seal using a 12 in. long, 1-1/4 in. galvanized pipe nipple and the cracked race placed upside down atop the new race. It took a fair amount of hammering, but I had done what I thought was going to be impossible (see picture below). Using my handmade bearing race press, I proceeded to seat the new races into the steering tube. After that, it was just a matter of following the Service Manual instructions to install the new bearing and torque the steering head & top bridge to factory specs!
**** Tip: Before torquing the stem nut on the top bridge after the forks have been inserted, turn the steering full to the left to check and make sure that you can lock the forks using the ignition key. If it is hard to lock or won’t lock at all, it means the top bridge and steering stem are slightly misaligned. ****
**** Note: I also had to R&R the ignition switch. Conveniently, Honda uses a special security bolt for which there is no tool (see picture). However, a 1/4 in. bolt extractor (also see picture) will get it out. I used a 25mm long M8 X 1.25 socket cap bolt (see picture), lock washers, and blue Loctite to secure the switch in the donor top bridge. I wish I could have used it for the broken pinch bolt, but I couldn’t. The broken piece was too deep in the steering stem. ****
For inquiring minds, I opted to use the stock Honda caged ball bearings at Larry’s recommendation. The upper race in the steering tube is approximately 47mm, and the lower race is 55mm. I started with a 47mm driver to seat the upper bearing race, but found I had to switch to the 46mm driver disc to completely get it in place. For some reason, all the auto parts, hardware, and Tractor Supply stores in my area didn’t have any urea-based grease. Amazon to the rescue again! I ended up ordering John Deere polyurea grease for the upper and lower bearings (see picture below). Of course, it’s green….
To my surprise, I had actually installed the donor parts and new steering bearings. My bike was no longer a derelict. Moreover, the steering is now both lighter and smoother. Prior to doing this job, I thought my steering just was fine. Now I know better. Thanks, Larry! Now, for the fork/axle alignment…
During my initial call to @Igofar on the White Courtesy Phone, I learned that my forks and front axle were misaligned. I had read some posts on the subject, but I’ll admit I didn’t understand the phenomenon. Moreover, I wasn’t fully comprehending the process.
During the call, Larry explained the process. Honestly, I didn’t understand his explanation and wasn’t sure I could do it, but he assured me I could. While I was awaiting the parts to replace the SMC and rebuild my brake calipers, I thought I’d try and take a stab at aligning my forks/axle.
When I want to loosen the pinch bolts on the right fork, I discovered that one of them on the lower steering stem was missing! (See the first picture below.) Sadly, it was even worse than I knew because the top half of the bolt had broken off! Talk about an “Oh Crap” moment.
I suspect that I had been riding the bike this way since Sept 2019 after a nearby Honda dealer had serviced the forks. Until I went to try the fork/axle alignment, I had no reason to go near the pinch bolts. I was both angry and embarrassed. Now I had to address a problem I should have to and it was something I felt that I should have noticed sooner.
Because the remainder of the bolt was deep inside the steering stem, I decided I needed to call the White Courtesy Phone again. I was thinking that I might have figured he’d tell me that I had to replace the steering stem and bearings, and I was not looking forward to that. That process seemed like advanced Rocket Surgery – lol.
Larry talked me off the ledge and told me not to worry. He theorized that an impact air wrench had been used to tighten the bolt and too much torque had been applied causing the bolt to snap. The break looked clean, and Larry was confident that I could remove the remaining portion of the bolt.
If first tried drilling into the broken bolt using the extractor I had on hand. Per his instructions, I applied heat (with my heat gun), penetrating oil (part acetone, part ATF), an inserted my extractor. Frustratingly, the extractor promptly broke (see picture two).
My extractor was too weak, and now I made the bad situation worse. Although I tried half a dozen more of Larry’s suggestions, it became clear that I was not going to get the broken piece out. That’s when he said I would need to replace the steering stem. I had another “Oh Crap” moment. At this point, I thought my bike had become salvage. Needless to say, I was quite despondent. Quickly, Larry said, “Let me call you right back.”
Several minutes later, he called back and that he spoke with a guy who works on ST’s and who had a used top bridge and lower steering stem in good condition from a decommissioned Police bike. It will come as no surprise to many that the guy Larry called was @Aniwak a.k.a. John Sibley. Larry negotiated a reasonable price with John, and soon, I would have a very nice donor steering stem and top bridge. (see before and after pictures of the donor parts.) Much appreciated @Aniwak! However, he said the bearings and races would need to be replaced. Good grief!
While I was waiting for the parts and tools needed to replace the steering, Larry began coaching me on the process to R&R the bearings and races. Although I understood most of his explanation about the removal process, I wasn’t sure how I was going to install the new bearing races. The Service Manual says to remove the race from the stem using a chisel (yikes). Moreover, the Service Manual details the removal and installation of the races into the steering tube with equipment that is virtually unobtainable in the USA. Furthermore, I had never done anything like this before.
After watching several online videos, Larry’s instructions began to make a lot more sense to me. Because all of the drivers and presses used in the videos to seat the races into the head pipes were for tapered bearings, Larry said I’d need to make my own press using washers and a long bolt or a threaded rod. I will admit, I did not like the sound of that. Had I known that the ST-Riders had a steering stem loaner kit (see post #42 in this link), I wouldn’t have worried so much. Alas, I did not.
Eventually, I came across a 52-piece, non-tapered bearing driver set on Amazon (see below). The variety of metric sizes (18mm to 65mm) looked like the solution to my “washer” dilemma. Each driver/disk had a 12mm opening for the driver handle, so I also ordered a 12mm threaded rod from Amazon. Until the set arrived, I was concerned that the relatively low cost of the set ($50) might not work. Fortunately, the driver set was much sturdier than expected. A picture of the press I fashioned is posted below.
**** The driver set would also come in handy to help me replace the front wheel bearings. (see the picture of the tool and driver) I had to replace the wheel bearings because I believe the axle was over-torqued by the dealer. The inner races of both bearings were so tightly pressed against the spacer/distance collar, the bearing would not move independent of the spacer. Drat! Another problem I have to fix. ****
After the steering stem socket arrived, I was able to remove the steering stem from my bike. (see attached pictures.) The races in the steering pipe punched right out with a drift. Before I seated the new races into the steering tube, I thought I’d practice using a set of cold chisels to remove the race on my damaged steering stem. To my surprise, I was able to remove the race and dust seal! I was ecstatic, and I began to think I might just be able to pull this job off.
Of course, it wasn’t that easy. No matter what I did (heat, penetrating oil, tiny screwdrivers) I could not get the race to budge on the donor part. The bike was fighting me again! This prompted yet another call to the White Courtesy Phone.
Again, Larry reassured me everything would be all right, donned his thinking cap, and brainstormed some solutions with me. Initially, I sought out a local shop that had an ARC welder. According to Larry, the ARC welder could get the race hot enough to slide off. After making several fruitless calls, I visited a local auto repair shop that my wife and I have used in the past. The owner is a motorcycle guy, so I hoped he might be willing to help me.
Sure enough, he was willing and able to help me. Instead of using his ARC welder, he offered to “crack” the race off. Subsequently, he pulled out a 3 in. grinder to score a diagonal line into the race about 2-4mm deep. Then he took a chisel, inserted it into the cut he made, and struck the chisel with his hammer. Viola! The bearing cracked and I was able to slide it off with my fingers! (see the picture below.)
I was able to seat the new race and dust seal using a 12 in. long, 1-1/4 in. galvanized pipe nipple and the cracked race placed upside down atop the new race. It took a fair amount of hammering, but I had done what I thought was going to be impossible (see picture below). Using my handmade bearing race press, I proceeded to seat the new races into the steering tube. After that, it was just a matter of following the Service Manual instructions to install the new bearing and torque the steering head & top bridge to factory specs!
**** Tip: Before torquing the stem nut on the top bridge after the forks have been inserted, turn the steering full to the left to check and make sure that you can lock the forks using the ignition key. If it is hard to lock or won’t lock at all, it means the top bridge and steering stem are slightly misaligned. ****
**** Note: I also had to R&R the ignition switch. Conveniently, Honda uses a special security bolt for which there is no tool (see picture). However, a 1/4 in. bolt extractor (also see picture) will get it out. I used a 25mm long M8 X 1.25 socket cap bolt (see picture), lock washers, and blue Loctite to secure the switch in the donor top bridge. I wish I could have used it for the broken pinch bolt, but I couldn’t. The broken piece was too deep in the steering stem. ****
For inquiring minds, I opted to use the stock Honda caged ball bearings at Larry’s recommendation. The upper race in the steering tube is approximately 47mm, and the lower race is 55mm. I started with a 47mm driver to seat the upper bearing race, but found I had to switch to the 46mm driver disc to completely get it in place. For some reason, all the auto parts, hardware, and Tractor Supply stores in my area didn’t have any urea-based grease. Amazon to the rescue again! I ended up ordering John Deere polyurea grease for the upper and lower bearings (see picture below). Of course, it’s green….
To my surprise, I had actually installed the donor parts and new steering bearings. My bike was no longer a derelict. Moreover, the steering is now both lighter and smoother. Prior to doing this job, I thought my steering just was fine. Now I know better. Thanks, Larry! Now, for the fork/axle alignment…
Attachments
-
 Broken Pinch Bolt.jpg204.6 KB · Views: 100
 -
 Broken Extractor.jpg51.6 KB · Views: 105
 -
 Donor Top Bridge & Steering Stem.jpeg77.2 KB · Views: 102
 -
 Donor Top Bridge & Stem Cleaned.jpg201.6 KB · Views: 102
 -
 Driver Set.PNG1.3 MB · Views: 100
 -
 Steering Tube Race Press.jpg179.5 KB · Views: 99
 -
 Wheel Bearing Driver.jpg108.1 KB · Views: 99
 -
 Steering Stem Removed.jpg151.1 KB · Views: 94
 -
 Lower Race.jpg101.6 KB · Views: 95
 -
 Special Bolt.jpg166 KB · Views: 100
 -
 Cracked Race.jpg159.9 KB · Views: 98
 -
 Seated Race.jpg172.5 KB · Views: 94
 -
 Extractor.jpg176.7 KB · Views: 92
 -
 JD Grease.PNG219.6 KB · Views: 95
