OP
OP
I don't use Copper grease any more. I use Ceratec. Copper grease is fine - but there were suggestions - from someone I know who tests brakes for a living - that the copper in the grease may cause galvanic corrosion - ie the copper in the grease reacts with the different metals that it is in contact with which causes some oxidation to occur.
I have to say that I've never experienced this. (Nor have I seen it when using copper banjo bolt washers). But the Ceratec grease is specially formulated for use on backing plates. Curiously, the Honda manual does not specify anything to use, and neither of my brand new ST1300s have had any grease applied to the brake pads.
Never use grease to clean the pistons. Mineral or petroleum based greases swell the rubber seals, rendering them pretty useless for sealing anything. Silicone greases are usually Ok in these situations - but you have to have something that isn't going to melt and get onto the disc surface.
When the pistons are extended, then I will smear the exposed part with rubber grease to protect them from the salty crud on our roads. This is kind to the seals (not that it is going to get near to them), it doesn't attract crud as is often claimed, but any that gets on it sticks. Neverthless it is captured in a soft grease and it cleans off very easily leaving the piston surface shiny. Its not as if the pistons are going to be pushed back into the seals at any time in that state. The only times I have never not applied rubber grease to the pistons, the expose surface of the piston has been covered in a thin layer road dust and it has set like concrete. This is much more difficult to remove and doesn't always leave a shiny surface underneath it. Maybe that is a UK thing.
Back of pads - copper grease/ Ceratec / Maybe Moly paste. These are subject to high heat and high pressure so generally a silicone based product is not as suitable - although Honda recommended the Silicone based M77 Moly grease as a suitable alternative to the M60 paste for a couple of their cars for the back of brake pads.
Metal retainer clip - TB 1521 adhesive, then a smear of copper grease or moly paste for the bronzed backing plate of the pads to slide smoothly.
Slider pins - rubber grease / Silicone grease - they fit inside rubber boots, so something that isn't going to damage the rubber. ie not mineral oil based or petroleum.
Pin Hanger(Pad Pin?) - Copper grease / moly paste / ceratec. Not sure about rubber grease here. Purpose is to enable pads to move and to keep it from becoming corroded.
The workshop manual makes no mention of securing the chrome retainer clip in the instruction pages, but there is mention of using Threebond 1521 glue for the clip in the pages of tables at the start of the manual:

Threebond 1521 is:
https://threebond-europe.com/wp-content/uploads/2020/03/1500_series_large.jpg
TB1521C is a multi-purpose, high strength, chloroprene rubber adhesive. It is suitable for bonding a wide range of substrates including metals, rubbers and plastics, gives high initial bond strength and elasticity after setting. TB1521C is widely used in the automotive and allied industries where its viscosity makes it ideal for bonding weatherstrip rubber. It has an operating temperature of between -40 and +100 deg C

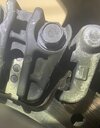
I think that its purpose is to provide a flexible cushion between the clip and the bracket, to stop it vibrating and grinding away the recess in the caliper Here is a photo from my first 1300 where the rear caliper has done just that. Note the cap above the clip. Note the position of the tab in relation to that rectangular shaped raised part of the casting. These brakes were working fine no symptoms presenting themselves - but it may not have taken too long for problems to arise.
I decided that any strong, flexible adhesive for metal that could cope with heat up to 100 deg C would be OK.
I went on a hunt and found UHU Max Extreme Repair. I've attached the pdf of the spec. It seems to call itself Max Repair Power now. Check on Amazon, see if it is available in USA. Both of my bikes were supplied brand new without glue applied.
I have to say that I've never experienced this. (Nor have I seen it when using copper banjo bolt washers). But the Ceratec grease is specially formulated for use on backing plates. Curiously, the Honda manual does not specify anything to use, and neither of my brand new ST1300s have had any grease applied to the brake pads.
Never use grease to clean the pistons. Mineral or petroleum based greases swell the rubber seals, rendering them pretty useless for sealing anything. Silicone greases are usually Ok in these situations - but you have to have something that isn't going to melt and get onto the disc surface.
When the pistons are extended, then I will smear the exposed part with rubber grease to protect them from the salty crud on our roads. This is kind to the seals (not that it is going to get near to them), it doesn't attract crud as is often claimed, but any that gets on it sticks. Neverthless it is captured in a soft grease and it cleans off very easily leaving the piston surface shiny. Its not as if the pistons are going to be pushed back into the seals at any time in that state. The only times I have never not applied rubber grease to the pistons, the expose surface of the piston has been covered in a thin layer road dust and it has set like concrete. This is much more difficult to remove and doesn't always leave a shiny surface underneath it. Maybe that is a UK thing.
Back of pads - copper grease/ Ceratec / Maybe Moly paste. These are subject to high heat and high pressure so generally a silicone based product is not as suitable - although Honda recommended the Silicone based M77 Moly grease as a suitable alternative to the M60 paste for a couple of their cars for the back of brake pads.
Metal retainer clip - TB 1521 adhesive, then a smear of copper grease or moly paste for the bronzed backing plate of the pads to slide smoothly.
Slider pins - rubber grease / Silicone grease - they fit inside rubber boots, so something that isn't going to damage the rubber. ie not mineral oil based or petroleum.
Pin Hanger(Pad Pin?) - Copper grease / moly paste / ceratec. Not sure about rubber grease here. Purpose is to enable pads to move and to keep it from becoming corroded.
The workshop manual makes no mention of securing the chrome retainer clip in the instruction pages, but there is mention of using Threebond 1521 glue for the clip in the pages of tables at the start of the manual:
Threebond 1521 is:
https://threebond-europe.com/wp-content/uploads/2020/03/1500_series_large.jpg
TB1521C is a multi-purpose, high strength, chloroprene rubber adhesive. It is suitable for bonding a wide range of substrates including metals, rubbers and plastics, gives high initial bond strength and elasticity after setting. TB1521C is widely used in the automotive and allied industries where its viscosity makes it ideal for bonding weatherstrip rubber. It has an operating temperature of between -40 and +100 deg C
I think that its purpose is to provide a flexible cushion between the clip and the bracket, to stop it vibrating and grinding away the recess in the caliper Here is a photo from my first 1300 where the rear caliper has done just that. Note the cap above the clip. Note the position of the tab in relation to that rectangular shaped raised part of the casting. These brakes were working fine no symptoms presenting themselves - but it may not have taken too long for problems to arise.
I decided that any strong, flexible adhesive for metal that could cope with heat up to 100 deg C would be OK.
I went on a hunt and found UHU Max Extreme Repair. I've attached the pdf of the spec. It seems to call itself Max Repair Power now. Check on Amazon, see if it is available in USA. Both of my bikes were supplied brand new without glue applied.
Attachments
Last edited:


")