Checking my toolbox for an old rubber valve stem…rubber valve stem to fit/slide inside the banjo fitting
")

Checking my toolbox for an old rubber valve stem…rubber valve stem to fit/slide inside the banjo fitting

many many thanks to yourself and Larry for without this advice, It was becoming a absolutely nightmare. my hat of to you both. warmest regards CraigGlad you passed the MOT!
I've confused you. Sorry. You need to have a good picture in your head about how the brakes are connected. I'll put a link at the bottom of this post - it shows a series of diagrams to explain how fluid reaches each of the brakes and bleed points.
It sounds very much like the SMC bore isn't sealing - possibly been knocked out of shape. The description you gave is pretty much the same as the situation a friend had. He fitted a service kit and it continued to do the same thing. A new SMC fixed it. He sent me his old one, which I investigated and then took a hacksaw to expose the full length of the bore. There are photos of it somewhere on here.
The rear brake going hard when the front brake is applied when the bike is stationary ? I don't see how that can happen. The front brake lever operates the two outer pistons in the front caliper. Nothing else. I need to think about this
I can see how the rear pedal may dip slightly when the front brake is applied: If the rear pedal is pressed it operates the front and rear centre pistons. When the front lever is applied, the two outer pistons at the front operate. The two outer pistons have a greater combined braking for e than the sungle centre piston, so they squeeze the pads harder onto the disc - leaving the centre puston applying little pressure at all, so with the same pressure still on the brake pedal, the lever can push the centre piston out a little more - so the prdal dips a tiny bit.
Pretty pictures. Download the pdf in post"1
Article [13] - ST1300 - Brake Maintenance - Getting all the air out of the brake system | ST1300 Articles
A detailed look at the process of getting the air out of the Honda ST1300 brake lines. A sequence of diagrams of the brake circuits, colour coded to show which parts of the system are being accessed when each bleed valve is opened and explanations of where the trouble spots are. These are just...www.st-owners.com
Question……why do you have to even crack bolt 2 or 4 if just changing out SMC? With 1 and 3 removed from the SMC, won’t the caliper still come off?
The usual format from me - Description, some useful photos and a few tips and tricks to help you to avoid the normal 'Doh!' moments -
- Like emptying all of the fluid out before realising that you wanted tomove the pistons out as far as possible;
- Like reftting everything before realising that you cannot get your torque wrench in to fasten the last bolt;
- Like checking that the new SMC has been greased under the boot and then discovering that you can't replace it properly.
Anyway - there is a sequence, but it is not intended that you follow it. Just read it through before tackling the job. You may find the information useful.
Feel free to download, save or print this.
And if I mention @Mellow he may put it into the articles section !


I bought these from demon-tweeks.com Buy Goodridge Copper Crush Washers | Demon Tweeks (demon-tweeks.com)
In 'Choose an Option', I selected 3/8 inch ID (-3)
Now -> 3/8 inch = 9.525mm - and these are for an M10 bolt - so I was a tad cancerned. But further down the page it says:
So I ordered the -03 (3/8" / 10mm ID) version.
I measured one of mine with a vernier scale caliper.
OD 14.48mm
ID 10.03mm
Thickness 1.1mm
And for some reason these 3/8" washers are much cheaper than the 10mm washers.
As you can see, I bought a bag of 100. At 24p each incl VAT, that's only £24.00 for the 100. I just like to have things like this in stock. I hate it when a job is held up for want of a few small components.
Produce code is GDR44516.
This could be the start of a very old joke:
"You know those copper washers that you told me about ?""Yeah, I bought a bag of 100. Why""Well I bought some""Ok""But they didn't fit""Oh - thats funny, mine didn't fit either"
Except that isn't the case. Mine fit and seal perfectly !
And although they are copper fitted to alloy, I have had no problem with galvanic corrosion. But I don't leave them untouched for years on end either. I bought them in Jan 2019. I have 75 left. So I must have had the front brake system apart twice in 4 years. Probably once when I bought them for a new SMC and once when I took the forks off to fit new fork seals.
 www.goodridge.co.uk
My experience was similarly uneventful and successful... if you discount my failure to place a spacer between the front pads while I pumped the rear brake. Realized the error of my ways mear millimeters from popping the pistons out of the caliper and flooding my garage floor with DOT4 and really messing up my bleeding progress. Disaster averted!I followed jfheath’s instructions and changed mine out with no problems apart from a couple of leaky crush washers. I used a syringe and tubing for the flush which worked great as I had no helper. I did one practice flush to remind me of the order and two real flushes. No problems thank Goodness. Thanks to jfheath.
Where is everyone getting new SMC from. I can't find one anywhere and I'm in trouble without the partGlad you passed the MOT!
I've confused you. Sorry. You need to have a good picture in your head about how the brakes are connected. I'll put a link at the bottom of this post - it shows a series of diagrams to explain how fluid reaches each of the brakes and bleed points.
It sounds very much like the SMC bore isn't sealing - possibly been knocked out of shape. The description you gave is pretty much the same as the situation a friend had. He fitted a service kit and it continued to do the same thing. A new SMC fixed it. He sent me his old one, which I investigated and then took a hacksaw to expose the full length of the bore. There are photos of it somewhere on here.
The rear brake going hard when the front brake is applied when the bike is stationary ? I don't see how that can happen. The front brake lever operates the two outer pistons in the front caliper. Nothing else. I need to think about this
I can see how the rear pedal may dip slightly when the front brake is applied: If the rear pedal is pressed it operates the front and rear centre pistons. When the front lever is applied, the two outer pistons at the front operate. The two outer pistons have a greater combined braking for e than the sungle centre piston, so they squeeze the pads harder onto the disc - leaving the centre puston applying little pressure at all, so with the same pressure still on the brake pedal, the lever can push the centre piston out a little more - so the prdal dips a tiny bit.
Pretty pictures. Download the pdf in post"1
Article [13] - ST1300 - Brake Maintenance - Getting all the air out of the brake system | ST1300 Articles
A detailed look at the process of getting the air out of the Honda ST1300 brake lines. A sequence of diagrams of the brake circuits, colour coded to show which parts of the system are being accessed when each bleed valve is opened and explanations of where the trouble spots are. These are just...
I don't know which model you have - and it makes a difference. There is a white label on the frame under your seat which will say something likeWhere is everyone getting new SMC from. I can't find one anywhere and I'm in trouble without the part

 www.fowlersparts.co.uk
 www.fowlersparts.co.uk
When you say that you can't move it are you referring to the entire assembly or the piston inside the SMC is seized.I think my problem is the SMC. I can't move the SMC piston on the front left caliper at all.
They are the same -( abs / non abs that is) The ABS doesn't affect the brake calipers front or rear. The right hand caliper bracket is different because it has a moulding for the ABS sensor attached to it.I don't know of any difference in the SMC between ABS and non-ABS for all years 2003 through 2007. I suspect that it is a mistake in the listings but don't know for sure. Someone on here will.
I removed the caliper and that bushing is in nice shape. Very shiny and smooth, and pushes in and out and rotates smoothly. The SMC piston will not move at all. Maybe because of the brake line fluid pressure. Should I perform the test of opening the bleeder on the PCV and see if that frees it up, or does this pretty much point me to ordering a new SMC?They are all the same. The ABS doesn't affect the brake calipers front or rear. The right hand caliper bracket is different because it has a moulding for the ABS sensor attached to it.
From 2008 - everything relating to front brakes change from the earlier versions. (Ie Pads, pad pins, calipers, brackets, pistons, pad spring, brake lever, master cylinder, SMC). Nothing is interchangeable.
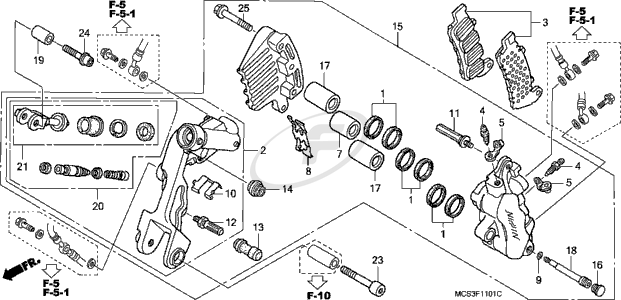
Get a length of cord. Remove the front left pads and unbolt the caliper and lift it off the brake disc. Use the cord to hold the caliper so that the weight is not taken by the hydraulic brake lines. Then look at the lower mounting position - as Andrew said. There is a chrome bush in there which has an oil seal front and back. That bush should push out, smoothly and easily, revealing the needle roller bearings underneath. (It may have come off with the bolt, and be firmly mated with it).
The chances are that the bearings cannot move - the grease in there will never have been touched in the last 19 years. But the bearings themselves may be OK, so you might be able to clean them up, get rid of the old grease, make it all nice and shiny. Put in some new.
The bush should be nice and shiny and smooth - once you have freed it from the bolt. If it isn't, your bearings aren't going to be any better.
Some people use loctite to re-use the old bolts. They are supposed to be replaced with new as they are ALOC bolts. I say that with all of the confidence of a man that knows what he is talking about, but I don't. I cannot find anywhere that tells me what ALOC stands for. But all ALOC bolts have a thread locking compound applied . So most people - incuding me - will clean up the old bolt threads and apply loctite. But there are types of bolt that must never be re-used. I don't know if this is one. The manual says to fit new. I keep a set of ALOC bolts in stock, but I'll remove my bolts at each tyre change - which is about 5,000 miles - and I'll replace them every 2 or 3 tyre changes. Very hot water is a good way to get rid of thread lock. It peels off like fresh bubble gum.
A word of warning about liquid thread lock agent. Put it on that bolt and there is a remote chance of it getting inside the bearings. I use the lipstick paste type version.
 ! No pinching.