Any idea on how to solve this?
I had a similar problem several years back. I solved it by doing this:
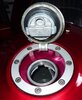
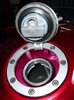
remove the filler cap with three of those allen bolts
The filler cap is held by just three of the bolts: the two at the 11:00 and 1:00 positions relative to the flip-up cap, front of the tank, and the one hidden by the key in your photo. The other four are just for show.
You cannot remove the filler cap surround with the cap locked in position.)
I
thought I had been able to remove the filler cap with it still locked but I may be mis-remembering. It certainly makes sense as an added security measure, or it'd be child's play to remove the cap and siphon out a tankful of high test.
Anyhow: I think I was able to use a dental pick or similar sharp, stiff, narrow tool to lift the broken stub high enough that I could get a needle-nosed plier on it and extract it. I may have used a very fine drill bit to start a shallow hole in the stub, then driven a small screw into the stub to extract it. Use caution if you go that route: you don't want to screw up the tumblers.
Whatever you eventually succeed in doing, have a look at the condition of the filler cap latch while it's exposed. Make sure there's no burr on it anywhere, nor on the underside of the place where the latch engages. A shot of dry lubricant (powdered teflon or powdered graphite, for example) into the workings of the lock will help keep the tumblers moving freely and easily.
Never use liquid lubricants in a lock! Liquid lubes attract dust, dirt, and grit and eventually make the lock nearly impossible to operate.
Also: since you're Stateside you bike doesn't have the European HISS security chip in it. Take your remaining spare (OEM?) key to a key cutting outfit and get a half dozen more spares cut. The OEM keys are of the softest metal known to man, and (as you've found) break easily. They should really be regarded only as patterns from which better duplicates can be cut. Leave the original in a safe place at home, where you'll never be tempted to use it.


")
