Headache with Brakes, any help appreciated

Thank you all so much for the advice and support, came to the conclusion last night after yet another session of bleeding and fettling that I do indeed need to bite the bullet and replace the SMC with a new unit. Ordered one first thing for delivery tomorrow. Whilst I’m waiting a few other jobs can be carried out. I will let you know how it goes 👍
Inspect and check the rear caliper bracket as well, so you don’t have to do the job twice again.
Replacing the SMC only, may not fix the issue.
 
Someone already sliced one open and did something similar. See @jfheath 's post above.
That'd be me.

Unsure how you'd clear such a tiny port (and the rest of the tiny passage) on the side down in the plunger's bore....

You can get to it from the inlet port - but you have to remove the cap (2 screws) and extract the gauze filter cartridge - which also has a tiny port.
You'd be pushing the gunge into the bore though - it should flush away, but that is not guaranteed. If the SMC piston cannot fully return, you would damage the primary seal - but tif the piston cannot fully returns you need a brand new SMC anyway.
 
I should add - I once had a problem with rear brakes which I could not pin down. I bought a new SMC anyway to avoid worrying about it. The problem turned out to be something else. The original SMC is still tucked away somewhere safe in case I need it. There was nothing wrong , but I'd fit a new service kit to that one quite happily. Fowlers have them in stock at present - about £246. At the way things are going, you could get a brand new SMC for the cost of a couple of tanks of petrol.

But note Larry's comment - there are more to rear brake problems than the SMC. Like mine, your rear brake issues could be something else entirely.
Read Avoidng the pitfalls. See articles, filter on 'jfheath'.
 
Problem resolved!! fitted an new SMC yesterday and bled the system 3 times following the procedure. left it overnight and bled again this morning. Everything now appears to be s it should.
Had a few test rides and the brakes are now far better than they were before!!
I am however still bemused as to why the SMC rebuild didnt work. body of the SMC was spotless, ports clear, filter clean the only thing that i can think of is that the cylinder the piston sits in had an issue that the ultrasonic cleaner couldnt clean, or it had damage that i just could not see internally.
Thanks again for your guidance and links to some fantastic articles on the ST's braking system, hopefully i wont be reading them again in the near future :)
 
Excellent!!!
It’s good to have good brakes… which work really, really well on the ST when properly maintained.
Thank you for the update, and very well done!
 
Problem resolved!! fitted an new SMC yesterday and bled the system 3 times following the procedure. left it overnight and bled again this morning. Everything now appears to be s it should.
Had a few test rides and the brakes are now far better than they were before!!
I am however still bemused as to why the SMC rebuild didnt work. body of the SMC was spotless, ports clear, filter clean the only thing that i can think of is that the cylinder the piston sits in had an issue that the ultrasonic cleaner couldnt clean, or it had damage that i just could not see internally.
Thanks again for your guidance and links to some fantastic articles on the ST's braking system, hopefully i wont be reading them again in the near future :)

Glad you are all sorted out. The cost of a new SMC is worth every penny for peace of mind.

Rebuilding the SMC with a service kit does not work very often. A new service kit relies very heavily on the roundness of the bore, and it relies on there being no corrosion inside the bore, the top hat rubber boot being seated properly and all sorts of things. Usually something eles is wrong rather than just the piston and seals.

Keep your old SMC (if you haven't already ditched it). Remove the circlip. and withdraw (or blast out) the piston. See what is happening inside. Take off the inlet port 'diamond shaped' union and take out the gauze filter cartridge.
See what you can learn from it. In particular, how difficult it is to refit the rubber boot properly. So when you hear that people recommend lifting the boot and putting in some silicone grease - a) there is not need, it already has some in when supplied new b) I would hazard a guess that only a very small proportion have fitted the boot correctly. Try it. Separate the bracket from the push rod end. Get a socket from your tool box that fits inside the bore and that will take the top hat inside. Use the socket to push the brim of the rubber boot into place. See how much effort it takes ! Now remove it again and try to do it with the push rod bracket in place.

I would go back and read the stuff on brakes and the SMC, rather than not needing to look it at it again. Look at it this time from the point of view of maintenance rather than fixing a problem. Do things correctly every time you flush the fluid and the brakes will be perfect forever. I used to do my brakes every tyre change - which was about 5,000 miles. Flush and rebleed every 18 months / 2 years. I'd try for 18 months.

Do things like check the chrome pad retaining clip position in the rear caliper. See if there is an issue developing there. It is quite possible. Avoiding the pitfalls mentions this and you can do more research on it.

But your bike model is 20 years old - the bike itself is 18-19 . You can expect some things to be going wrong. Seek them out and plan to address them over winters before they catch you out and leave you stranded for Summer riding.

But right now - you've got a Summer of riding to enjoy and some brilliant roads around Shropshire and into mid-wales.
 
Afternoon all, I thinkthat i may have spoken to soon :frown:
Secondary issue has emerged, when i was out yesterday the front brake began to bind to a point wher the wheel was pretty much locked, released the front bleed nipples and it rotated again, i was only a 1/2 mile or so from home.
Got the ST in the garage and looked at the front calipers again,,,,, when i depress the outer pistons they move freely back into the caliper, same for the centre piston. I detached both calipers and established that when i pushed in the two pistons on the left hand caliper it pushed out the upper piston on the right hand caliper and visa versa. I then packed the left hand caliper with the pistons fully closed and found that i could not then push in the upper piston on the right hand caliper its solid. I then swopped oever and reversed the packing with the same result. Any suggestions as to what may be causing this? from what i have read on the forum it is leading me to the return port in the master cylinder but i rebuilt that when i installe dthe new SMC. The problem is only with the front brakes the rear and SMC seem to e working as they should.
Thanks in advance!!
 
The return valve on the master cylinder is clear, crack the nipples and i can push them in, close the nipples and solid one comes out as on goes in!!
 
Did you check the rear caliper for scoring, fluting, misalignment etc as Igofar said?
 
If checking the front, then focus only on the two outer pistons (top and bottom) on each caliper.
Of you have put a lump of wood in the caliper to stop the pistons on the righ (say) from moving then
1. You should be able to press in the top left and the bottom left will be pushed out - careful you don't eject it all the way.
2. The same should happen when you push in the bottom left - the top left should be pushed out.
3. If you try to push both in together, or see-saw them, then it will be harder, but fluid should make its way into the reservoir and th epistone will push back into the bore relatively easily.

You might need to make sure that the reservois is not brim full - the fluid must be able to return.

You can try the same with the right hand upper and lower pistons. Do not bother about the centre piston - that is operated by the brake pedal.

If you find you can do one and two - then the two outer pistons are working fine and they are passing fluid from one to the other.

If you cannot do #3 on either caliper then there is a problem - the fluid should be able to be pushed back into the reservoir. So - remove the brake lever - undo the lock nut, put it safe and unscrew the pivot bolt. Note when reassembling, that the bolt needs to be screwed in until it is snug. Not tight. It isn't a bolt holding things together - it is a pivot, which is locked in place by the locknut.

If you CAN push pistons and fluid back without the brake lever in place, then that removes the compensation port from the list of probelmes, but there's is a mechanical issue - eg the push rod is too long. But they don't grow so something else has happened. Have you fitted a service kit recently ?

All four front caliper outer pistons are in effect connected together, so when you push on piston in, any of the other three are likely to be pushed out. You might like to bloack one or two off and see if any pistons is noticebaly more difficult to push out that the others.

The centre piston does not come into the behaviour of the front brake lever system The centre pistons are all operated by the brake pedal.

Rear brake system

Front brake calipers - See if you can push in the centre piston of the front caliper. Beware that the centre psiton on the other side will push out. So make sure that is actually happening - do it on both sides - to make sure that both pistons can be pushed in and that they will move out again - and then stop one of them from moving (block of wood in the caliper) and push in the centre piston on the other side. Check the rear reservoir has plenty of air space above the seal - you cannot push fluid back to the reservoir if the reservoir is full. Then change the bloced piston and push in the centre psiton ont he other front caliper.

While you are at it - see if you can push in the rear centre psiton with thumb pressure. That is a direct line to the rear master cyclinder on the brake pedal and should be the easiest of the lot.

Then it is the rear outer pistons. These are the hardest. You should be able to see-saw them easily - ie push one outer piston in, the other should push out. Pushing both in together with thum pressure can be difficult. The fluid has a long way to travel and it has 3 tiny compensation ports to get through. Best is to stop the forward piston from being pushed out and use double thumb pressure - pressing equally on opposite sides of the piston to push it in. It should move. Slowly, but it should move. If it will not, then attach a bleed tube to the PCV bleed valve - right hand side of the bike above the right hand coil. Leave it open but find a way of dangling the tube from high up - so that you can see it. OPen the bleed valve and go back to the rear caliper and try to push the pistons in. They should move easily. Close the PCV bleed valve.

Attach your tube to the front left centre (lower) bleed valve and do the same thing. Open the valve slightly and then go back and push the rear outer pistons. If you cannot do it, then there is an issue with the SMC not allowing fluid pressure to escape. If fluid does come through then you have already checked the rest of the rear brake
 
Thanks John, info appreciated.
I went through you guidance on the front brakes and after removing the front brake lever i COULD push all four of the outer pistons from the front calipers back easily. Prior to removing the lever the pistons do see saw when pressed on both left and right. I had fitted a master cylinder rebuild kit recently (OEM) and have replaced this with the old unit for testing purposes and the same symptoms and results were experienced.
If it helps with your thought process, when the front brakes bind tightly, the front brake lever is solid to the touch and the pistons will not retract until the top bleed nipple is opened and a spurt of fluid is released from each, only the front brakes bind up the rear wheel will turn.. When checking the temperatures of the discs after a short test the right disk was the hotter of the two by 20 degrees celcius.
 
Working on my new to me 1998 VFR the front brake was driving me crazy. I did a rebuild kit careful to put everything back exactly as I took it apart.
I swapped out the aftermarket lever. No good.
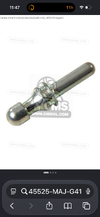
While swapping in the master cylinder from my 2006 ST I noticed that a previous owner had put the pushrod in backwards.
 
The effect of having the push rod backwards is the same as too long a push rod because the large end doesn’t seat in the small hole all the way.
IMG_0697.png
 
I deleted my long previous reply - @sirbike posted something that I did not know - about 1 minute before I posted mine - that the pushrod is not symmetrical on the brake lever side. You’ll have my original essay in your mailbox from the forum. The push rod is not part of the service kit.

But your symptoms definitely point to a problem at the brake lever installation. It could be muck, rust, grit in the cup on the lever. But a reversed pushrod is much more likely. The shaped end will go into the cup on the lever. Check when you remove the lever again which way round it has been installed. Then you will know !.

Also make sure that the boot is properly fitted. The brim of the top hat needs to be pushed firmly into position. The spring in the brim of the ‘top hat’ needs to be pushed over a slight taper in the bore. You will feel it snap into place. I use a suitable sized socket from my toolbox for the SMC boot. Don’t use anything that could pierce the rubber boot.

Reason is that if the pushrod is ‘too long’ or not seated properly, the piston is slightly pushed in all of the time, and that seals off the compensation port - so pressure cannot return fluid to the reservoir.
 
Above is a picture from the Honda parts diagram. It looks different than what I saw. If I remember correctly this is what my ST1300 had and it is most likely the original part never replaced.

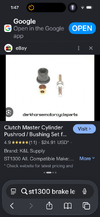
Below is the K&L pushrod kit. Same shape for the 5 gen VFR and early ST1300.
Easier to see how it was put in the wrong way.

IMG_0698.png
 
John, sirbike, you hit the nail on the head there!! pushrod wrong way round and refitted correctly now and there is a polar difference!! Sirbike, thank goodness you read the post yesterday and pointed that out, i was almost at my wits end after hours of dismantling, checking, cleaning, reassembling, chasing air to no avail, next stop was a gallon of petrol and some matches!! Its amazing how that one small change can make such a huge difference :) THANK YOU BOTH, you have a friend for life now :thumbsup-2x:
 
Glad that you have it sorted. That image from @sirbike is what I have seen before, and curiously that is the part that was present on a friend’s brake lever - the contact who’s front brake had locked solid. I’ve never had my own front brake master cylinder apart - only the clutch. I think that his was an A2.

If it is any consolation, we spent a whole day day going through the front brake system, scratching our heads, before he revealed that he had fitted an after market service kit for the brake lever. My first thought was that he had inverted the primary seal as it is difficult to put that into the bore flared end first. No, he was certain that was correct. He’d used washing up liquid (detergent) to help lubricate it!! :eek: I had some choice comments to make. So he went home with some homework to do. He contacted me later to say it was all fixed - he’d filed the pin down at one end and that his brakes were working fine now. I’m not suggesting that is the way to go. I’ve not seen him around recently either.

There is a correct orientation for that pin too - one end is rounded, the other is almost flat. I guess that the rounded end goes into the piston, as the angle will change at that end as the lever is pulled in. The clutch lever end has the brass bush that pivots, which caters for the change of angle at that end. The 2006 and earlier have the ‘cup’
 
Last edited:
Thanks John, I have used it this morning to commute to the office (75 miles) and it has been perfect.... I was just discussing the issue and the wonders of this forum with a collegue and fellow rider who like me was amazed that such a simple mistake on the master cylinder rebuild could have such a big impliction!! Photos of all future works will be taken before and during any dismantling :)
 
Back
Top Bottom