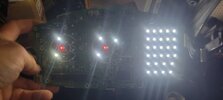
I ordered the white led's across the pond from Lightenupgrade for the 1300.

moddy

the mod
Joined
Dec 2, 2011
Messages
48
Location
Seymour, IN
Bike
05 ST1300
It took me a while to decide this, for the cost of a little less than 40 LED's from England, because I am attracted to doing things so cheap that I'm paid for it instead.
Finding my own LED's for what they have put together may not be worth your time to do it.
Unless you already have a drawer of SMD LED's in the color you want, you'll need to get them from Lightenupgrade.
For 28.75 including shipping at the time of this post (US currency after conversion), they'll send you what you need with instructions.
Not for the non technical. You'll need to have decent soldering skills and the ability to take your dash apart. You have to
want to do this. Or send your dash in for them to do it.
I chose white, it more closely resembled what I've been looking at the last 8 years/just boring I guess.
When I first found out about this option, it was well documented here.

https://ozstoc.com/index.php?topic=14275.0

The reason I wanted to do it is probably 3 good ones
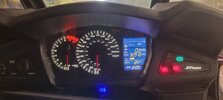
Sunlight at the right angle helps the LCD orange to blend together making it hard to see detail.
The LED's are 21 years old and the output is likely less lumens than when they started in 05.
The amber color will be upgraded to white, complete with a new diffuser.
At some point soon, will try to recreate what I see when the light hits it just right, then after the upgrade,
will try to take the same picture in the same light to show the difference. mod
 
The main thing about sourcing LEDs for a DIY upgrade is getting ones that are bright enough. There was a thread or two awhile back about a member doing a bit of trial and error to find ones that are"just right".

I've thought about doing the bluegauges.com upgrade but have been too lazy to get roundtoit.

1783459535035.png

I've never like the orange light. The white LEDs would be my choice. I really like the look after seeing this and driving a couple of cars that use white for the gauges. The contrast between the LEDs and the background is the most pleasing to me. I'm not that enthused by the blue panel on the right but it's not a dealbreaker.

I chose white...
Excellent choice. Some pics along the way and of your completed project would be greatly appreciated.
 
Here we go. Not much of a defense in, "I can't see my display properly" but in the right light, not even worth trying to see the time, which is what I usually spot check the most. However long it takes to come from over there, but after photos coming soon. Should be easy to recreate the type of light in the initial photos.20260707_183654.jpg20260707_183806.jpg
 
I have done this upgrade too. You need some soldering skils to do this.
For me the most difficult part was to get the needles back on their original place.
But the dash looks new again.
 
For me the most difficult part was to get the needles back on their original place.
I have a plan and hopefully it goes well because that is not something I want to keep messing with. I'm also intending on doing a speed correction because I've noticed my needle shows I'm going faster than I am. Quite honestly I should probably leave it that way it helps me do 3 miles an hour under compared to the needle.
 
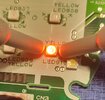
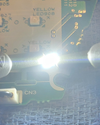
The LEDs have arrived, maybe took 10 days. Here is a test by sending 3 volts down some extra voltmeter leads.
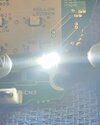
One lit, straight on without the diffuser, 35 of these are going to be a chorus of retinal burn. Now just to take everything apart. I don't think I'll miss riding to work on Friday for the weather prediction, a lot of boom crackle in the sky so it's safe to have the machine apart for the upgrade and not be rushed. A lot of things going on at the same time for a successful outcome. Looking forward to it.
This exercise is a great combination of tools, paying attention to detail like LED orientation and solder skills. This project will be lit.3765.jpg
 
Finished. I'll have more of a write-up for some of my experiences. It's been documented so well in a couple of corners on the web that I don't need to do anything thorough, just share what I might have seen somebody else didn't mention. Totally worth it, has its challenges and doable.

Ok ok, two more pictures. Lighting up the original amber LED and one of the 35 new ones.
 

Attachments

  • 20260717_001009.jpg
    20260717_001009.jpg
    58.7 KB · Views: 25
  • 20260716_160527.jpg
    20260716_160527.jpg
    121.4 KB · Views: 20
  • 20260716_160738.jpg
    20260716_160738.jpg
    80 KB · Views: 20
How did you put the needles back on the correct place? For me that was the hardest.
I found guidance from ozstoc, a link I'll get to for how this all started. Putting the bike on the center stand in 5th gear with the engine running, gives you a tach and speed value you can repeat if you liked where your needles were. In my case I did a speed correction. My bike has always shown me I was going slower than the needle represented so I did a couple miles an hour speed correction, we'll see how that goes. It was fiddly when I lightly pressed the needles in place with the engine running. Sometimes it was as much as 5 miles an hour off until I got it where I wanted to. Careful not to press too hard you can push it so it's touches the plate behind it. Almost couldn't get something under it to pull it back off.
 
Last edited:
It took me a while to decide this, for the cost of a little less than 40 LED's from England, because I am attracted to doing things so cheap that I'm paid for it instead.

Does their kit include a new diffuser for the LCD display? It doesn't mention it anywhere unless I overlooked it. Mine is getting the dreaded bubble in it and is getting harder to read.
 
Ok, let's begin. What started it all about a month ago was, how can I actually know what time it is on my bike because trying to make out the time from the original display was fruitless. Researching a low draw 12v clock I could install somewhere on my bike led me to a much longer idea for LED replacement from CallMeSteve at ozstoc . A very good write up to begin with and of course there is a youtube video for nearly an hour to help you with many aspects of disassembly and soldering.
Getting access to it for removal is easier than you might think, for an instrument cluster. What I noticed is I was more cavalier in the handling of this circuit board as I exposed it, than using a static wrist strap and just handled it by the edges as to not break off any of the smaller electrical components.
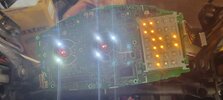
As I began heating the solder with a small clean and tinned tip, I found using the spring loaded suction removal device wasn't that effective. So, I used a 45 degree angled pick from Harbor Freight to push on the side of the LED when it heated enough I could push it up on one side, then proceeded to do that for the remaining 36 LEDs that needed to be removed.
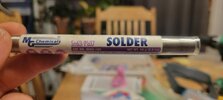
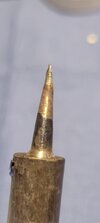
Images show the solder I used. It was great. Low temp, 350F, flowed really well, had flux in it, a great combination. Have a clean and tinned tip (this goes for any successful soldering). The image with the full display showing some white LEDs and some amber were the progress of soldering some in place and obviously the amber still illuminated was more work to do to get them loose.
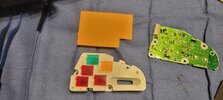
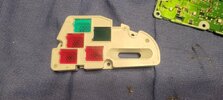
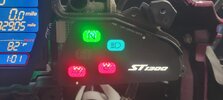
The three images of the neutral, oil and high beam display are of my own creation. Notice how the only dimly lit symbol is the high beam. I've owned the 1300 for 8 years and every time I've switched to high beams, there is better than just an indicator they're on, it is obnoxious. It's dark, so you turn your high beams on and you basically have a blue high beam indicator telling you your high beams are on, counter intuitive. So, I cut a shape of the old diffusor that fit nicely under the blue lens for the high beam and was happy it really cut down on the blaring indication my high beams are on, the illumination is subdued. Like looking at an icon on your smart phone. You can see it, but it doesn't have the presence of a bulb behind a tinted plastic.
Lastly, a cool thing about speed adjustment. My speed has shown I was doing 3 mph above my actual speed, not terrible, it has probably deterred a few speeding tickets because my actual speed was 3 mph less. After you have recorded your speed and tach on the center stand with the engine running in 5th gear, will be useful in correcting your indicated speed. If you are traveling slower than your indicated speed you want to place the needle slower than when you recorded it. If you are traveling faster than your indicated speed, place the needle on the needed speed correction faster than it was recorded. I closed my deficit to 1 mph, instead of 3, not bad.
Lastly, once I realized the orientation of the LED's was the same throughout the whole board, 2 for tach (I left the red one for the needle) 3 for speed, (left the red one for the needle) I desoldered them all at one time. I felt this was important for paying attention to the row you're on when soldering the new ones. You don't want to get distracted from your system of soldering both sides for 37 LEDs. You'd have to pull the whole thing apart if you've got a flicker. However, if one those LEDs was as bright as it was when I started, I doubt you would notice since 30 of them lit together behind the LCD was brighter than the sun. Cheers
 

Attachments

  • 20260716_215508.jpg
    20260716_215508.jpg
    52 KB · Views: 7
  • 20260716_212100.jpg
    20260716_212100.jpg
    110.9 KB · Views: 7
  • 20260716_212126.jpg
    20260716_212126.jpg
    89.5 KB · Views: 7
  • 20260716_171912.jpg
    20260716_171912.jpg
    72.9 KB · Views: 7
  • 20260716_221814.jpg
    20260716_221814.jpg
    56.8 KB · Views: 7
  • 20260716_161600.jpg
    20260716_161600.jpg
    31.8 KB · Views: 7
Last edited:
1784322179467.png

This is brilliant. Some pun intended. It looks terrific. I think the white on black makes a slightly high-end statement. The white LEDs for the LCD panel also look really good.

I'm not crazy about the bright blue background. Is that the diffuser? Is it translucent and we're seeing the white LEDs showing through it? My preference would be for the same look as the meters.

More description later,
Looking forward to it!
 
1784322179467.png

This is brilliant. Some pun intended. It looks terrific. I think the white on black makes a slightly high-end statement. The white LEDs for the LCD panel also look really good.

I'm not crazy about the bright blue background. Is that the diffuser? Is it translucent and we're seeing the white LEDs showing through it? My preference would be for the same look as the meters.


Looking forward to it!
I picked the white LEDs and white diffuser. I really himmed and hawd about finding my own LEDs and most of them that you source are in China and it takes three to four weeks to get here so support this kit it's going to end up being your best option for doing it.
It would seem the LCD with a white LED and white diffuser is going to be that color, the web page I ordered the kit from has variations of color with the use of different color leds.
 
Last edited:
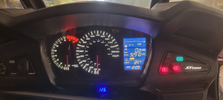
I have ridden home the first time at night and thought about this more than once (8 times at least) a "like" and a "not terrible but will pass it on when I get home". You HAVE TO, place a cut piece of the old diffuser under the high beam indicator. The joy of it not being a blaring bright indication the high beams are on was terrific. You could just spot check the indicator without wishing it was off while your high beams were on. Here is the "Not terrible, will pass it on..The two awesome powered LEDs for the tach and 3 awesome powered LEDs for the speedometer probably shouldn't be changed unless they are out. For the LCD, the illumination comes across like you see in the pictures. It is also different with the 30ish LEDs behind it, compared to the white diffuser for the white LEDs for the tach and speedo. It was not a terribly bright illumination for having changed them, but the markings for tach and speedo are white, with powerful white LEDs with a white diffuser. So...given this knowledge before I did my replacement LED work, would have left the amber LEDs in place and only changed the LEDs behind the LCD. Why I tell you this, is you now have the chance to go with "enough" illumination for the tach and speedo, to resemble the LCDs new illumination, instead of the tach and speedo being %15 more illuminated than the LCD. I won't go back and change it, it would of course mean taking everything off just to change out 5 LED's (not doing that), just a consideration from my experience. Unless you could use better illumination for the tach and speedo, just leave it.
 
Last edited:
The two awesome powered LEDs for the tach and 3 awesome powered LEDs for the speedometer
There have been previous threads on the upgrade but most if not all were lost to the ether. I don't remember any pics documenting the LEDs and their placement.

So to be clear— there only two (2) LEDs for the tach and three (3) for the speedo that change the color from amber to white (or whatever is chosen)? And the 30 LEDs are only for the LCD panel?

Did you change the LEDs for the FI / High Beam / Etc panel too?
 
So to be clear— there only two (2) LEDs for the tach and three (3) for the speedo that change the color from amber to white (or whatever is chosen)? And the 30 LEDs are only for the LCD panel?
Yes to all, 2 for tach I changed to white, left the red for needle. 3 changed for speedo, left the red for needle. 30ish for the LCD and 2 (if you want) behind the lighted ST1300 in the right side indicator.

Did you change the LEDs for the FI / High Beam / Etc panel too?
No changes to the LEDs for FI High Beam, only the addition of a square cut from the old diffuser to cut down the intensity of the indicator. This is a great picture showing the final light test. Picture is the intensity of the white LEDs for the gauges with a white diffuser and white numbers and tick marks. Maybe, just maybe if you only replaced one of the amber LEDs for the white, it will cut down on the full intensity. Really, at night even bad illumination you're capable of seeing your indicated speed.
 

Attachments

  • 20260716_192420.jpg
    20260716_192420.jpg
    41.6 KB · Views: 5
Last edited:
Back
Top Bottom