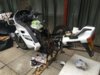
Pre Pandemic the '91 ST had it's burnt out stator removed and replaced with a working one, new wires and heatproof/waterproof sleeving fitted.Connections soldered and suitably insulated and weatherproofed with self amalgamating tape . All was good until now , when the return leg of a 100 mile run showed a low reading on the voltmeter. Made it home with an indicated 11 volts. On examination, the field windings were ok but three phase output was showing around 2 or 3 volts ac across each phase (phase wires disconnected from reg/rectifier. ) So....40 Amp upgrade commenced. Fleabay supplied the baseplate and shaft, bought and fitted new bearings. Smaller bearing is a standard size so easy SKF replacement from my local bearing shop. Larger bearing is only made under licence for Honda and Suzuki so not available except from main dealer !
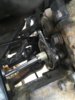
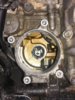
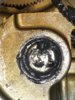
Sorry this is a long post . Stripped the ST and thanks to previously copper greased threads, removed the stator with ease. Not so the main alternator body, which had to be soaked in penetrating oil and levered off (although the mounting bolts came off with clean threads). Having read many posts on doing the upgrade I decided on an ‘upgrade’ of the ‘Frenstick’ method, using a splined adapter (perfect fit), borrowed from a locking wheel nut removal kit. Cleaned the engine mating surface and base plate, fitted new O ring , oiled the bearings and applied moly/oil mix to gear meshing area and O ring etc..base plate went through the frame ok and onto the engine. Thin gear meshed with the engine gear , and turning the spline tool clockwise the baseplate moved in a bit more but not as far as the O ring. While keeping pressure on the splines I tapped around the centre of the casting with a wooden hammer shaft (as many have described previously) but it didn’t go in ! Knowing the gear was meshed ok (as I could turn the engine with the splined tool) I decided to put the old alternator mounting bolts in, finger tight, and GENTLY pull the base plate in evenly to mate with the engine. BIG MISTAKE. A slight turn on each bolt seemed ok but on the second round , I heard a loud crack.....you guessed it , a mounting lug broke off the base plate ! This was not brute force but maybe some ignorance involved. Everything removed to start over. Have examined mating surfaces in the engine and all is good. Don’t want to break my replacement base plate so should I adopt the ‘Lewis pin’ method this time in conjunction with the spline tool putting light pressure against the spring loading to ease removal of the pin when the base plate is fully seated (somehow) . How tight a fit is the baseplate going in ? Any thoughts from those ‘in the know’ would be gratefully accepted. Kind regards Davemac
Sorry this is a long post . Stripped the ST and thanks to previously copper greased threads, removed the stator with ease. Not so the main alternator body, which had to be soaked in penetrating oil and levered off (although the mounting bolts came off with clean threads). Having read many posts on doing the upgrade I decided on an ‘upgrade’ of the ‘Frenstick’ method, using a splined adapter (perfect fit), borrowed from a locking wheel nut removal kit. Cleaned the engine mating surface and base plate, fitted new O ring , oiled the bearings and applied moly/oil mix to gear meshing area and O ring etc..base plate went through the frame ok and onto the engine. Thin gear meshed with the engine gear , and turning the spline tool clockwise the baseplate moved in a bit more but not as far as the O ring. While keeping pressure on the splines I tapped around the centre of the casting with a wooden hammer shaft (as many have described previously) but it didn’t go in ! Knowing the gear was meshed ok (as I could turn the engine with the splined tool) I decided to put the old alternator mounting bolts in, finger tight, and GENTLY pull the base plate in evenly to mate with the engine. BIG MISTAKE. A slight turn on each bolt seemed ok but on the second round , I heard a loud crack.....you guessed it , a mounting lug broke off the base plate ! This was not brute force but maybe some ignorance involved. Everything removed to start over. Have examined mating surfaces in the engine and all is good. Don’t want to break my replacement base plate so should I adopt the ‘Lewis pin’ method this time in conjunction with the spline tool putting light pressure against the spring loading to ease removal of the pin when the base plate is fully seated (somehow) . How tight a fit is the baseplate going in ? Any thoughts from those ‘in the know’ would be gratefully accepted. Kind regards Davemac