OP
OP
interceptor44
1991 ST1100
found a st1300 bleed...looks different but same procedure?

I find the soft silicone airline tubing used for home aquariums fits very well.ok, thank you.....and thanks to all for all of the input/info. Will tackle it on Sunday. One more thing, the size tube to drain...
going to Ace Hardware tomorrow.
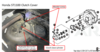
Yes, that is the clutch slave cylinder. ALL the bleeding work is done from the little nipple on the top. 8mm I believe. When looking at hydraulic systems, generally, the pressure hose will enter at a low point, and the bleeder will be at a high point. Bubbles rise to top and are released through the bleeder.Is this it...right above oil plug...
drain on top...hex on bottom to open/close?
ok, sounds good, thank you, will let you know.....Yes, that is the clutch slave cylinder. ALL the bleeding work is done from the little nipple on the top. 8mm I believe. When looking at hydraulic systems, generally, the pressure hose will enter at a low point, and the bleeder will be at a high point. Bubbles rise to top and are released through the bleeder.
Basic instructions:
1. Suck all that crappy fluid out of reservoir with turkey baster, etc. Wipe out reservoir carefully with very clean rag. Refill with clean new fluid.
2. Loosen the bleeder on the slave cylinder, to make sure it isn't frozen, then snug it gently. I like to use a small combination wrench, box end, over the nipple, then a piece of vacuum tubing, or clear hose led to a suitable container. This will collect the expelled fluid and minimize the mess.
3. Pull clutch lever in so it hits the grip and hold it there. This is important. Hold it there firmly. Now open the bleeder. It only takes about an eighth of a turn and you will hear fluid get pushed out by the clutch springs.
4. Close bleeder snugly, not much force is required. Think use one finger. Now you can release the clutch lever. Don't just allow it to snap open, release easy, like you are pulling away from an intersection.
5. Repeat 3 and 4 over and over until clean fluid comes out bleeder. Be careful, keep an eye on the reservoir. Do not let it run dry it'll suck air and you are back at square one.
I bleed with the reservoir cover off, but unless you are very careful you run the risk of jarring the bike and spilling the fluid. It attacks paint, so towels or rags under it are highly recommended. Some like to leave the cover on, but I have trouble seeing the fluid level.
Good luck.
RT
What he said!Another tip - brake fluid will strip paint, Be careful with it!
Nice! Thank You.What he said!
Home Depot has the clear vinyl tubing; 1/4" OD. 10' for just over $3 USD. I run it into a sports drink bottle where I drilled a snug fit hole in the top. You should also pour some brake fluid into the bottle before you start so the open end of the tube never sees air or you can unintentionally suck air BACK into the system you're trying to bleed.
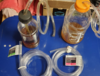
Here's what you're working with too.
My brake bleeding hardware - 3/8" OD for the car on the left, 1/4" OD for the bikes on the right.
Ok...thanks!
Got it...I will keep my eye on it after I change fluid...thank you.Did you notice my post #25 about the possible leak at the slave cylinder? That would explain the low fluid level in the reservoir. Clean the area around the slave well and then watch for new brake fluid to appear. A minor leak will take some time to become evident again, but shouldn't be overlooked.
I have more for you as well. I haven't had time to write them down as of yet.(sorry Andrew, I've been busy).
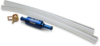
I can get behind this choice too. Homeless Despot was just more convenient at the time I needed the tubing. And the silicone aquarium air line would be much easier to handle, as the vinyl tubing is rather stiff and forces you to comply with its wishes rather than the other way around.I find the soft silicone airline tubing used for home aquariums fits very well.

Ok, well I took it for a spin and all feels good. If it were clogged I am guessing it would be hard to stop or it wouldI believe the short answer is yes, as long as you keep cracking the bleeder and pumping the lever (or pedal) of these hydraulic systems on the 1100 you should continue to get flow through the system. Sometimes getting that sequence of pump, crack, close, pump (repeat)... coordinated can get confusing, particularly if you're doing it alone. That's where those Motion Pro devices shine. No guesswork.