just to clarify a bit on this comment, by way too long he means it comes in a 3 meter length, and you only need about 1 ft as I recall. The fiche says its 5.5mm x 3m. Take the old one to an auto parts store or Honda dealer and see what they have.Don't buy hose #13 using the part number, it's way too long. Just get a suitable length from a local dealer who should have the bulk roll in stock.

You are using an out of date browser. It may not display this or other websites correctly.
You should upgrade or use an alternative browser.
You should upgrade or use an alternative browser.
Coolant Leak right in the middle of my ST1100
- Thread starter Winfried
- Start date
Beeflips
(it's me...Greg) Returning some videotapes
My 2000 ST1100 has about 36k on it, I got it with 23k in 2020. Had the carbs off a few times, but I think this winter I'll be jumping into this project too. Plus the forks leak, need to check valve clearances, add driving lights, fix/replace the heated grips, brakes, a whole grocery list. So I'll be following if you document things.
ReSTored
Site Supporter
My 2000 ST1100 has about 36k on it, I got it with 23k in 2020. Had the carbs off a few times, but I think this winter I'll be jumping into this project too. Plus the forks leak, need to check valve clearances, add driving lights, fix/replace the heated grips, brakes, a whole grocery list. So I'll be following if you document things.
As a general comment, st-owners is a great site for technical support. St-riders is also excellent + it has a multitude of loaner "tool kits" for various jobs such as valve adjustments + fork rebuilds. I borrowed the valve kit to do my ST1100 and it was a great resource. If you plan to do a lot of work on your 1100 over the winter season join st-riders.
I can tell you that there is, relatively speaking, very limited online info for my Tracer GT vs. the resources for the ST1100 and ST1300. I've no issue servicing my brake calipers, pads, and doing most of the routine adjustments on the Tracer, primarily due to the fact that I learned an enormous amount servicing my ST1100. I do have a valve check / possible adjustment coming up for the Tracer March 2024 based on my mileage that I'm a bit nervous above, but I'll get it done one way or another. Hopefully there might be a few more YT videos and Tracer forum posts covering this in detail by that point in time. BTW, I do the the OEM Yamaha Tracer service manual. It was <$20 to download a digital copy of it. It does cover off everything service related, but not quite the same as having owners walk you through their service experience.
So much wrong with the YT video…. wonder if after he reversed the #1 boot clamp the throttle didn’t hang up on it… I doubt he had a service manual. Certainly wasn’t on an Internet forum.

Well there's a service manual on the ground next to him. Can't tell if it's for the ST1100 or if he even opened it.
I give him an E for effort. And I appreciate the lengthy video tour of the nether regions of his bike. I'll be doing the same to mine sometime in the future.
OP
OP
I got the fuel tank removed and it wasn't that hard. But removing the carbs has me stymied. I loosened three boot clamps but the top right boot clamp.... can't find the screw as it seems unreachable.
Do I have to remove the top that holds the 4 rubber intakes, and if so, which screws do I take out? I found screws with tab-overs. I bent the tabs to reach the Phillips head screws, but so tight that I'm afraid I'll round them out then I'll really be up the creek.
If I can remove the whole assembly as one piece, what do I loosen and get it lifted out. On the half-ass video, it says the boots is all that holds the carbs, which he explains after the fact. On the top right carb boot, he had to use a flexible screw driver, and I can see the only way is with top air intake removed, as per the previous paragraph.
I grew frustrated and left it. I went and downloaded shop manual for $5. Shows parts, but not with instructions detailing what and how to remove. So a little, or maybe a lot of help please. So much trouble for a coolant leak.
you shouldn't have to remove the top snorkels, they can remain attached.
As to why you can't access the boot screw, that's a mystery, maybe someone else has been in there and made things worse? FWIW, if you don't have a JIS screwdriver already, pick one up for this job, it will greatly reduce the chances of rounding out one of the screw heads.
As to why you can't access the boot screw, that's a mystery, maybe someone else has been in there and made things worse? FWIW, if you don't have a JIS screwdriver already, pick one up for this job, it will greatly reduce the chances of rounding out one of the screw heads.
Smudgemo
Intermodal Man of Mystery
Get a strong light in there. I've seen complaints that the boot clamp sometimes rotates away from it's normal position, but I'm not sure if it can. I've been in there a number of times and it's never easy to find things.
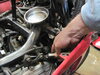
You can just see which angle the screw point in this picture. The clamps have a pin that prevents them from moving away from the screwdriver's force. Front is to the right --> in this shot.

You can just see which angle the screw point in this picture. The clamps have a pin that prevents them from moving away from the screwdriver's force. Front is to the right --> in this shot.
OP
OP
On the picture showing the 4 boots, the one on top right has the top of screw pointed away from the right side of bike where I could use my screw driver to reach it. Instead it points to the front of bike. So how do I get to it with my screw driver?
OP
OP
Sorry to forget to add. The carbs sit on top so hard to reach. The other 3 I loosened as my screw driver could reach them. It's that one that I can't reach. Guy on YouTube says he used a flex screw driver and can't see how that's possible.
John OoSTerhuis
Life Is Good!
This should help (pics by Jon Ransom, STOC 63):
My little flashlight with the bulb on the end of a gooseneck/flex-shaft works well for finding carb boot and sync screwheads..
John
My little flashlight with the bulb on the end of a gooseneck/flex-shaft works well for finding carb boot and sync screwheads..
John
Last edited:
OP
OP
The pictures are shown with the carbs removed, everything is clear showing the clamps that have to be loosened. The one that I can't cant get loose is the top right one. How do I get my Phillips screwdriver to reach it? Without the attached carbs on top, loosening them would be easy. But the whole reason for loosening them is to remove the carbs, which are in the way to loosening the top right screw. So far no one has instructed how to get to that one screw on the top right carb. The screw is facing away. In the YouTube video the guy moved the clamp so in the future he could use his screwdriver to reach it fron the right side through the frame. So how did he unscrew it from it original position where it was facing away?
I used a Phillips screwdriver with a 12” long shaft to get at it from the other side of the bike.
I'm guessing you're going to have to remove the radiator and see if you can access it from the front.On the picture showing the 4 boots, the one on top right has the top of screw pointed away from the right side of bike where I could use my screw driver to reach it. Instead it points to the front of bike. So how do I get to it with my screw driver?
As I recall the boots are keyed so they fit the intake port on the heads in a certain orientation, and they also have stops to which the clamps are aligned, so the screws SHOULD be in the orientation you see in the photo above. Seems like someone else has been in there and caused you a lot of extra work, or maybe that clamp is actually loose and has rotated on its own.
If you're the gambling type you could try to pry the carbs off with only 3 loose screws, but I can't say what might go wrong with that approach as I've never tried it.
Have you tried to pry up the carbs even with that screw unloosened? You might be able to if the rubber intakes have dried enough. Might be worth a try.
RobbieAG
Robert
I ended up getting super long screwdrivers from Harbor Freight (or Northern Tool?) to be able to get to all the carb screws.
Something like this:

 www.harborfreight.com
Something like this:
22 In. Long Reach Screwdriver Set, 2 Piece
Amazing deals on this 2Pc 22In Long Reach Screwdriver Set at Harbor Freight. Quality tools & low prices.
www.harborfreight.com
John OoSTerhuis
Life Is Good!
JOT… loosen the bottom boot clamp so the boot comes up-n-off with the carbs…?
I was wondering about that too, but in the photo above those clamps appear to be underneath the rubber mat and may not be easily accessible. I didn't have to try to access them before so I don't know how easy that would be to do with the carbs in place.JOT… loosen the bottom boot clamp so the boot comes up-n-off with the carbs…?
The ST-Riders has a great write-up on How to remove and rebuild the carbs in the archives of Wisdom. You may need to join to view.
Link here but again you might have to sign up. There is a good set of photos to help you get to the screws.
http://www.st-riders.net/index.php?topic=10249.0
Link here but again you might have to sign up. There is a good set of photos to help you get to the screws.
http://www.st-riders.net/index.php?topic=10249.0
I used that one as a go-by when I rebuilt the carbs on my 1991. A common source of problem is the little square foam filter found in the corresponding little square plastic box on the front of the round air filter housing. These need to be checked every time the main filter is checked. Time will crumble them up and they will end up in the top of the carbs, sometimes causing problems. They are cheap from the different parts houses, even cheaper if you cut them out of a lawnmower foam filter. I get two the one that fits my push mower. I slice it in half with a bread knife, then trim to shape with a pair of scissors. The spare goes into a ziplock baggie. Only $2.78 from Partzilla so you aren't saving much by doing this, so long as you are ordering other parts as well....shipping.The ST-Riders has a great write-up on How to remove and rebuild the carbs in the archives of Wisdom. You may need to join to view.
Link here but again you might have to sign up. There is a good set of photos to help you get to the screws.
http://www.st-riders.net/index.php?topic=10249.0
Share: