Darkside of the Zmoon

if you can't take a 6k miles ride, at least you can add lighting.
Please post some picks of your upgrades. The Skenes may have additional functionality but the Zmoons yellow beam adds some conspicuity in their own right.

The Skenes or one of its variations are supposed to look continuous from head on or in a rearview but "twinkle" or some such when in someone's peripheral vision. Do yours have that functionality and have you tested it? Maybe a walkaround as though you're a passing vehicle?

I don't have the Zmoons but they're on the Getaroundtoit list. If when I'll just leave them on yellow full time and maybe white with the high beams. Maybe.
 
I heard back from Morimoto about their lights.
the One Banger insides cannot be rotated 90 degrees to allow a side mount ( to keep the flat beam pattern oriented with the ground ).
The ModPod pattern is conical.
Just thought to share with the group.
 
Update on the install of the Zmoon and Skene. After multiple attempts at bracketing and one more will happen, they're up and running. I tapped into the position light wire on the left side main harness so as to have the Skenes functioning with the light switch on the right pod (parade bike). I used the sealed micro relay from Cycle Terminal.
IMG_5540.jpeg

I used the quartet harness 9 pin TS function and wired the Skene controller
IMG_5541.jpeg

When I was bench testing with a power supply (no controller), the Skenes didn't have the "flicker", when wired to the controller they do. I have not tested at night or at a distance, but they are bright. I have the Zmoons as fog only on switch 4 and not currently using for conspicuousness.

So far very satisfied with the fit and finish as well as the brightness. The TS function makes me happy.
IMG_5539.jpeg

IMG_5482.jpeg
 
These $20.00, now $25.00, lights lasted 60k miles, no complaints. Not sure if dirt or just time has left one dark and one with a very noisy fan on start up. They were hooked up as hi and low originally, however I probably didn't have them aimed right and the "hi beam" was blinding traffic as I passed them. I left them amber and always wanted them to flash as turn signals, but EE is not my forte'. Enter the Photon Blasters from Skene with turn signal function.

View attachment 322053


View attachment 322054View attachment 322055

Im thinking there is a new set of Zmoons in my future as the Skene looks good for being seen, but throws limited light to see the road. I may amend this later as get them bracketed and outside at night. Of course no simple light upgrade is complete without adding unnecessary complexity by including a 6pack of red amber LEDs to the top box. Alas, another thread for another time.

View attachment 322056

As the great lyricist Billy Joel once said, "If you can't drive with a broken back, at least you can polish the fenders". In my case though it's, if you can't take a 6k miles ride, at least you can add lighting.
I have these lights installed properly however one is amber and one is clear, I changes thew switch then the whole harness same problem. Anybody with a clue what's happening? Thanks
 
I have these lights installed properly however one is amber and one is clear, I changes thew switch then the whole harness same problem. Anybody with a clue what's happening? Thanks
It sounds like you have one light's white-light wire and the other light's yellow-light wire tied together.

(Replacing parts is a terrible method of trouble-shooting.)
 
It sounds like you have one light's white-light wire and the other light's yellow-light wire tied together.

(Replacing parts is a terrible method of trouble-shooting.)
There's only 3 wires, wht, blk and red on the light, and on the harness yellow , blk and red. the 2 lights are spaced 3 feet apart, I don't know how anything could get mixed up?
 
I have these lights installed properly however one is amber and one is clear, I changes thew switch then the whole harness same problem. Anybody with a clue what's happening? Thanks

I had that happen. There was an internal grounding to the frame of the light. that should not be there in one of my lights. It would cause the light to act oddly with it not switching properly. Once I isolated the light from the frame (I mounted mine on the metal forks) it solved the problem. It made it hard to troubleshoot as when I took the light off (not grounded to the bike) and just had the 3 wires connected (positive to yellow, positive to white and ground wires) it worked fine. Attach it to the bike so the metal housing of the light touched the bike frame and nope, it wouldn't switch properly.

Quality control on these lights is so-so, but that's reflected in the price :)
Thanks for your help, let me see if I have this right, the lights needs to be grounded to the metal part of the forks? mine aren't grounded at all, they're mounted to the fairing. How about the relays, they seem to not be grounded at all. I am totally grateful, ZMOON has no tech support, and Amazon hasn't a clue what I'm saying.
 
Thanks for your help, let me see if I have this right, the lights needs to be grounded to the metal part of the forks? mine aren't grounded at all, they're mounted to the fairing. How about the relays, they seem to not be grounded at all. I am totally grateful, ZMOON has no tech support, and Amazon hasn't a clue what I'm saying.

The lights only need to be connected by the 3 wires. I forget the colors, but both lights are the same. One wire is ground, one wire is +12v for the white LED and the other wire is +12v for the yellow LED. The only ground they need to work is the ground wire.

One of mine was messed up internally (when the metal housing of the light touched metal of the bike) so perhaps one of yours is too in some way.
 
If I had to guess, one light is shorting inside and looping thru the second.. effectively using one of the power wires as a ground to the 2nd light.

It might be best to return them for another set.
 
... just had the 3 wires connected (positive to yellow, positive to white ...

Did you try swapping the light wires on one lamp to the other positive wires? Maybe it was wired opposite by mistake at the factory.
 
Since I'm here... update to the Zmoons, had to relocate again, the added weight of the Skene lights made the single point bracket fail.

Moved the fulcrum back, and added a rubber washer.
IMG_6387.jpegIMG_6388.jpegIMG_6390.jpeg

*Edit for spelling
 
Last edited:
@Willsmotorcycle Everytime this post pops up, it reminds me that I have a set of these lights to install. I have them on the Versys, but need to get the ones mounted on the ST1300. I think I have relays and switches.

John
 
I have been plaguing the forum recently with questions about zmoons and wiring. Thanks to advice from @Uncle Phil and @Andrew Shadow success is mine (OK their's). Now before you all say so what's so clever about that? you have to realise that I hate working on bikes. My idea of motorcycling is get on... turn the key... and ride. Yes, I can do the basics and a little more with the sidecar, cos there aren't any sidecar maintenance guys around, but overall I don't get any real satisfaction from fiddling with my machines :)

However, in this case, and as I'm recently retired and have plenty of time on my hands I thought I'd give it a go. So off I went. To make my life easier I had also purchased the zmoon harness. Interestingly, the blurb from zmoon just say plug the loom to the battery and connect the lights :rolleyes: Even I know that's not a good idea. So a waterproof relay and fuseblock were purchased and away we went.

First thing was to figure out where I wanted the lights to go. Lots of the group fasten them to the forks where the reflectors go, but UK models don't have the reflectors and if I'm honest I didn't like the look. I was aiming to create the famous light triangle, so looked at the top of the tip-over bars covers but again they looked unsightly. Eventually I decided that they should go under the covers. Then, how to mount them using the existing cover retaining bolt (different positions on each side on my 2000 solo). Ended up using two L bars (currently from a furniture assemble kit :D, but two more rigid and better suited L bars are in the post).

1.JPG

Next, working out a route for the loom, there is an excess of cable, but with the provided relays/fuses placed in the underseat storage, simply looped it up the left hand side of the bike around the air filter and back down the right hand side.

Now came the, to me, complex bit, so bite the bullet and fit the relay and fuseblock. Everything loose, battery and axillary feed pulled away from their homes and off I went. In-line fuse from battery to relay (plus connection to auxillary feed), then followed the previously received advice, wired in the fusebox. All untidy, just making sure I had lots of space.

4.JPG
3.JPG


Just previous to this this point I had to relocate the power source for my dash accessories (satnav, temp/voltage display, dashcam and Pure 200 DAB adaptor), currently hooked up to the accessory power feed. Expensive items disconnected this was the first attachment to the fuseblock.... :D

2.JPG

Fingers crossed, turn on the ignition.... and it worked :D

Now to the lights. Annoyingly, although the loom comes with female connectors for the lights, the lights come with... just wire... I know its only a few male connectors to be fitted, but really!
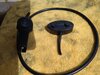
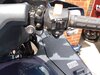
Anyway, connection made and ..... they worked. However, the loom comes with a four way illuminated switch that definitely didn't look waterproof so I replaced it with a 3 way unilluminated motorcycle switch off ebay. Fitted to the right of the handlebars.

10.JPG11.JPG

Now, tidy up that mess. The relay went into the perfectly sized space underneath the main fusebox, secured with velcro (another brilliant idea stolen from @Uncle Phil). The lighting relays/fuses into the underseat storage, again secured with velcro. The fuseblock to the rear of the storage (you'll never guess what is is secured by :D) and my Autocom intercom box. with more velcro secured to the side of the storage area.

5.JPG6.JPG7.JPG

Now this should be the end of the story... However, having done all this, I was pondering... I would actually have liked to have both independant use of the lights AND the option of having the yellow light be replaced by white when I used Main (High) beam.....

So if a relay is just a remote switch, could I... yep, I thought, just put a relay in the switch wiring linked to the main beam.... so I gave it a go with a 5 pin relay I had lying around in the garage. It worked.. but where was I going to stick that big bloody relay... Google search and Amazon came to the rescue...a micro relay...

12.JPG13.JPG

Once again, some tidying up and routing of wiring and we have light. And all because of and thanks to this forum!!

8.JPG9.JPG
 

Attachments

  • 10.JPG
    10.JPG
    186.4 KB · Views: 1
  • 11.JPG
    11.JPG
    124.3 KB · Views: 1
Last edited:
Back
Top Bottom