front left brake and rear brake drags

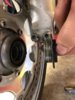
I messed up, here is the left front spacer again:
A5CDD9AD-7785-4BE1-A29D-962DF4FDC9B5.jpeg

Well it's good that you found the culprit. I took pictures of my spacers when I dismantled the front end to get them back where they belong.
I think a good cleaning of your calipers and slide pins wouldn't hurt either, but having the spacer in backwards would cause the front left pads to bind.
Good luck
 

Attachments

  • Front wheel spacer 3.jpg
    Front wheel spacer 3.jpg
    60.8 KB · Views: 34
  • Like
Reactions: Obo
Those also do not look like oem honda pads either, as they are missing the white heat shield on the rear.
The rubber bits look swollen and or crooked as well.
Check the O ring on pad retaining pin, if torn or missing, it will bind due to angle.

new bolts, seals and rubber bits added to my order. no reason not to.
 
Well it's good that you found the culprit. I took pictures of my spacers when I dismantled the front end to get them back where they belong.
I think a good cleaning of your calipers and slide pins wouldn't hurt either, but having the spacer in backwards would cause the front left pads to bind.
Good luck
really got the spacer backwards?. If so, that garage will not see more business from me. too bad since they are in walking distance from where i live
 
Did you inspect and measure the left wheel spacer to verify which way it is/was inserted?
 
Did you inspect and measure the left wheel spacer to verify which way it is/was inserted?
no, it was done by the garage/dealer when they replaced seals on the fork. I had it done under guarantee, as I bought it 2 months ago from them. If it wasn’t for the guarantee I would have done it myself. I have been working on bikes and cars since I was 15.
Now I am studying up on the ST1300. already serviced preload adjuster, sparkplugs, air filter, coolant, oil etc. Now I need to fix front spacer, brake pads and such. The first year with a new bike is getting everything sorted out and establish a service baseline.

This forum is invaluable for learning this bike.
 
Regarding the difference between left and right brakes being applied - @mjc506 hit the nail on the head. There is a small block on the right fork leg - which is the delay valve. This has a double concentric piston. The inner piston sits inside the outer piston, and is normally held open by a weak spring. This allows fluid returning or being bled free passage to and from the front right centre piston. As soon as the brake pedal is pressed, the pressure from the pedal overcomes the weaker spring and the inner piston seals itself against the top of the main piston - preventing any pressure from reaching the right centre piston. In the meantime, pressure to the front left centre piston is applied freely.
The outer piston, now plugged by the inner piston is held in place by a much stroner spring. When pressure is increased at the brake pedal enough to overcome that spring, the main piston / valve moves, opening the route to the front right piston.

In short - if you don't press the pedal hard enough, the front right centre piston is never applied.

-----

The photos indicate that a good clean up is needed. The pad pins look to be scored, but since there are signs of grease, it is possible just the grease being marked as the bolt was turned in - etching out its own thread in the grease. But check. If that pad pin is not smooth, the outer brake pads can't slide properly across the pin as it needs to.

The calipers do not look to be central from the photos - but it is probably parallax effect from the angle of the camera. You will be able to spot that easily.

Why the left caliper is sticking, we cannot tell. But you mentioned the compensation port in the rear master cyclinder. You can check this - if there is space in the reservoir, the front left centre piston should push in - with resistance - but steadily. Use both thumbs to try. If that works then the fluid is going through the port OK. Clean up the outside of the pistons with fluid and a shoelace or strip/hem of fabric first, you don't want to be pushing muck past the seals. They should come up shiny metal.

With the pads out it should be possible to move the caliper in towards the centre of the wheel and it should stay there. It should be possible to move it out from the centre and it should stay there. This movement is should be easy and will feel almost as if the caliper is loose. If it is an effort, then the slider pins and bores need some attention. Careful - once the pads are out, if you press the pedal or the lever, you can shoot the pistons out. Work on one caliper at a time.

One more thing - having just read Larry's list. The lower mounting 'bolt' on the left caliper bracket - has a needle roller bearing. It isn't actually a bolt in the normal sense, in that it doesn't clamp anything. It is a stud or a spindle on which the SMC pivots. That bolt (and the other caliper bolts) are supposed to be replaced with new - they have some red thread lock agent on them. Many people clean them up and apply loctite. However, if you apply the liquid stuff, it flows all over the place, and one of the places it manages to flow to as you are tightening up the bolt, is onto the outside of the sleeve that fits onto the bolt. That is the sleeve that slides into the needle roller bearings. Loctite is pretty good at stopping bolts from coming undone. It turns out that it is also pretty good at locking metal sleeves and needle roller bearing togther into one solid mass.
 
Last edited:
Did you inspect and measure the left wheel spacer to verify which way it is/was inserted?
no, it was done by the garage. But I am off to the shop to get some tools (17mm hex) and will flip the spacer around today. When I get the brake parts next week I will service the calipers and put in new pads. After that full bleed of the system. Going to get myself a vacuum bleeder.
 
Tested a bit more today.
After freeing up the calipers LF and rear, the bike will roll and roll and pick up speed freewheeling down a hill.
Hitting the front brak hard, both front discs warms up nicely indicating both calipers operate.
When on the center stand I spun the rear wheel and pushed the SMC forward. bang, the rear wheel stops dead. release the SMC and it spins feeely again.
So SMC seems to work, front brake works.

Hitting rear brake engage LR and read pads. Hangs until pushed back manually.

Starting to suspect rear master cylinder or the rear brake/MC assy.
Any other suggestions?
 
Before I did anything further, (including riding the bike) I would remove all 3 calipers and clean/inspect all the moving parts (piston's, guide pins, retaining pins, rubber bits, etc.)
We know from your pictures, those are NOT OEM Honda pads on the rear, and the rear pistons are beyond dirty (see binding/scrape marks on piston in picture).
This alone may explain why you have to push stuff back manually etc.
Remove the pads, clean everything up, and inspect all the bits, then post more pictures.
You need to inspect the rear caliper mounting bracket carefully, as most folks miss the minor damage that may be causing your brake issues.
Your looking for flute like wear in the bracket hole (think sand waves) a loose front clip, allowing pads to tilt/bind, dirt obviously, and pad fitment issues.
Those pads are missing the heat shield behind the cage, which may be throwing off the fitment enough to bind/jam.
You stated that your SMC appears to be working correctly, but don't be so sure just yet.
If you grab the LF caliper, can you shake it forward/rearward and cause it to make noise? (dead space inside bore)
Its possible that air in the system, weak/worn assist spring, worn rubber scrubbers, will still allow you to forcefully push the piston down enough to lock and seem to release the rear brake system.
It should take very little effort to preform the safety test, but you can get incorrect results with brute strength etc.
I've seen folks push so hard, they almost push the bike of the Center Stand, and because they were able to stop the wheel, they thought it passed the inspection etc.
I would also loosen the stopper bolt, and the rear axle nut, then re-torque them in the proper sequence (stopper bolt first 51 ft pounds, axle nut second 80 ft pounds) verify in your service manual.
Also check the condition of the guide pin(s) in all three calipers.
A dealership missed this one (trying to attach photo below) after replacing all the lines, complete rear caliper, complete SMC, levers, fluid, labor etc.
Cost the guy a lot of money....when he bailed on the shop and brought me the bike, I found this!
20170605_140149_1591570932141_001.jpg20170605_140356_1591570931362_001.jpg20170605_140133_1591570932810.jpg20170605_142343_1591570928078_001.jpg
 
Good comments. caliper service kits should be here end of week, will serrvice all calipers then and get back with more info and pics.
SMC took no effort to move forward, it was dead easy.

Yes, it all looks very dirty and in need of a good scrubbing and service. I will do all the checks you suggest once I get the service kits and parts, and then a good bleed.
 
Excellent, glad you found it :)
well, I’m not out of the woods yet.
This was but one of the signs igofar asked me to look for.
Now i am swapping all seals, pins and rubbers on the caliper and cleaning it up before putting on new pads.

New caliper bracket is coming, and I ordered an SMC as well for good measure.
I have repair kits for rear MC and both front calipers as well, so I will go through the lot before a complete bleed of the system. I hope that will do the trick (but no guarantee).
 
I'm sure you're covered with all the help here for possible causes of your issue. It's been a great help to many here to keep these great bikes going.

I recently had an issue with the rear rotor getting too hot. It turned out to be the caliper sliding pins on the bracket were dirty and gunked up preventing it from releasing like it should. That was solved with cleaning and lube. From now on, this will be part of my standard procedure whenever I take the rear wheel off or service the brakes.
 
Back
Top Bottom