Article HID Install with Time Delay Relay

OP
OP
sennister
Joined
Aug 6, 2007
Messages
4,216
Age
49
Location
Grant, MN (aka Stillwater)
Bike
ST1100 & ST1300
STOC #
6145
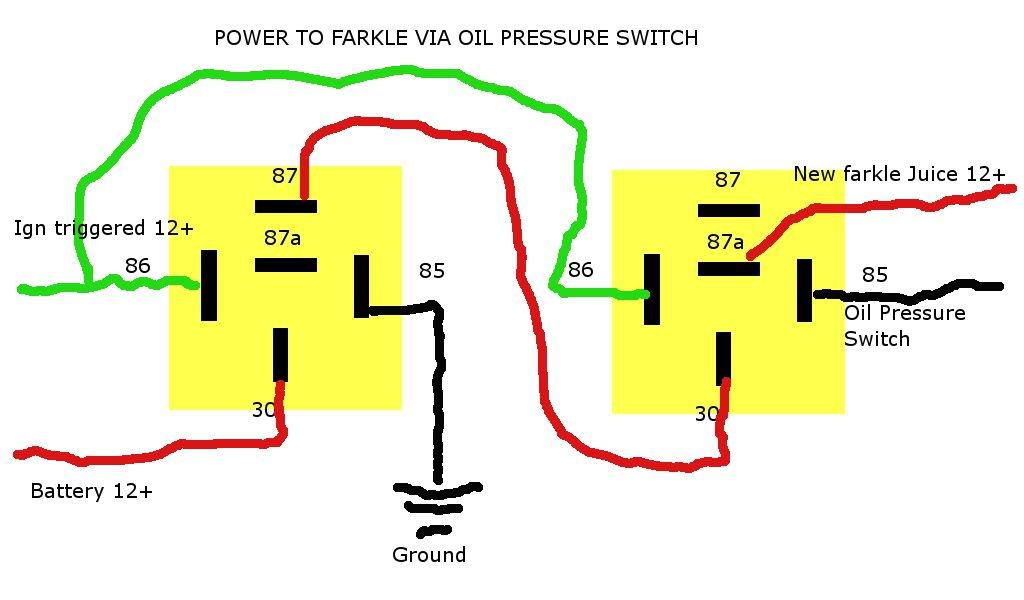
Doh I just went back to Dave's instructions and looked at the schematic he drew. I saw my mistake. I will let you know later I am so challenged with this type of stuff I overcomplicate things. Couls someone smack me on the back of ther head!

You can give me a ring again if you still don't get it worked out.
 

SteveST1300

Site Supporter
Vendor
Joined
Dec 21, 2004
Messages
4,348
Age
69
Location
Ledgewood, NJ 07852
Bike
03&04 ST1300
STOC #
5079
Thanks Dave I should have looked at your Schematic yesterday I was reading the text and looking at the pictures but the schematic is what I needed. I will try it out tonight I am pretty sure I know wht I did wrong.
 
OP
OP
sennister
Joined
Aug 6, 2007
Messages
4,216
Age
49
Location
Grant, MN (aka Stillwater)
Bike
ST1100 & ST1300
STOC #
6145
Thanks Dave I should have looked at your Schematic yesterday I was reading the text and looking at the pictures but the schematic is what I needed. I will try it out tonight I am pretty sure I know wht I did wrong.
Anna'sDad just PMed me a new schematic that is much clearer. If you go back to the first post I have a shot of it along side my quick sketch. Then if you scroll to the bottom of the post you will see where I attached the full PDF if you or anyone wants to print it off. I had always planned on going back to redo the schematic but hadn't gotten to it yet. I had quickly thrown together this article as there were several members asking for more information on what I was working on. Because the schematic was needed and I didn't have a lot of time to make it pretty so I had plans on redoing it once I had some free time. Yeah right, what is that... Luckily another member saw what I was doing and went through the effort to create a very detailed drawing.
 

EASt

Streuselkuchen
Joined
Feb 19, 2006
Messages
2,058
Location
Minnesota
Bike
S1000XR
I've got the HIDs installed with the three-pole switch... timer coming. Thanks for the help on this Dave, and thanks to Rich R for more or less walking me through the install last night.

Good gravy, these lights are bright. I'm actually concerned that they're too bright to drive around at night with. They're just... farkin' bright!
 

STranger

Jay Knight
Joined
Sep 24, 2008
Messages
863
Location
Mariposa,Ca
Bike
99 ST1100
STOC #
8033
Sennister I wanted to add this for an alternative to the time delay circuit(great install BTW) since the time delay relay is more difficult to source and the price is a little on the high side. If it bothers you please let me know and I will take it down.

This circuit could be used to activate any power only after the oil pressure builds in the case.
If you need to add a switch just use pos or neg of the 1st relay.
Parts 2 bosch type 30 amp relays one needs to be able to work normally closed.

I have not used this for the HID installation....mine install is for a second battery. YMMV

 
OP
OP
sennister
Joined
Aug 6, 2007
Messages
4,216
Age
49
Location
Grant, MN (aka Stillwater)
Bike
ST1100 & ST1300
STOC #
6145
Hmm interesting idea. I wonder though at what point would it trigger the HIDs to fire. Does the act of cranking the engine activate the circuit? I suspect it will. Though the voltage draw would be such that the HIDs won't be able to come on so it may be fine as this would prevent them from cycling while warming up. I don't know if low voltage to the ballasts are an issue or not. I think I have seen mine cut out in testing without the engine running when the voltage dropped to 11.5v or so.
 

STranger

Jay Knight
Joined
Sep 24, 2008
Messages
863
Location
Mariposa,Ca
Bike
99 ST1100
STOC #
8033
Not sure if cranking builds enough pressure in the case. Does the 1300 spin up with the kill switch activated? If so could you try to crank while watching the low oil light and see if it cuts off? If not I'll see what I can do tonight.
It might be possible to flow a capacitor in the circuit to stablilize the the output.......not sure.
 
Joined
Apr 25, 2007
Messages
4,950
Age
62
Location
New Jersey
Bike
st1300 '04
STOC #
7163
Re: ST1300-HID Install with Time Delay Relay

The 13 won't crank with the kill switch off.

The oil pressure light stays on until the motor is running If it didn't start right away I
don't know if you'd get enough pressure to trip the pressure switch. It may chatter the relay though until pressure builds.

You could put a TDR in line with the pressure switch tho.
 

Attachments

STranger

Jay Knight
Joined
Sep 24, 2008
Messages
863
Location
Mariposa,Ca
Bike
99 ST1100
STOC #
8033
You know on second thought..........this may not be the best idea for your only lights........if you get a low oil light at night.......this could be very bad
 
Joined
Nov 6, 2010
Messages
490
Location
Maple Valley, WA
Bike
2001 ST1100
STOC #
8294
Great write-up, sennister!! :yes: Thank you for your effort to document this mod. It is extremely helpful.

I just installed an HID kit and the TDR using your instructions. On my ST1100, instead of trying to trace the right hand switch connector, I just sliced the sheath coming from the switch and fished the Red/Black and Blue/White wires out. I am mounting my TDR up front so running from the switch bundle to the TDR was a breeze.

I did have one issue that had me stumped. I tested the HIDs first without the TDR. Can you say BRIGHT? :bow1: But after I wired in the TDR the HIDs would not come on. I triple checked the connections and had +12V to the trigger (1) and 12V terminals, the ground was good but nothing on the output (L). After extensive cursing and running out of things to try:banghead:, I tried flipping the small switch on the TDR from ON to OFF (actually blank). Bingo!! The lights came on after the appropriate delay.:D Mine was labelled as a TDR-P so I assumed that the switch was configured to turn ON when positive voltage triggered it. So if anyone can't get the TDR to work after wiring it in, try flipping the flipping switch. ;)
 

Mellow

Joe
Admin
Joined
Dec 1, 2004
Messages
18,899
Age
60
Bike
'21 BMW R1250RT
2024 Miles
000540
I think I'm going to give this one a shot... I have a headlight cutoff switch but I like this option even better. I'll probably keep my headlight cutoff switch to use for camping so I can just have my small indicator lights on when I need just a little light for a short amount of time.

Thanks!.. ordered.
 

Throttlejockey

Padden is my hero
Joined
Aug 18, 2009
Messages
2,342
Age
58
Location
San Diego
Bike
06 ST1300
STOC #
8080
Joe, if you install it with the switch like sennister did you can have the position lights only come on.
 

Mellow

Joe
Admin
Joined
Dec 1, 2004
Messages
18,899
Age
60
Bike
'21 BMW R1250RT
2024 Miles
000540
Joe, if you install it with the switch like sennister did you can have the position lights only come on.
Right.. I already have a switch so I'm there at the moment. I'd just like to add the ability to leave the switch 'on' and have the timer do all the work that way I only mess with the switch when I want to use the small indicator lights at a dark campground vs messing with the switch every time I start/stop the bike.
 

Mellow

Joe
Admin
Joined
Dec 1, 2004
Messages
18,899
Age
60
Bike
'21 BMW R1250RT
2024 Miles
000540
Do you have a 3 position switch?
No, just an on/off switch connected to my right switch housing.

The way I read this, you don't need a switch at all, just set the delay to 10-20 seconds and whenever power is supplied, a timer starts. I'm thinking my switch would just control when that power is supplied. I could leave it on all the time so when the bikes' ignition is in the ON position, power is supplied and the timer starts.. or, start the bike and use the switch to begin the power supply which would start the delay.
 

Throttlejockey

Padden is my hero
Joined
Aug 18, 2009
Messages
2,342
Age
58
Location
San Diego
Bike
06 ST1300
STOC #
8080
The reason sennister set it up with the 3 way switch was one position would be off (position lights on) one to bypass the TDR in case of an issue (lights on all the time) and the TDR position.
 

Mellow

Joe
Admin
Joined
Dec 1, 2004
Messages
18,899
Age
60
Bike
'21 BMW R1250RT
2024 Miles
000540
What if there's an issue with the switch? :rofl1:

I usually wire things in a way that if there's a problem, I can get to everything from the right side panel.

I'll probably connect wires to the TDR using posi-locks and if there's an issue with that, quickly rewire to remove the TDR from the issue.

Hopefully, the TDR shouldn't have any issues, I have room under the pass seat so I may put it there.
 
OP
OP
sennister
Joined
Aug 6, 2007
Messages
4,216
Age
49
Location
Grant, MN (aka Stillwater)
Bike
ST1100 & ST1300
STOC #
6145
What if there's an issue with the switch? :rofl1:

I usually wire things in a way that if there's a problem, I can get to everything from the right side panel.

I'll probably connect wires to the TDR using posi-locks and if there's an issue with that, quickly rewire to remove the TDR from the issue.

Hopefully, the TDR shouldn't have any issues, I have room under the pass seat so I may put it there.
I just saw this discussion so I thought I would chime in. As mentioned I added the 3 way switch to have a means to bypass the TDR. The good news is that they seem pretty reliable. The integrated relay in the VVME kit not so much. Lots of people have had failures with that both with the VVME kit and there was another source that I read about where it is a similar design. As for the people using the VVME kit stay tuned. I am working on another article to come up with a means to replace the singe relay of the VVME kit with a set of 3 Bosch style automotive relays. In this modification of the VVME kit I am after a couple things. First I hate single points of failure. Sure the 3 way switch could fail but that isn't too likely. I plan on splitting out the single VVME Relay into a relay that will power the left light, a separate one to power the right light and the third will actuate the high/low beam. While that could be split out as well into a 4th relay to individually control the high/low beams I think that is a bit much, a failure of this relay would result in being stuck on low beam which wouldn't pose too big of a safety risk. The other benefit of this modification will be that if you are on the road somewhere and you mount these relays in an accessible location you could easily get a replacement at any auto parts store or Walmart along your way and be back in service.

In my case I installed one of those Cherry rocker switches in the right switch pod like a lot of people did to manually control the headlights. In my case though I used the switch to act as a master power for the 12V DC Motor Controller that I am using to regulate the heat on my headed grips. I like having the master power for this easily accessible. I also had the two wires that went to the starter switch that were no longer needed once I bypassed in in the article. This meant I had the wires already there for hooking up the Cherry rocker switch.

This last year I had a little over 10K miles on this set up and no issues.
 
Joined
Aug 26, 2011
Messages
5
Location
Armadale Western Australia
Bike
ST1300A
One of the guys in Australia is an aircraft tech.
What we did was get a plug from Easter Beaver and use it to interrupt the side stand. With the stand down, lights off. Stand up, lights on.
The best thing is that you don't have to cut any wires and it is removable in 10 seconds, ok 50 seconds with getting the side cover off.

http://ozstoc.com/index.php?topic=324.0
 
Top Bottom