I can't figure out what I'm doing wrong with the engine guard covers

Joined
Sep 11, 2023
Messages
13
Location
Texas
Bike
2007 ST1300
Hi everyone. My 2007 ST was missing the left and right side engine guard covers, so I ordered them from Partzilla, along with the hardware the diagram indicated they are to be installed with:
Image 9-15-23 at 6.55 PM.jpeg

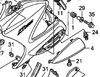
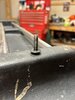
The screw (#21) is described as "SCREW, PAN (6X11)". I ordered two of these.


IMG_4352.jpeg

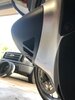
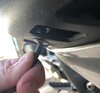
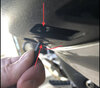
Without the cover, the screw threads in just fine:
IMG_4353.jpeg

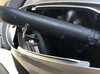
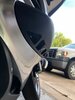
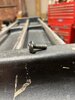
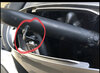
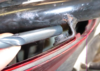
But when I try attaching the cover and then screwing it in, it just isn't working. It seems like the angle is wrong and/or the screw is not long enough. I spent about 20 minutes fiddling with it and just can't get the cover screwed in:
IMG_4355.jpeg

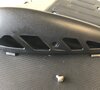
It was the same situation on the opposite side cover/screw. Can someone give me a sanity check and let me know if this is the correct hardware for the covers? If it isn't, can you point me to the correct ones to order?
 

Kevcules

Site Supporter
Joined
Jul 16, 2016
Messages
1,396
Age
55
Location
NB Canada
Bike
2008 ST1300
Those are the wrong bolts possibly. The ones you need are longer with no shoulder. These are what my bike has anyways.
The parts diagram does look confusing if that part number is what you got. Maybe they messed up sending the wrong bolts?
Just go down to your local hardware store and buy these regular 6mm buttonhead bolts.
 

Attachments

Last edited:
OP
OP
MeLikeyTacos
Joined
Sep 11, 2023
Messages
13
Location
Texas
Bike
2007 ST1300
Well, crap. Thanks for the quick reply! I guess the parts diagram is wrong then. But now I don't know what the specific hardware is to order; guess I need to go dig through the bins at home depot or something...
 

Kevcules

Site Supporter
Joined
Jul 16, 2016
Messages
1,396
Age
55
Location
NB Canada
Bike
2008 ST1300
Well, crap. Thanks for the quick reply! I guess the parts diagram is wrong then. But now I don't know what the specific hardware is to order; guess I need to go dig through the bins at home depot or something...
Bring the new bolt with you to compare the thread pitch and get a 6mm bolt about 10-12mm long should be good.
 

Igofar

Site Supporter
Joined
Jan 8, 2011
Messages
7,106
Location
Arizona
Bike
2023 Honda CT125A
That is the correct fastener.
Are you making sure the edge of the plastic tip over cover is in the slot/groove along the edge, if not, this will take up space.
Another common reason is because the tabs that are welded on the crash bars get bent.
 

jfheath

John Heath
Site Supporter
Joined
Mar 18, 2006
Messages
2,842
Age
70
Location
Ilkley, W Yorkshire, UK
Bike
2013 ST1300 A9
2024 Miles
000679
STOC #
2570
I put mine in my Honda screws tin. I never fit them. The screw is not there to keep the cover in position. If the cover is clipped onto the mid fairing properly, it will stay there. The screw is there to stop it from being knocked off.

Reason I don't fit the screws: The threads inside the cover get bombarded with rainwater, salt, grit etc and they rust. Even coated with copper grease - it just gets pressure washed off - presumably from the kickup of spray from the front wheel. It's a difficult screw to get out if the hex socket rounds - which it does easily on those screws, especially when trying to remove one with rusted threads.

So i use cable ties instead. Bend the pointy end over a bit about an inch from the end and poke it up through the hole, Hook the end from inside with a finger through the vent nearest the screw hole (you have a choice of which side) and pull it back out again to complete the loop and fasten the zip tie. It does not need to be pulled tight. Snip the end (although I have stopped doing that now) Rotate the cable so that the joint is back inside the cover. Push the flailing end up inside as well.

To remove, I just snip them off - easy if you don't pull the cable tie tight. Slack enough to get the point of some scissors or cutters behind. The longer wider ties are easier to work with than the smaller ties.

I've been doing this for two 1100s and two 1300s - 230,000 miles. It has never been an issue - except in the very early days when I used to pull the cable tie really tight, I noticed a crack in the plastic cover near the hole - The bike had 30,000 miles on it when I got it, so the crack may have been there before, but from then on, I never pulled the cable tie tight. Just make sure the plastic clips locate properly when you fit the covers.

But you still need to straighten that bracket - It should be right next to the plastic cover when the cover is clipped into place properly.
 
Last edited:
Joined
Jul 15, 2023
Messages
513
Location
Mesa, AZ
Bike
VFR750F, ST1300
Something is seriously wrong. Way, way too large of gap between bracket and panel. Not even sure bending bracket outwards will work because panel won't be parallel with and actually touching full face of bracket.


jfheath

John Heath
Site Supporter
Joined
Mar 18, 2006
Messages
2,842
Age
70
Location
Ilkley, W Yorkshire, UK
Bike
2013 ST1300 A9
2024 Miles
000679
STOC #
2570
This is mine taken from the front. Looks like I need to get a wire brush and paint onto it (again).

The drill bit is a makeshift feeler gauge. 9mm. The 8.5mm went through the gap. The shaft of the drill was just about parallel with the tube - I'm holding it away at an angle at the bottom left of the picture.

The bottom face of the bracket rested perfect;y against the inside of the cover when it was fitted.

1694855604663.png

I am wondering if yours has had a heavy tip over, and the crash bars themselves have been bent upwards a tad ? Your nut bracket has certainly been leant on a bit.

If so, I would resort to the cable tie method until you can investigate further.

Put bike on centre stand, front wheel on the ground.

Measure from the ground to the outer edge of the rear of the cover's hole. In line with the rear clip. That will give a point of reference measurement.
Then measure from the ground to the bottom of the tip over bar.


Ok - having just done it Mark a point on the floor vertically below the point labelled.
Take both measurements from that point. (I had to, my garage floor is not even - years of centre stand / concrete interface)

To the top of the lower lip (where the purple line forms a right angle) - mine was 43.9cm
Leaving the measure on the same spot and tilting the line outward slightly to meet the inside of the bend of the tip over bar - the measurement to the bottom was 48.8cm.

So a difference of 2.9cm. There are some line of sight errors likely to have been made - but only 1mm either way. A long straight rule would have been better. But all you need is an indication of whether or not the tip-over bar is bent. And if it is, does it matter - apart from the fact that if it is, trying to bend that bracket with the welded nut is going to fix the problem !
 
Last edited:

ST Gui

240Robert
Site Supporter
Joined
Sep 12, 2011
Messages
9,254
Location
SF-Oakland CA
Bike
ST1300, 2010
john's bracket forms a perfect right angle with two straight sides where the one shown in the OP's photo has a slight buckle on one side. The bracket itself has an odd look to it but that may just be the lighting. It looks to me like the bracket itself had some direct impact and maybe not the tip over bar. That it's the same on both sides and with no covers makes me wonder about tip-overs. Bending the bars up would angle the bracket more toward the cover than away from it.

It might be worthwhile to compare the angle of the tip-over bars to those of bars known to be in good condition. Using the bars as tie-down points with excessive force or the bike rocking and applying excessive force could bend both bars down which would tilt the brackets up.

The side covers could be missing because they were damaged in a tip over or possibly the original owner used the bars as tie down points and couldn't get the covers back on. If the latter you'd think they'd have been thrown in under the "you deal with it" clause.

Bending the brackets alone might be enough. If not can tip-over bars be 'adjusted' or would then need to be replaced?
 

Gus1300

Site Supporter
Joined
Apr 5, 2007
Messages
565
Location
Haymarket VA
Bike
04 1300A
Mine usually take some patience to get reinstalled as well; I'll reread the zip tie method though, sounds like it might be easier in the long run.
 

Jethro

R.I.P. - 2023/10/20
Rest In Peace
Joined
Mar 13, 2012
Messages
762
Location
Marmora,Ontario, Canada
Bike
2006 st1300
I used to get the cover. Situated as close as possible,snug. A couple of hard hammers with my fist ,palm ,& bingo! Then install
.
 
OP
OP
MeLikeyTacos
Joined
Sep 11, 2023
Messages
13
Location
Texas
Bike
2007 ST1300
Got 'em on! Thanks for all the feedback everyone. It just took a bit of "motivation" with a set of vise grips and a hammer to get the brackets in the right position.
So i use cable ties instead. Bend the pointy end over a bit about an inch from the end and poke it up through the hole, Hook the end from inside with a finger through the vent nearest the screw hole (you have a choice of which side) and pull it back out again to complete the loop and fasten the zip tie. It does not need to be pulled tight. Snip the end (although I have stopped doing that now) Rotate the cable so that the joint is back inside the cover. Push the flailing end up inside as well.
I laughed at this not because I disagree, but because it was my first thought as I was struggling with this yesterday. But after owning a KLR650 for 9 years, I'm trying to do things "properly" and not rely on zip-tie fixes anymore. :) If these screws won't stay put though, that will be the workaround.

Anyway, here's how she looks now. Next week new tires and brake pads are going on, oil change, top off the coolant, and she'll be ready to eat some miles!

IMG_4356.jpeg
IMG_4359.jpeg
 
Top Bottom