Introduction

Where has the time gone.
My bike came with Delkevic exhaust cans, the baffles weren't fitted.
For Delkevic PR1855 cans I have managed to fit PR2736 baffles.
https://delkevic.co.uk/oversize-baffle-for-dl10-sl10-350mm-round-silencers/ - comes with the required fitting bolts.

Going on a ride tonight after bypassing the petcock. Either that has sorted it or I will burn enough fuel to replace the pump without spilling fuel everywhere.
If that doesn't work to lower your fuel level, run a piece of gas line from the tank end into a contain and turn the key on.
You should have a 'built it' tank emptier in the tank ... ;)
 
If that doesn't work to lower your fuel level, run a piece of gas line from the tank end into a contain and turn the key on.
You should have a 'built it' tank emptier in the tank ... ;)

I prefer just to spill it all down the side and onto the floor...
It coped fairly well, previously it got upset over 75mph, had it for 10 miles at 80-100mph and nae bother so I'm pleased.
The anti-social popping has also gone away with the new baffles which is 40 quid well spent.
Need to polish the windscreen, can't see through it at night. Due a coolant flush too.
If only just writing these things on here made them happen :roflmao:
Also need to keep riding the thing, very out of practice.
 
I prefer just to spill it all down the side and onto the floor...
It coped fairly well, previously it got upset over 75mph, had it for 10 miles at 80-100mph and nae bother so I'm pleased.
The anti-social popping has also gone away with the new baffles which is 40 quid well spent.
Need to polish the windscreen, can't see through it at night. Due a coolant flush too.
If only just writing these things on here made them happen :roflmao:
Also need to keep riding the thing, very out of practice.
Suit yourself on spilling it - at the price you have pay for it over there I'd be trying to soak it up with a sponge and wringing it back out into a jug! :biggrin:
The best thing you can do for a ST1100 is run it on a regular basis and run it hard.
 
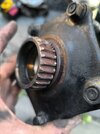
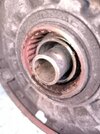
Decided to finally open the rear drive and see if I had the dreaded worn splines.

The splines had been helpfully lubricated with plenty of high quality iron oxide, none of that horrible moly rubbish. Also my bike is much faster without the 3rd o-ring. Plenty of life left 👍👍👍.
 

Attachments

  • 17908723003728594068973805383631.jpg
    17908723003728594068973805383631.jpg
    107.3 KB · Views: 7
  • 17908723237962269486686777760769.jpg
    17908723237962269486686777760769.jpg
    138.3 KB · Views: 7
Gave it a good clean, looks like the splines on the spider are missing about 20% of the material. Oh well, will keep an eye out for a new one. Have lubed everything up, nobody said the moly paste from loctite smelled like cake mix.

Had a tough time refitting the rear wheel, it felt very tight getting the spacer and rear caliper hanger back in and ended up struggling for best part of an hour, now the rear wheel barely turns a single revolution before stopping so I think I've cocked it up.

Drained the radiator, fluid was fairly fresh but I've bought the wrong drain plug and forgotten that I had the new coolant pipes to fit too. Refilled it anyway but only took a litre instead of 2.5.

Still need to swap the final drive oil but it's getting late and I've already ended up with two more fasteners than I started with. Time to put the tools away I think, work tomorrow and not back until Saturday morning. I do wish I had a garage that wasn't 200 miles away.
 
Did you press the rear brake pistons back into the rear caliper before the wheel install?
What I do is put the wheel in place, insert the axle so that I can move it into the drive.
Then I scotch underneath the wheel so it doesn't move, remove the axle, insert the caliper and reinsert the axle.
If everything is right, the wheel should turn without a lot of effort.
 
Did you press the rear brake pistons back into the rear caliper before the wheel install?
What I do is put the wheel in place, insert the axle so that I can move it into the drive.
Then I scotch underneath the wheel so it doesn't move, remove the axle, insert the caliper and reinsert the axle.
If everything is right, the wheel should turn without a lot of effort.

I did retract the brake pistons prior to reassembly. Removing the rear wheel was fairly tricky to begin with, the hanger took a fair amount of persuasion to come out from between the swingarm and spacer/rear wheel. I even had to get the big impact gun for breaking free the bolt securing the caliper hanger to the swingarm.

I was sitting behind the bike, as far as I could see the rear wheel with spider was mating well with the final drive on the right hand side however it didn't take much for it to lean away from the final drive and reduce the space. I spent a lot of time trying to hold the rear wheel square to the final drive and fit the spacer/hanger.

I tried using the axle from the opposite side to support the rear wheel while I assembled the spacer/hanger but it still didn't want to sit well. Eventually after shifting around until I could use both legs to position the rear wheel and then managed to shoehorn the spacer and hanger back in by hand and used the axle to align everything as it was wiggled in. Your method sounds much simpler so I will try that, my gut feeling is the rear wheel is probably not sitting square against the final drive. Either that or I need to buy another one to compare it too...
 
Back
Top Bottom