Article [13] ST1300 - Brake Maintenance - Replacing the Secondary Master Cylinder (SMC)

Kevcules

Site Supporter
Joined
Jul 16, 2016
Messages
1,396
Age
55
Location
NB Canada
Bike
2008 ST1300
Terrific write up John (@jfheath), thanks for adding some clarity to an often cloudy subject.

That being said, I do have a couple of questions as I prepare to replace my SMC. Just a straight replacement. Out with the bad, in with good. New parts are on hand, tools readily available to be mis-used and armed with the knowledge I have gained from several reading sessions on the subject.

With no experience removing any type of caliper let alone one that has a SMC attached to it, could I not just pinch off the 1, 2, and 3 brake hoses to limit the volume of fluid lost? What would I use to pinch off a brake line? Threefold reason for my question:
1) Having never done this before, I don’t know what kind of flow rate I will face by opening up the system
2) Would this not prevent too much air from entering the system?
3) I don’t work fast so this would buy me some time and awkward fumbling with plastic bags and zip ties.

I do understand that regardless, a full bleed of the brake system will be necessary once the replacement parts are in place. Guess I’m just trying to visualize how this will go.
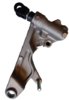
I've got a new SMC also but haven't needed to install it yet and was thinking similar thoughts as to how it was going to go. Seems pretty straight forward besides the "huge" bleed after. :)
I saw a guy on YouTube recently replacing his cars brake caliper and he used a rubber valve stem to fit/slide inside the banjo fitting and stop the fluid leak temporarily, while he got ready to attach the brake line. Pretty cool idea which I will try the next time I need it.
I personally would never pinch a brake line hose.
Good luck....
 

Igofar

Site Supporter
Joined
Jan 8, 2011
Messages
7,107
Location
Arizona
Bike
2023 Honda CT125A
NEVER, NEVER, NEVER, NEVER, NEVER, NEVER, NEVER, NEVER, NEVER, NEVER, NEVER, NEVER, NEVER, NEVER, NEVER, NEVER, NEVER, NEVER, NEVER, NEVER, NEVER, NEVER, NEVER, NEVER, NEVER
PINCH A BRAKE LINE.....WITH ANYTHING....REGARDLESS OF WHAT SOME CLOWN ON YOUTUBE SAID TO DO! :well1:
A rubber valve stem can be used, bonded washers with a bolt and wingnut can be used, heck a small piece of rubber tubbing with a bolt inserted through it can be used.
Don't worry about the air your gonna have to bleed the system correctly anyhow when your done.
 
Joined
Nov 4, 2016
Messages
15
Location
hertfordshire, England
Glad you passed the MOT!

I've confused you. Sorry. You need to have a good picture in your head about how the brakes are connected. I'll put a link at the bottom of this post - it shows a series of diagrams to explain how fluid reaches each of the brakes and bleed points.

It sounds very much like the SMC bore isn't sealing - possibly been knocked out of shape. The description you gave is pretty much the same as the situation a friend had. He fitted a service kit and it continued to do the same thing. A new SMC fixed it. He sent me his old one, which I investigated and then took a hacksaw to expose the full length of the bore. There are photos of it somewhere on here.

The rear brake going hard when the front brake is applied when the bike is stationary ? I don't see how that can happen. The front brake lever operates the two outer pistons in the front caliper. Nothing else. I need to think about this

I can see how the rear pedal may dip slightly when the front brake is applied: If the rear pedal is pressed it operates the front and rear centre pistons. When the front lever is applied, the two outer pistons at the front operate. The two outer pistons have a greater combined braking for e than the sungle centre piston, so they squeeze the pads harder onto the disc - leaving the centre puston applying little pressure at all, so with the same pressure still on the brake pedal, the lever can push the centre piston out a little more - so the prdal dips a tiny bit.


Pretty pictures. Download the pdf in post"1

many many thanks to yourself and Larry for without this advice, It was becoming a absolutely nightmare. my hat of to you both. warmest regards Craig
 
Joined
Apr 17, 2023
Messages
51
Age
55
Location
New Hampshire
Bike
2006 ST1300
Question……why do you have to even crack bolt 2 or 4 if just changing out SMC? With 1 and 3 removed from the SMC, won’t the caliper still come off?

Thanks so much for your write up and the help.
 
OP
OP
jfheath

jfheath

John Heath
Site Supporter
Joined
Mar 18, 2006
Messages
2,847
Age
70
Location
Ilkley, W Yorkshire, UK
Bike
2013 ST1300 A9
2024 Miles
000679
STOC #
2570
Question……why do you have to even crack bolt 2 or 4 if just changing out SMC? With 1 and 3 removed from the SMC, won’t the caliper still come off?
Ah - I wondered if someone was going to ask that. It's so long ago I had to go and look to remind myself.

It's not because the caliper won't come off unless you do. I was describing what I would do, and I would take it off. In which case I'd rather do it at this stage when the caliper is held pretty firmly. This is so that you don't need to apply the full 34Nm and more to undo a bolt on an object which is very difficult to hold in your hand against the turning force. But that #2 banjo bolt has two hoses connected to it. One that you can see in the photo, the other is a very short length that connect it to the inlet port of the SMC - and the SMC side of it has got to be removed. It is the banjo bolt for the centre piston but the other arm has a short hose to the inlet of the SMC - which has got to come off. This leaves you with long hose with a hole in the middle flapping around near the tyres and brake disc. If you remove #1 and #2 , you can slip the end of that hose into a poly bag and let it drip into there.

So no - I don't think you do need to take off 2 and 4. But I don't know. I've always just taken them off - I like things away from the bike so that I can inspect and clean. And anyway I bought a bag of 100 copper washers. I'm going to make damn sure that I get my money's worth.
 
Joined
Oct 11, 2023
Messages
7
Age
63
Location
Kettering, UK
SMC New Photo 33pc.jpgThe usual format from me - Description, some useful photos and a few tips and tricks to help you to avoid the normal 'Doh!' moments -
  • Like emptying all of the fluid out before realising that you wanted tomove the pistons out as far as possible;
  • Like reftting everything before realising that you cannot get your torque wrench in to fasten the last bolt;
  • Like checking that the new SMC has been greased under the boot and then discovering that you can't replace it properly.

Anyway - there is a sequence, but it is not intended that you follow it. Just read it through before tackling the job. You may find the information useful.

Feel free to download, save or print this.

And if I mention @Mellow he may put it into the articles section !
Hi. hanks for the PDF article, it's going to prove very useful when I come to replace my SMC. Just out of interest, can you remember the Gooodridge part number for the crush washers?
 
OP
OP
jfheath

jfheath

John Heath
Site Supporter
Joined
Mar 18, 2006
Messages
2,847
Age
70
Location
Ilkley, W Yorkshire, UK
Bike
2013 ST1300 A9
2024 Miles
000679
STOC #
2570
I bought these from demon-tweeks.com Buy Goodridge Copper Crush Washers | Demon Tweeks (demon-tweeks.com)

In 'Choose an Option', I selected 3/8 inch ID (-3)

Now -> 3/8 inch = 9.525mm - and these are for an M10 bolt - so I was a tad cancerned. But further down the page it says:

1697453357057.png

So I ordered the -03 (3/8" / 10mm ID) version.

1697453586552.png

I measured one of mine with a vernier scale caliper.

OD 14.48mm
ID 10.03mm
Thickness 1.1mm

And for some reason these 3/8" washers are much cheaper than the 10mm washers.

As you can see, I bought a bag of 100. At 24p each incl VAT, that's only £24.00 for the 100. I just like to have things like this in stock. I hate it when a job is held up for want of a few small components.

Produce code is GDR44516.


This could be the start of a very old joke:

"You know those copper washers that you told me about ?"
"Yeah, I bought a bag of 100. Why"
"Well I bought some"
"Ok"
"But they didn't fit"
"Oh - thats funny, mine didn't fit either"

Except that isn't the case. Mine fit and seal perfectly !

And although they are copper fitted to alloy, I have had no problem with galvanic corrosion. But I don't leave them untouched for years on end either. I bought them in Jan 2019. I have 75 left. So I must have had the front brake system apart twice in 4 years. Probably once when I bought them for a new SMC and once when I took the forks off to fit new fork seals.
 
  • Like
Reactions: Obo
Joined
Oct 11, 2023
Messages
7
Age
63
Location
Kettering, UK
I bought these from demon-tweeks.com Buy Goodridge Copper Crush Washers | Demon Tweeks (demon-tweeks.com)

In 'Choose an Option', I selected 3/8 inch ID (-3)

Now -> 3/8 inch = 9.525mm - and these are for an M10 bolt - so I was a tad cancerned. But further down the page it says:

1697453357057.png

So I ordered the -03 (3/8" / 10mm ID) version.

1697453586552.png

I measured one of mine with a vernier scale caliper.

OD 14.48mm
ID 10.03mm
Thickness 1.1mm

And for some reason these 3/8" washers are much cheaper than the 10mm washers.

As you can see, I bought a bag of 100. At 24p each incl VAT, that's only £24.00 for the 100. I just like to have things like this in stock. I hate it when a job is held up for want of a few small components.

Produce code is GDR44516.


This could be the start of a very old joke:

"You know those copper washers that you told me about ?"
"Yeah, I bought a bag of 100. Why"
"Well I bought some"
"Ok"
"But they didn't fit"
"Oh - thats funny, mine didn't fit either"

Except that isn't the case. Mine fit and seal perfectly !

And although they are copper fitted to alloy, I have had no problem with galvanic corrosion. But I don't leave them untouched for years on end either. I bought them in Jan 2019. I have 75 left. So I must have had the front brake system apart twice in 4 years. Probably once when I bought them for a new SMC and once when I took the forks off to fit new fork seals.
Thanks for the info. I spoke to Goodridge today and he said that 44516 either -3 or 10mm should beOK. I just wanted to check that they would work OK. You can actually buy direct from them:


The SMC is on order along with new rubber boots.
 
Joined
Jul 7, 2020
Messages
112
Age
63
Location
New Jersey
I followed jfheath’s instructions and changed mine out with no problems apart from a couple of leaky crush washers. I used a syringe and tubing for the flush which worked great as I had no helper. I did one practice flush to remind me of the order and two real flushes. No problems thank Goodness. Thanks to jfheath.
 

STRider

Site Supporter
Joined
Mar 17, 2020
Messages
1,108
Age
64
Location
Oregon
Bike
2012 ST1300A
STOC #
50
I followed jfheath’s instructions and changed mine out with no problems apart from a couple of leaky crush washers. I used a syringe and tubing for the flush which worked great as I had no helper. I did one practice flush to remind me of the order and two real flushes. No problems thank Goodness. Thanks to jfheath.
My experience was similarly uneventful and successful... if you discount my failure to place a spacer between the front pads while I pumped the rear brake. Realized the error of my ways mear millimeters from popping the pistons out of the caliper and flooding my garage floor with DOT4 and really messing up my bleeding progress. Disaster averted!
 
Top Bottom