Article [13] ST1300 - MCL wing cover templates

Josh_ST

I love my 2 wheeled therapy machine!
Site Supporter
Joined
Feb 21, 2022
Messages
197
Location
Marysville, OH
Bike
2003 Honda ST1300
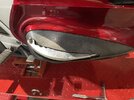
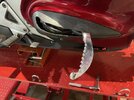
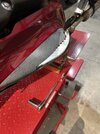
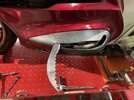
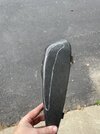
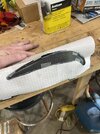
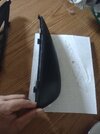
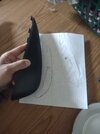
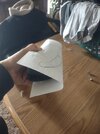
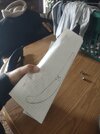
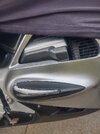
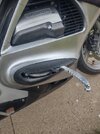
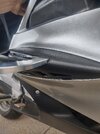
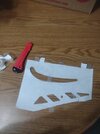
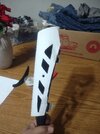
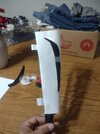
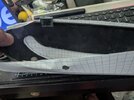
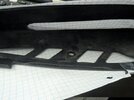
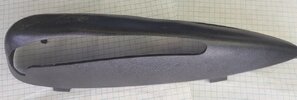
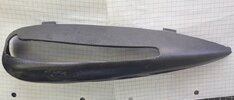
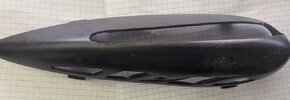
Well, here's my attempt at trying to model a 3D object in 2D. Pictures to show how I made the templates so you can cut the "swoosh" part out of the printouts, and then tape the template over the outside of the cover and trace the "swoosh" onto the cover and then cut the cover. I traced the factory cutouts and the bolt hole to help align the template the best you can. There are bracket like marks on the paper to align and tape to the top tabs.

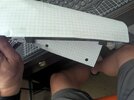
For reference the graph paper is 4x4 graph ruled 8.5x11, squares are 1/4 inch x 1/4 inch.

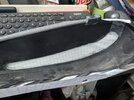
EDIT: I did a test print and dimensionally they aligned, you'll just have to trim off the "blank" area along the "brackets" on the paper with scissors or a paper cutter.
 

Attachments

  • Left Cover.PDF
    Left Cover.PDF
    968.5 KB · Views: 43
  • Right Cover.PDF
    Right Cover.PDF
    1,006 KB · Views: 19
  • Burrito.jpg
    Burrito.jpg
    101.6 KB · Views: 67
  • L1.jpg
    L1.jpg
    109.4 KB · Views: 60
  • L2.jpg
    L2.jpg
    118.2 KB · Views: 57
  • R1.jpg
    R1.jpg
    109.4 KB · Views: 56
  • R2.jpg
    R2.jpg
    134 KB · Views: 64
  • wrapped.jpg
    wrapped.jpg
    100 KB · Views: 68
  • 1.jpg
    1.jpg
    55.5 KB · Views: 49
  • 2.jpg
    2.jpg
    58.7 KB · Views: 49
  • 3.jpg
    3.jpg
    89.5 KB · Views: 48
  • 4.jpg
    4.jpg
    102.6 KB · Views: 48
  • 5.jpg
    5.jpg
    61.9 KB · Views: 46
  • 6.jpg
    6.jpg
    80.6 KB · Views: 46
  • 7.jpg
    7.jpg
    59.4 KB · Views: 70
Last edited:
You are da man. Just to confirm. Left and right is as you sit on the bike? I'll be giving this template a run in the near future and report how it goes.
 
Yes, and each template should only line up to one cover.
 
Good luck, I provide no warranty on this work :biggrin:
 
Edited post to include more info and adding profile pics of the covers so you can estimate if your lines are in a good position before committing to the utility knife.
 
Had a go at it this afternoon. Templates were a huge help! I’d say I got 95% of the way there with the template and then did some trimming from there to fine tune them.

Taped the template to the cover. Used a white paint marker to trace to opening. Then used a dremel with cut off wheel to cut the opening. Finished with a file to clean the edges up.

Not as good as lazer cut ones but I can live with them.

Huge thank you @Josh_ST
 

Attachments

  • IMG_7431.jpeg
    IMG_7431.jpeg
    123.8 KB · Views: 52
  • IMG_7430.jpeg
    IMG_7430.jpeg
    129 KB · Views: 51
  • IMG_7425.jpeg
    IMG_7425.jpeg
    137.9 KB · Views: 51
  • IMG_7426.jpeg
    IMG_7426.jpeg
    150.5 KB · Views: 47
  • IMG_7429.jpeg
    IMG_7429.jpeg
    172.1 KB · Views: 46
  • IMG_7428.jpeg
    IMG_7428.jpeg
    154.2 KB · Views: 38
  • IMG_7427.jpeg
    IMG_7427.jpeg
    154.7 KB · Views: 44
Last edited:
They look great, glad I could help and glad to see they are "good enough" to get them close!
 
Okay I've tried messing with this for a day now and I'm a little puzzled, the right and left template when I try to put them on as shown in the pictures above, they don't fit. Stupid question but the stenciling on the templates you provided they fit if the drawing is on the outside of the papers after you tape it to the engine cover. Were they meant to have the template drawing on the outside of the cover when you line them up? Or are they meant to have the drawing of the template on the inside when you wrap the paper template around the cover? Because in the pictures above it shows the drawing on the inside of the template when folded around the engine cover.
 

Attachments

  • IMG_20260331_144117112.jpg
    IMG_20260331_144117112.jpg
    110.3 KB · Views: 11
  • IMG_20260331_144100606.jpg
    IMG_20260331_144100606.jpg
    106.3 KB · Views: 13
  • IMG_20260331_144423741.jpg
    IMG_20260331_144423741.jpg
    105.1 KB · Views: 11
  • IMG_20260331_144415128.jpg
    IMG_20260331_144415128.jpg
    111.6 KB · Views: 11
I wrapped them around the outside and traced the lines from the insides. @Landon any words of advice for @Ajcole85 since you're the only person that's posted that they used them.
 
Okay I've tried messing with this for a day now and I'm a little puzzled, the right and left template when I try to put them on as shown in the pictures above, they don't fit. Stupid question but the stenciling on the templates you provided they fit if the drawing is on the outside of the papers after you tape it to the engine cover. Were they meant to have the template drawing on the outside of the cover when you line them up? Or are they meant to have the drawing of the template on the inside when you wrap the paper template around the cover? Because in the pictures above it shows the drawing on the inside of the template when folded around the engine cover.
I cut the blade slot out of the paper and the 4 holes on the underside. I also trimmed the edge of the paper where the markings are for the tabs on top of the cover. Lined the 4 holes up on bottom of the cover and taped it in place and then wrapped it over the top and lined up the tap markers and taped it in place. Paper was in outside of cover. Traced the blade opening and then cut it out using a dremel and cleaned it up with a file. I cut the blade opening a little small and the keep trimming a little at a time till I had a good fit when installed. Can always take a little more off, can’t put it back so go slowly.
 
I used this template too. Worked well! I didn't have a Dremel, but I used a coping saw with a wire blade. I utilized a file to clean up the rough edges. Not bad from 5 feet away, a little rough if you look close. Much better than no covers at all though. Just FYI, I only used the one template so I didn't have to cut out two. I just used the back side of the paper for the opposite side since they are mirrored.

ETA: Oh, interesting. I really had to expand the cutout to make it fit, I just assumed I traced it too small. I forgot mine is the PA with the "block" mounted for the siren bracket. I had to shave off front and back to clear that block, otherwise the cover wouldn't slide into place.
Ryan
 

Attachments

  • 1000007098.png
    1000007098.png
    1 MB · Views: 21
Last edited:
I cut the blade slot out of the paper and the 4 holes on the underside. I also trimmed the edge of the paper where the markings are for the tabs on top of the cover. Lined the 4 holes up on bottom of the cover and taped it in place and then wrapped it over the top and lined up the tap markers and taped it in place. Paper was in outside of cover. Traced the blade opening and then cut it out using a dremel and cleaned it up with a file. I cut the blade opening a little small and the keep trimming a little at a time till I had a good fit when installed. Can always take a little more off, can’t put it back so go slowly.
So the way you wrapped the template is to have the stencil showing on the outside like in my pic above?
 
So here is my first attempt at cutting the slot in the wing cover for the blade. After cutting the holes in the stencil, I taped to the engine guard cover. It would be a wise thing for others using the same stencil to leave a bit of paper between the two edges on the slot for the blade so that when you tape it to the cover and you begin to trace your lines they don't flop around as much. In the picture I used my finger to show where you should probably leave a piece of paper connecting both top and bottom cuts on the stencil. I will include a picture of the stencil I am using that I taped both sides so they don't move. But I used a utility knife to trace the lines for the slot, took my stencil off and slowly kept tracing those lines over and over with the utility knife till I got a nice deep groove to where I can slowly start cutting the slot. Then I fit it onto the bike and even though it was a bit snug in some areas it was a good overall fit. And is a good starting point to fine-tune the slot for the blade. I know everyone rides and handles their bike differently and some people's engine guard covers may over time move slightly so when you mount the blades on they might fit a little bit differently for everybody but generally in the same position. So this stencil is a good starting point to get your slot cut and then fine tune it with a dremel. For those who are yet to cut their engine guard covers, if you go to use a Dremel with a small sanding bit, use extreme caution when you first start to touch the engine guard cover with your sanding bit. It is a lot softer than you think. Extreme light pressure to fine-tune your lines will be necessary when using a Dremel to smooth your edges on the cut and to fine-tune the openings so that the blade moves freely without hitting the front of it and causing your engine guard cover to rock forward and backward. This worked for me on the first one, maybe if you can get some masking tape to stick to the engine guard cover when you are cutting your slot it would prevent you from having a scratches like I have on the rear end of mine that you can see in the picture because my utility blade kind of got away from me while I was trying to deepen the groove of my cut line. Thanks a lot for the help guys! Looking forward to my trip to Texas with my new footrest LOL
 

Attachments

  • IMG_20260411_163852056_HDR.jpg
    IMG_20260411_163852056_HDR.jpg
    213.8 KB · Views: 5
  • IMG_20260411_163126984_HDR.jpg
    IMG_20260411_163126984_HDR.jpg
    132.6 KB · Views: 5
  • IMG_20260411_163120954_HDR.jpg
    IMG_20260411_163120954_HDR.jpg
    180.9 KB · Views: 5
  • IMG_20260411_163115252_HDR.jpg
    IMG_20260411_163115252_HDR.jpg
    136.6 KB · Views: 5
  • IMG_20260411_163108928_HDR.jpg
    IMG_20260411_163108928_HDR.jpg
    154 KB · Views: 5
  • IMG_20260411_163108928_HDR.jpg
    IMG_20260411_163108928_HDR.jpg
    154 KB · Views: 4
  • IMG_20260411_163115252_HDR.jpg
    IMG_20260411_163115252_HDR.jpg
    136.6 KB · Views: 4
  • IMG_20260411_163120954_HDR.jpg
    IMG_20260411_163120954_HDR.jpg
    180.9 KB · Views: 3
  • IMG_20260411_163126984_HDR.jpg
    IMG_20260411_163126984_HDR.jpg
    132.6 KB · Views: 5
This is how I cut my stencil and the utility knife I used, the piece of tape joining the two sides of the slot for the wing blade hold the edges together so they don't flop around when I go to trace my line onto the engine guard cover. But other than that this stencil worked great for me as seen in the pictures in my previous post
 

Attachments

  • IMG_20260411_165007926.jpg
    IMG_20260411_165007926.jpg
    121.1 KB · Views: 1
  • IMG_20260411_165625815.jpg
    IMG_20260411_165625815.jpg
    114.9 KB · Views: 1
  • IMG_20260411_165620470.jpg
    IMG_20260411_165620470.jpg
    110.7 KB · Views: 1
My second attempt on the other side turned out much better. The whole in general for the blade is a little smaller than on the other side but barely noticeable.
 

Attachments

  • IMG_20260411_182827333_HDR.jpg
    IMG_20260411_182827333_HDR.jpg
    116.4 KB · Views: 3
  • IMG_20260411_182818672_HDR.jpg
    IMG_20260411_182818672_HDR.jpg
    153.5 KB · Views: 3
  • IMG_20260411_182805647_HDR.jpg
    IMG_20260411_182805647_HDR.jpg
    151 KB · Views: 3
Back
Top Bottom