Water Pump R&R Part 1, 2, 3

Joined
Dec 26, 2019
Messages
167
Age
70
Location
Bahama, North Carolina USA
Bike
2003 ST1300
Thanks to members on this forum, I've found a lot of info to help me with various things.
I thought I'd post an R&R thread on water pump repair to give a little back.
Check out these threads also:

Mine is a 2003 ST1300 without ABS.
I've customized it with Rostra Cruise, Electric Windshield, and XM & GPS through a mixer to Bluetooth transmitter.
Over the winter I noticed drips under the bike behind the front wheel. It looked like a mixture of oil and anti-freeze (It had the green AF).
I guess it was the cold and wear and time.
So recently I decided recently to dive in, and putting aside some other motorcycle projects, found the expected water pump "notification hole" was dripping AF & Oil.
Never a good thing !

The following are pictures of the work with some narrative geared for anyone who might be reticent about doing the job themselves.
It is not a difficult job, but you do need a few skills (or a friend to guide you) and a press does help.
I hope this helps. I find that seeing pictures helps make that translation between shop manual (always nice to have) and actual work.

Put the new bearing in the freezer overnight as it does make insertion easier.

PARTS: (Partzilla prices)
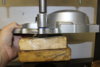
11394-MCS-010 - GASKET, FR. - Replacement part for 11394-MCS-00011$16.97
19217-MAL-300 - SEAL, MECHANICAL11$47.13
19226-MCS-000 - GASKET, WATER PUMP11$15.87
91201-965-000 - OIL SEAL (12X22X5) - Replacement part for 91201-148-00311$4.11
91301-MCS-A11 - O-RING (19.9X3.1)22$6.34
96100-62003-00 - BEARING (6200)11$10.66


1-Leaking from hole.JPG

Sad, trail of tears

2-trail of tears.JPG

Radiator removed and AF drained

3-Radiator removed - draining.JPG

4-Hose removed.JPG

Pump cover removed - showing Oring gasket

5-Water Pump cover removed.JPG

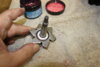
Orientation of pump impeller

6-Water Pump itself.JPG

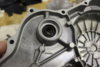
Pump assembly built into engine front cover

7-Water pump and shaft.JPG

Gasket remnants - Don't lose the two coolant tubes (not shown here) that go into the two top holes visible below

8a-Gasket remnants and internals.JPG

8b-Gasket remnants and internals.JPG

Remove carefully to avoid gouging the metal. Work slowly.


9a-Removing gasket remnants.JPG

Pencil points to RTV used in the area of the front engine cover where engine halves come together.

10a-RTV used where engine halves come together 2.JPG

10-RTV used where engine halves come together 1.JPG

Pressing out the pump from the shaft side

12-Pressing out the water pump.JPG

Yay - pump popped right out

13-Water Pump out.JPG


SEE PART 2 - (Limitation on number of attached pics)
 
Last edited:
CONTINUING from PART 1


Here you see the pump impeller side of the mechanical seal

14-Pump mechanical seal.JPG

I used the "nut and bolt technique to remove the bearing

15-Insert nut and bolt to remove bearing.JPG

I pressed the bearing out from the pump impeller side - goal was not to reuse the bearing

16-Press gently to remove bearing.JPG


Apply heat to the mechanical seal to soften the glue (seal is made that way)

17-Heat mechanical seal to loosen glue.JPG

Yay - seal was pressed out with no issues

18-Press mechanical seal out.JPG

Remove the inner oil seal (behind the bearing) with your fingers or pick

19-Remove inner oil seal with fingers.JPG


OK, Ready for new parts

20-Ready for new parts.JPG

Remove the old seal and white bearing with a pick


21-using a pick remove the rubber seal and white bearing.JPG

Clean out the area where the seal and bearing go

22-Clean the seal area.JPG

Seal parts are all ready to go

Start the install!

23-Parts ready to go 1.JPG

23-Parts ready to go 2.JPG

Order of parts from left (engine side) to right (pump side)
Bearing, Oil Seal, Mechanical seal, Rubber and ceramic seal

24-Order of parts.JPG

Mechanical seal is already pressed in on pump side, this shows the oil seal in position on the engine side - it will be pressed down into its boss by hand.


26-Oil Seal installed.JPG

Pump side seal and bearing installed

27-New Seal and bearing installed.JPG


CONTINUE ON TO PART 3
 

Attachments

  • 25-Pressing in mechanical seal.JPG
    25-Pressing in mechanical seal.JPG
    89 KB · Views: 39
CONTINUED FROM PART 2
PART 3 - FINAL

Don't forget the tubes for the coolant located at the top of the engine cover.
Mine were a bit crusty and certainly the ORings will require replacement too.
Part number is 91301-MCS-A11 - O-RING (19.9X3.1) Quantity 2.

28-Collars and ORings.JPG

Gently scraping reveals a build up of scale


29-See the crustiness.JPG

A bit of wire brushing removes the scale. I also used some 150 wet grit sandpaper as required.

30-Remove all the crustiness.JPG

My favorite gasket sealer is Gasgacinch. It is a contact cement that works well and usually comes off quite easily when needed.
It dries to a rubbery texture and you don't need much. Apply THIN coats to both sides of the gasket and parts.

Press the bearing in slowly and carefully as it has to go into its location in the front engine case as well as over the pump impeller shaft.
It's all a friction fit

31-My favorite gasket glue.JPG


Remember to use a bit of RTV for good measure where engine cases come together.


32-RTV where engine cases join.JPG


Place the coolant tubes in the front case - the Gasgacinch will hold them in.

Don't forget the engine block pin dowels that help align front cover to engine.

Gently place the front cover on the engine and install all the bolts.

Then add the water pump cover and yes, I use Gasgacinch on the ORing there too.

I torqued the bolts to 5.5 Ft/Lbs. No need to mash everything and risk stripping out holes or breaking bolts.

I changed the oil and filter and replaced the coolant with Honda blue premix from the Honda car dealer.

Added this: There are two bolts with crush washers on them on either side of the engine. They are coolant jacket drains. See below circled for the LEFT side.
I would suggest removing these and letting the old coolant drain out. Yes, it's a bit messy!
Use new crush washers when reinstalling - same as you would oil drain bolt.
Might as well get as much of the old stuff out as possible!

Good luck with your project.

Location of drain bolts in heads.PNG
 

Attachments

  • 26-Oil Seal installed.JPG
    26-Oil Seal installed.JPG
    94.5 KB · Views: 23
  • 27-New Seal and bearing installed.JPG
    27-New Seal and bearing installed.JPG
    126.4 KB · Views: 21
Last edited:
Thank you Nick for your generous contribution. Some of us haven't been down this road ..............yet. May I ask what you're odometer reads? Enjoy the fruits of your labor!
 
Hi Terminator. Mine has 175XX on the clock.
It hasn't seen a lot of riding since I've gotten it due to work, and a myriad of projects. Including those I mentioned in the first post.
Now that I'm retired that will change!
This is proof that just sitting around is hard on engines eh?
 
... you see that the pump shaft inserts into the driven gear when assembled, that would be second "bearing" as it were.
Noted that of course, still unclear if this is not a contributing source to wear on the mechanical seal due vibration, oscillation, lateral loads/movement, etc...
 
Noted that of course, still unclear if this is not a contributing source to wear on the mechanical seal due vibration, oscillation, lateral loads/movement, etc...

I totally see your point.
There is x amount of unsupported shaft from the front case shaft bearing to the actual impeller and the portion of the shaft that protrudes through the mechanical bearing is not supported. One would think that a certain amount of lateral movement would be induced due to road and engine vibrations.
 
Did you insert a straight edge between front cover & engine block,or just get lucky that the water pump ”driven” sprocket did not slide forward with pump & have chain fall off the back of clutch. When this happens you have to pull clutch to re-attach chain & driven sprocket. Another don’t ask me how l know.
 
As a somewhat impulsive, yet trepidatious DIY'er, this member truly appreciates your clear photos and relevant commentary.
I thank you for that.
I find in most cases, I have less trouble uninstalling things, with the back end refitting all of it to be my downfall. That's where I spend most of my time.
This post is going into my overweight bookmarks file.
 
Sadlsor, that was a good one, but don't fret.
I think the worst part is draining all of the antifreeze.

Take your time cleaning up the gasket materials and use a piece of cardboard with a drawing of the engine front cover.
Then poke the bolts into the cardboard in the same place they were on the bike.
Make sure the bolts are clean - some will usually get crusty. You can take a tap and chase the threads in the engine by hand if you like.
I use anti-seize on all bolts too.
 
Did you insert a straight edge between front cover & engine block,or just get lucky that the water pump ”driven” sprocket did not slide forward with pump & have chain fall off the back of clutch. When this happens you have to pull clutch to re-attach chain & driven sprocket. Another don’t ask me how l know.

Hey Jethro,
Yes actually I did - albeit very carefully not to damage the engine or cover gasket surfaces.
I used my trusty rubber mallet to whack the cover loose after removing bolts, then gently inserted a wide putty knife with electrical tape on it and wiggled.
The front cover came out straight and no issues with the chain.
Hmmm, maybe I did get lucky!
 
I have a couple questions….
Did you know there is a flat on the lower left engine cover designed to remove the cover?
No gasket sealant was to be used on the cover except at three and nine o’clock.
And most importantly, the water pump assembly must be replaced as a whole unit, the prop assembly should have been replaced as well as there was probably wear on the shaft where the bearings ride that may not be visible to your eyes.
Not replacing the unit as complete may mean your mechanical seal may go out again more sooner than later.
And lastly, did you make sure that you left no fingerprints on the white surface of the seals? Even film from a fingerprint can cause the seal not to bed in correctly.
The surface should be cleaned with denatured alcohol and a lint free towel, and not touched upon assembly.
Nice pictures, thanks for sharing.
 
There's a flat on the left side at the bottom that you can get behind with a dowel. There another place around 10 o'clock as you look at it from the front (meaning it is on the right side).

The Hondabond placement Larry is referencing is where the case joint is situated. IMO, you should consider using it anywhere you did or may have knicked the case scraping it. Some people use a thin layer on the whole thing for any gasket, anywhere. The factory definitely did the whole front cover gasket on my 05.
 
I have a couple questions….
Did you know there is a flat on the lower left engine cover designed to remove the cover?
No gasket sealant was to be used on the cover except at three and nine o’clock.
And most importantly, the water pump assembly must be replaced as a whole unit, the prop assembly should have been replaced as well as there was probably wear on the shaft where the bearings ride that may not be visible to your eyes.
Not replacing the unit as complete may mean your mechanical seal may go out again more sooner than later.
And lastly, did you make sure that you left no fingerprints on the white surface of the seals? Even film from a fingerprint can cause the seal not to bed in correctly.
The surface should be cleaned with denatured alcohol and a lint free towel, and not touched upon assembly.
Nice pictures, thanks for sharing.


Hi Igofar.
Yes, I saw the flat spot you mentioned to facilitate separation of the cover. Thanks for mentioning that.
I did not replace the impeller due to the low mileage and the press fit of shaft into bearing.
I suppose time will tell if I get lucky or not.
Interesting, I've never heard of cleaning the white bearing surface on the impeller side. How did you learn that?
You would think the Honda service manual would mention something like that - I've also done water pumps on other bikes and that was never mentioned.
The Honda crf250l dual sports have a common mechanical seal leak issue (search forums) and dealerships have been replacing them at an alarming rate from 2014 and up.
Honda Wrench finally printed the procedure in their publication that goes to the techs, advising them to wear new latex gloves and not to touch the seals with your bare hands. And to wipe off both parts with denatured alcohol etc.
The memo from Honda states that if the weep hole leaks after 600 miles that the seal never mated correctly. And the entire unit as a whole needs to be replaced.
I own a 2014 that the dealer replaced the seal 4 times on, only to have start leaking within a few hundred miles. Dealer just tried to use it’s ok they all do that.
I received the article, used the alcohol and no more leaks.
Been doing seals like that since I started following this advice, and have not had any leaks since.
I have tried replacing bearings and seals without the prop as you did with not so good, mixed results.
I hope your results are good.
 
Last edited:
The Honda crf250l dual sports have a common mechanical seal leak issue (search forums) and dealerships have been replacing them at an alarming rate from 2014 and up.
Honda Wrench finally printed the procedure in their publication that goes to the techs, advising them to wear new latex gloves and not to touch the seals with your bare hands. And to wipe off both parts with denatured alcohol etc.
The memo from Honda states that if the weep hole leaks after 600 miles that the seal never mated correctly. And the entire unit as a whole needs to be replaced.
I own a 2014 that the dealer replaced the seal 4 times on, only to have start leaking within a few hundred miles. Dealer just tried to use it’s ok they all do that.
I received the article, used the alcohol and no more leaks.
Been doing seals like that since I started following this advice, and have not had any leaks since.
I have tried replacing bearings and seals without the prop as you did with not so good, mixed results.
I hope your results are good.

Aha! Thank you for this.
I'm sure there are a lot of other Honda knowledge items that don't readily get disseminated.
At least if mine begins leaking again, I'll know why.
 
Noted that of course, still unclear if this is not a contributing source to wear on the mechanical seal due vibration, oscillation, lateral loads/movement, etc...

Dude has 175k on his bike. Me personally would expect water pump seal to go, hahha
 
Back
Top Bottom