A review and some pics would be greatly appreciated.its in the mail headed to me now!

Windscreen motor gear replacement parts and introduction.
- Thread starter 2mnb
- Start date
OP
OP
For sure!
Hi everyone
You some choice to repair. But I will tell you: this gear is really hard material. You will have problem to cut or mill it.
Of course it’s possible to turn off the gear and weld new material on it. After you have to mill the gear again.
This is a expensive option.
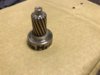
this you should now about my 3D-printed gear: it looks like brass/bronce but it is a special alloy steel (make the magnet test). The gear is also very hard, nearly equal to the origin. I optimzed also the gear teeth too.
You some choice to repair. But I will tell you: this gear is really hard material. You will have problem to cut or mill it.
Of course it’s possible to turn off the gear and weld new material on it. After you have to mill the gear again.
This is a expensive option.
this you should now about my 3D-printed gear: it looks like brass/bronce but it is a special alloy steel (make the magnet test). The gear is also very hard, nearly equal to the origin. I optimzed also the gear teeth too.
Said to hear and it was in my spam folder. :-(Lucky you. Maybe my email to him went to his spam folder.
Could you send it again?
OP
OP
Larry! Good to chat On the phone with you. Here is my email. Mc55806@gmail.com
@PANik I know this thread is a couple years old, but are you still making theses gears? I just had one go out on me.Hi everyone
You some choice to repair. But I will tell you: this gear is really hard material. You will have problem to cut or mill it.
Of course it’s possible to turn off the gear and weld new material on it. After you have to mill the gear again.
This is a expensive option.
this you should now about my 3D-printed gear: it looks like brass/bronce but it is a special alloy steel (make the magnet test). The gear is also very hard, nearly equal to the origin. I optimzed also the gear teeth too.
There is a full replacement kit available now. https://www.st1300-accessories.co.uk/product-page/screen-mech-repair-kit?fbclid=IwAR0UhvAbtMM8NfGzZ_LpdN37QUbceXlp1s1MnG6ce1IiSZF8dwY1jtBOP6o@PANik I know this thread is a couple years old, but are you still making theses gears? I just had one go out on me.
Here's the thread: https://www.st-owners.com/forums/threads/bike-quip-screen-mech-repair-kits-now-available.182103/
and @SupraSabre has installed one here: https://www.st-owners.com/forums/threads/2004-1-re-re-store-project.163011/post-2403199
Thanks for the information. Kit ordered.There is a full replacement kit available now. https://www.st1300-accessories.co.uk/product-page/screen-mech-repair-kit?fbclid=IwAR0UhvAbtMM8NfGzZ_LpdN37QUbceXlp1s1MnG6ce1IiSZF8dwY1jtBOP6o
Here's the thread: https://www.st-owners.com/forums/threads/bike-quip-screen-mech-repair-kits-now-available.182103/
and @SupraSabre has installed one here: https://www.st-owners.com/forums/threads/2004-1-re-re-store-project.163011/post-2403199
@Steviebilbo thanks for making these parts available. Great help!!
I have one of these kits on the shelf,,, ready for install this winter repair season. If you are planning on installing yours soon after arrival,,, start planning now on how you will secure the ferules. Hydraulic crimper,,, epoxy adhesive,,, mechanical crimper,,, I have not decided yet. cheers,, CAt'Thanks for the information. Kit ordered.
- Joined
- Feb 11, 2006
- Messages
- 9,661
- Location
- Jacksonville
- Bike
- GL1800 R1200RT NC700
- 2024 Miles
- 010688
- STOC #
- 6651
I stood by watching while Ashley installed this kit on his 2004. I can't really say I helped but I did bring over the crimper that he used - an Ancor double crimp racheting tool. It's one of those tools I bought for a project long ago and still comes in handy every so often.I have one of these kits on the shelf,,, ready for install this winter repair season. If you are planning on installing yours soon after arrival,,, start planning now on how you will secure the ferules. Hydraulic crimper,,, epoxy adhesive,,, mechanical crimper,,, I have not decided yet. cheers,, CAt'
I have a couple different crimpers already in my collection. I was thinking about crimping and epoxy, but I won't know for sure until I get the new parts. I'll post back when its done. I ride year round, so I don't have "winter" season to wait for repairs.I have one of these kits on the shelf,,, ready for install this winter repair season. If you are planning on installing yours soon after arrival,,, start planning now on how you will secure the ferules. Hydraulic crimper,,, epoxy adhesive,,, mechanical crimper,,, I have not decided yet. cheers,, CAt'
Andrew Shadow
Site Supporter
Dave:I stood by watching while Ashley installed this kit on his 2004. I can't really say I helped but I did bring over the crimper that he used - an Ancor double crimp racheting tool. It's one of those tools I bought for a project long ago and still comes in handy every so often.
Do you mean the type ratcheting crimpers that are used on electrical connectors?
I am familiar with the Swagelock type of ferrule crimpers that are much more heavy duty and robust. I thought of a ratcheting electrical connector crimper and was wondering if they would be able to crimp a ferrule of this type sufficiently, keeping in mind that I have never seen this ferrule so I don't know how much force is needed to crimp it. If standard ratcheting electrical connector crimpers can do the job, that's certainly good to know.
The kit's builder highly recommends a hydraulic crimp. I will do a magnet check on the furrel's later today,, but they look to be alloy,, and could be stainless. I think that Supra just epoxied his on. I can't believe that something like this wouldn't get the job done. But I will see if I can find a more cost effective solution. I look forward to your good results,, cheers,, CAt'If standard ratcheting electrical connector crimpers can do the job, that's certainly good to know.
20 in. Cable Crimping Tool (princessauto.com)
Andrew Shadow
Site Supporter
Princess Auto has a hydraulic hose fabrication shop in just about every store. Why not just bring it in and let them crimp it with the fancy heavy duty crimpers that they have for hydraulic fittings- if they have a suitable size dye of course.
- Joined
- Feb 11, 2006
- Messages
- 9,661
- Location
- Jacksonville
- Bike
- GL1800 R1200RT NC700
- 2024 Miles
- 010688
- STOC #
- 6651
This tool is sold to crimp electrical connections and that is what I typically use it for. The wire cables and ferrules in the repair kit are very small diameter and I think long handled Swagelock single action crimpers would be overkill. I’m familiar with Swagelock fittings from my sailboat rigging days. I contacted Ashley and he may end up contributing his experience.Dave:
Do you mean the type ratcheting crimpers that are used on electrical connectors?
I am familiar with the Swagelock type of ferrule crimpers that are much more heavy duty and robust. I thought of a ratcheting electrical connector crimper and was wondering if they would be able to crimp a ferrule of this type sufficiently, keeping in mind that I have never seen this ferrule so I don't know how much force is needed to crimp it. If standard ratcheting electrical connector crimpers can do the job, that's certainly good to know.
I finally got the new parts installed this weekend. First of all big thanks to @Steviebilbo for making the kit. The buying experience was excellent, and parts arrived faster than expected from UK to San Diego.
Hardest part of the job is just getting the tupperware off for access. After that, its all a piece of cake.
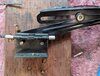
Regarding the ferrules. They are small, about 6mm in diameter to start with, made of some alloy. I initial used a Channel Lock 909 to crimp them down. The ferrule was long enough to crimp three separate times. I was able to squash the ferrule without too much problem. The only disadvantage of this method is it make the ferrule larger in one dimension since it is not being crimp "all the way around" as it would with a proper die or ferrule crimper.
I decided to crimp it more with a large pair of vise grips which was even easier than the 909. For the second one, I used the 909 to set the initial crimp for the position, and then finished it off with the vise grip. They are not going to come off.
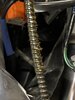
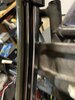
I did have to file down the larger dimension so that the crimp would slide down the rail. There is a note included in the instructions about a 4mm ferrule and enssuring a small enough size. Not sure why I received 6mm, but in the end, it all worked out fine. See attached pics.
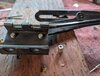
Ready to install
Ferrule is on, cable is tight in the slide block
prior to any criming
1st crimp with 909
crimped twice with 909. Windshield bracket was removed from sliding block for better manuverability

After 909 crimps

After vise grip crimp
After vise grip 2nd image
on the bike, ferrule has been filed to fit inside rail.
Channel Lock 909

Large vise grip. lots of leverage.
Hardest part of the job is just getting the tupperware off for access. After that, its all a piece of cake.
Regarding the ferrules. They are small, about 6mm in diameter to start with, made of some alloy. I initial used a Channel Lock 909 to crimp them down. The ferrule was long enough to crimp three separate times. I was able to squash the ferrule without too much problem. The only disadvantage of this method is it make the ferrule larger in one dimension since it is not being crimp "all the way around" as it would with a proper die or ferrule crimper.
I decided to crimp it more with a large pair of vise grips which was even easier than the 909. For the second one, I used the 909 to set the initial crimp for the position, and then finished it off with the vise grip. They are not going to come off.
I did have to file down the larger dimension so that the crimp would slide down the rail. There is a note included in the instructions about a 4mm ferrule and enssuring a small enough size. Not sure why I received 6mm, but in the end, it all worked out fine. See attached pics.
Ready to install
Ferrule is on, cable is tight in the slide block
prior to any criming
1st crimp with 909
crimped twice with 909. Windshield bracket was removed from sliding block for better manuverability
After 909 crimps
After vise grip crimp
After vise grip 2nd image
on the bike, ferrule has been filed to fit inside rail.
Channel Lock 909
Large vise grip. lots of leverage.
Well it seems I'm in a similar boat. This morning on the way to work my screen did the twist.
I've got her apart tonight and it looks like everything needs a REALLY good cleaning as it's got 20 years of OEM grease and crud in there. (I guess I really should have done some preventative maintenance on it had I known how stiff it was...)
One side moved well-ish and the other (the micro switch side) seemed to stick in a spot or two throwing it off kilter.
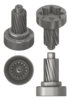
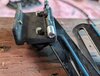
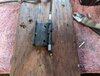
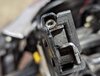
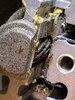
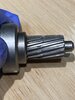
The gear appears OK but I haven't taken it fully apart yet. (The photo attached is crappy and looks better to the eye and after some cleaning (not disassembled yet.)
The cables seem to have a plastic coating, some of which is frayed, unless it's just more crud on them.
If it stuck and jumped a gear or the cable twisty part, then the gear could be damaged. More R&R and investigation is needed.
I've got her apart tonight and it looks like everything needs a REALLY good cleaning as it's got 20 years of OEM grease and crud in there. (I guess I really should have done some preventative maintenance on it had I known how stiff it was...)
One side moved well-ish and the other (the micro switch side) seemed to stick in a spot or two throwing it off kilter.
The gear appears OK but I haven't taken it fully apart yet. (The photo attached is crappy and looks better to the eye and after some cleaning (not disassembled yet.)
The cables seem to have a plastic coating, some of which is frayed, unless it's just more crud on them.
If it stuck and jumped a gear or the cable twisty part, then the gear could be damaged. More R&R and investigation is needed.
Sadlsor
Site Supporter
- Joined
- Jan 15, 2020
- Messages
- 4,254
- Age
- 66
- Location
- Birmingham, Alabama
- Bike
- 2008 ST1300A
- STOC #
- 9065
I'm jealous of my magic windscreen, so I'll definitely check my 2008 this winter and clean and lube it.
And I know not to move it at speed, so I wait till I'm under 20mph or stopped.
What is the recommended lube for the cables, anyone?
And I know not to move it at speed, so I wait till I'm under 20mph or stopped.
What is the recommended lube for the cables, anyone?
FYI I was stopped when it went askew on me so wind resistance wasn't really an issue.I'm jealous of my magic windscreen, so I'll definitely check my 2008 this winter and clean and lube it.
And I know not to move it at speed, so I wait till I'm under 20mph or stopped.
What is the recommended lube for the cables, anyone?
The blocks the screen mounts to in the channels are extremely hard to move by hand. I'm really surprised how easily they seemed to move by the gear drive in comparison.
I'd guess this is the primary reason most peoples fail. Stress on, or sticking of the sliders that move is transferred via the cable and results in the worm gear being damaged.
That stress could be exacerbated by airflow at speed but don't think that's the primary cause.
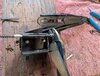
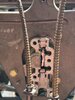
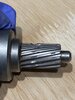
Upon closer inspection the winner is......
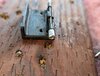
In 1st place the gear.
In a decent 2nd place were the tracks that were covered in crud that rivaled 30 year old tree sap.
The gear is chipped in two spots and otherwise damaged around the rest of the diameter in line with one chip. The damaged area closer to the base is where the cable runs for the offending side that was out of whack.
I've seen worse here though. Now to decide what to do...... fix it with new, see if I can find a used one and hope it's decent, see if this is salvagable or reassemble as it, unplug the motor and go with a static positioned screen for a bit.