1990 Pan (sympathetic) restoration

ST1100Y

Site Supporter
Joined
Dec 4, 2012
Messages
5,036
Age
59
Location
Vienna, AuSTria
Bike
ST1100Y, ST1100R
STOC #
637
I’ve got the Honda workshop manual - it’s worth it’s weight in gold!
My sentiments exactly...
(Got the CB500/550-4, NT700VA, ST1100/A/P, ST1300...)

According to the two bolts, the LHS downpipe had already been replaced once... (they're only present '96 onward...)

And about those (graphite?) muffler packing's: lots of copper slip will ease the job :cool:
(owned a '92, refurbed a '94 and a '96, runing a '00... tinker on my GF's NT700, etc...)
 
OP
OP
Joined
May 21, 2023
Messages
63
Age
44
Location
Rossendale, UK
OP
OP
Joined
May 21, 2023
Messages
63
Age
44
Location
Rossendale, UK
According to the two bolts, the LHS downpipe had already been replaced once... (they're only present '96 onward...)

And about those (graphite?) muffler packing's: lots of copper slip will ease the job :cool:
(owned a '92, refurbed a '94 and a '96, runing a '00... tinker on my GF's NT700, etc...)
Thanks for the info - I figured it was fairly solid for a 33 year old collector box! I was hoping to keep the original system on - but the chrome flanges at the cylinder head (through which the studs sit) are just red rust - and because they’re cosmetic (more so than an inline four) and not replaceable I’m still hoping to make use of the stainless system I’ve picked up.
 
Joined
Feb 25, 2016
Messages
4,781
Location
Northumberland UK
Bike
VStrom 650
like these (but not actually these)?


they look similar to the silencer gaskets - hoping I can find some repro ones the right size!

They sell them on ebay with new clamps too.
 
Joined
Feb 25, 2016
Messages
4,781
Location
Northumberland UK
Bike
VStrom 650
OP
OP
Joined
May 21, 2023
Messages
63
Age
44
Location
Rossendale, UK
couple of quid cheaper than Honda too!

i was thinking about the need for a seal between the down pipes and motad collector box - does yours have graphite in there too?
 
OP
OP
Joined
May 21, 2023
Messages
63
Age
44
Location
Rossendale, UK
So, whilst I’m not able to spend money at the moment, I’m happy to plan how to spend it, which is the next best thing, right?

Exhaust bits aside, I’ve got an extensive list of stuff on my whiteboard which, it seems, isn’t big enough….

IMG_5803.jpeg

I’m still undecided about what to do with the swingarm - scrap it, sand and prime it or get it powder coated (assuming it’s salvageable - i’ll cross that bridge down the line!). Everything else that’s black or silver I’m spraying myself, which im happy with doing.

The one thing I’ve not refurbished before is a petrol tank. The one on the bike was rusty inside, so I picked up this spare, with pump, in that local job lot.

IMG_5796.jpeg

I know that with careful prep I can turn this something quite passable. My plan is to take the rusty bits back to metal, prime then spray over. However, I’m not sure what this blue stripe is - I’m hoping it’s just Honda’s original primer or sealant between different sections of the tank, to prevent rusting at a junction, and not anything sinister. I also hope it can be overpainted!

IMG_5797.jpeg

My other issue is the pump itself…

The ‘old’ pump looks very clean and ‘golden’ from the outside - almost like new.

IMG_5798.jpeg

However, the internals aren’t in great condition and I broke the thick internal pipe when I removed it and couldn’t see what was going on inside the tank. In my defense I’ve not come across a fuel pump connected to the inside of a tank before now…..

IMG_5799.jpeg

IMG_5800.jpeg

The ‘new’ pump looks very tarnished from the outside but (pending carefully removing to check) should be clean inside.

my dilemma is this…

I’d like to put the internals from the new pump onto the body and frame from the old pump. Looking at them, this should be quite easily doable! However, the internal arm on the old pump has a fine film of rust on it, and, whilst I can clean it off (it’s quite thin) I’m concerned about sticking that in my tank for it to rust again.

Do I bother? If so, would the pump arm need treating or just cleaning up - it’s going to be sat in petrol so may not rust quickly, but over time….?

Something to think about at least. Need to go now, apparently the cat needs to be fed!
 
Last edited:
OP
OP
Joined
May 21, 2023
Messages
63
Age
44
Location
Rossendale, UK
Congrats on the new project. And what a project it will be! Been there, done that, several times! :thumb:

I'd look into some engine compression and leak down numbers before you go any further. This way you'll know if you have a healthy base to work with, and/or how far you're willing to go...
thanks!

a compression gauge isn’t something I’ve got - Im working on the principle that it was *probably* put away fine…tbh I’ve never used one - and now all I can think of is leaky valves and worn rings….

The MOT history matches the mileage (29k), the plugs look totally corrosion free and are a healthy colour. The oil is a little darker than I’d like and needs changing (no service history so I it could have been well overdue). The clutch is dragging - I’ll drop it, free the plates and rebuild it in course.

would one of the cheap eBay gauge kits suffice, or are motorcycle-plug specific kits needed?
 
OP
OP
Joined
May 21, 2023
Messages
63
Age
44
Location
Rossendale, UK
I’ve spent hours this week hiding in the garage, drinking many cups of tea and weighing up what to tackle first.

I’d already taken the seized calipers off, removed the paraphernalia besides the pistons and left them soaking in my Dad’s paraffin bath last week. He sent me a message a couple of days ago to say he’d released all the pistons using a grease gun - a less explosive and more controlled method than an air compressor.

The next development was Mrs Goblin asking what I’d like for Father’s Day from our goblin horde. This was a most unprecedented situation, and one I quickly capitalised on. Shunning the traditional oversized bar of Toblerone, socks and the desire for a day of peace and quiet I worked out what I needed the least of to get as much done as possible, and set about ordering brake seals, fork seals, fork fluid, three tins of zinc primer and four tins of satin black paint….

Spurred into action with a clear starting point, I had another couple of cups of tea whilst tidying up my workbench and repairing my air compressor line (next Father’s Day I’m asking for a rubber airline rather than these silly brittle coiled ones). Then, with a tidy bench and working compressor I decided to start stripping the replacement forks I’d bought.

IMG_5850.jpeg

I’d not properly looked at them, even when I bought them - I was only really interested in the stanchions themselves, which are considerably better than my rusty legs.

The first thing I noticed was the bonus front wheel spindle, bolt and speedo unit hiding through the top yoke! That lot I bought just keeps giving!

IMG_5855.jpeg

Next,the sheer volume of tar-brushed black paint became obvious. Bolts, anti-dive unit, even under one fork dust cap. It’s going to take some shifting….

IMG_5857.jpeg


IMG_5859.jpeg

Now, splitting fork legs, even on newer bikes, is always a ‘fingers crossed’ moment. With the left fork bottom in the in the vice I set to work shocking all the bolts to loosen them by putting a 3/8 Allen socket in and tapping firmly with a hammer. The anti-dive ones were a big concern - tiny Allen key on a bolt with a relatively big contact area means they can seize really easily, resulting in a chewed head. I was thinking all this, along with ‘how am I going to free this if it’s made of putty’ as I tentatively turned the first bolt. It was tight….gummed up with paint…but moved! The other three followed in the same way, and the unit came out.

IMG_5866.jpeg

Next, the 10mm fork bottom drain plug bolt came easily enough. Tipping the leg into a bucket revealed what I expected……

IMG_5863.jpeg

Lastly, the damper bolt at the bottom. If anything’s going to snap, or round off, it’s this. Back in the vice I used a long Allen socket to shock the bolt again before holding my breath and going for it…

IMG_5865.jpeg

…successfully! Bloody tight, but it came easily enough. Relieved, I set at the second leg, which went pretty much as the first.

Realising at that point I need a 17mm Allen socket to remove the top caps, and feeling I’d pushed my luck enough for an evening, I pumped as much fluid as possible out of both legs into a bucket, and left them to drain into a shallow tray overnight.

IMG_5867.jpeg

Hopefully I’ll get them split today, then I can start stripping the paint off ready for assessment and refurbishment!

Mike
 
Last edited:

Sadlsor

Site Supporter
Joined
Jan 15, 2020
Messages
4,289
Age
66
Location
Birmingham, Alabama
Bike
2008 ST1300A
STOC #
9065
I have to wonder, what sort of mindset would think painting those parts was ever a good idea?
And then I realize I probably don't wanna know.
You are well into a tedious and painstaking labor of love. And time.
Thanks for the update!
 
OP
OP
Joined
May 21, 2023
Messages
63
Age
44
Location
Rossendale, UK
This morning I decided to look at removing the fork caps. I don’t have a 17mm Allen key socket, so I knew I’d have to be creative.

Digging around various boxes of bits I found a 17mm bolt and a couple of nuts. Perfect! From here the plan was simple - wind the two nuts down the bolt, lock one tight against the other, turn it over and use the bolt head as a 17mm Allen key, levering the lower nut with a spanner.

IMG_5870.jpeg


Normally I’d always loose fork caps on the bike - nothing holds fork legs as tightly as the yokes! As these are a loose set, I put them back in the spare yokes and worked horizontally on the bench.

It worked perfectly on the left leg - the top cap loosened easily within 10 minutes of starting.

The right leg, it soon came clear, would need something different - it was tighter than a tight thing, and the bottom nut started winding the top nut (already a tight locknut) off.

I dug around and found a third nut to tighten everything together, and, alarmingly, I felt like the whole 10mm bolt shaft was twisting.

IMG_5871.jpeg

Whilst digging through my spares/salvaged bits box (we all have at least one) earlier I’d found what I think was a pivot bolt of some kind off a GSXR I used to own. 17mm head but with a short thick pivot and a short thread I dismissed it at first. However, a minutes work with the bench grinder put a flat edge either side of the shaft, allowing me to get a big pair of adjustables on.

IMG_5876.jpeg

Bingo! It was still tight, but came with a crack. I don’t know what ape tightened it last, but there was no need for it to be as bad as it was!

IMG_5873.jpeg

Feeling relieved I decided to call it a day and go and make a brew. Whilst wiping everything down I noticed the big needle roller for the anti-dive unit in the left fork leg didn’t look too healthy…

IMG_5877.jpeg

Gummed up with paint, missing at least two rollers that I can see and rusty as hell. It’s knackered.

A replacement Honda bearing is about £30, which I’m loath to spend right now. To keep the project moving I’ll instead investigate refurbishing the ‘original’ fork bottom. The roller seems perfect in it, and the leg needs removing at some point anyway - I just hoped I could get a refurbished pair of legs ready to one side and didn’t want to keep the bike strapped to a bench without a front end in for too long, but it’s nothing a jack under the engine and strap around the rear wheel won’t solve!

And yes, I’m ordering a 17mm Allen key socket! I’ll need it for for reassembly anyway…and for the swingarm, which keeps looking at me in a menacing fashion….
 
Last edited:

Sadlsor

Site Supporter
Joined
Jan 15, 2020
Messages
4,289
Age
66
Location
Birmingham, Alabama
Bike
2008 ST1300A
STOC #
9065
@GrumpiestGoblin I am convinced this ST will be forced to bend to your will.
Sure, it will put up a fight, and use sneaky underhanded tactics to thwart you, but your persistence will be rewarded in the end.
I don't do pom-poms, but we're cheering for you and your ultimate victory.
Winston Churchill was not known to be God's gift to motorcycle mechanics, but he had some good thoughts that can be appropriately used in this crusade.
 
OP
OP
Joined
May 21, 2023
Messages
63
Age
44
Location
Rossendale, UK
Small update this evening!

I spent a while in the garage a couple of days ago writing an in-order to-do list on my whiteboard. I’ve spent so long putting off actually ‘getting started’ (even though I’ve got this far) and just tinkering around the edges that I realised I needed to just write it down, start at the top and work down.

Job 1 was remove the exhaust. It was as difficult as I expected it to be! I removed the right hand downpipe first. It was very, very tight at the collector box, so I pried the segments of the joint open slightly, and managed to release it. I turned out I didn’t need to be careful - it’s got a great big hole in it and is scrap!

IMG_5919.jpeg

At least I’ve got that stainless Motad system I picked up to fall back on.

Now, I don’t know if it’s normal, but the only way I could manipulate the silencers was to remove the aluminium footrest plates from each side first. They had to come off soon anyway, I’ve got a cunning plan to polish them up quickly….

With these removed I could twist, wiggle and will the silencers off. They’re actually both solid and will spray up to an acceptable level.

IMG_5943.jpeg

With both silencers off I could then get the left hand downpipe off. No one prepared me for having to manoeuvre it through the centre stand! It took a bit of head scratching, but I got there.

Now I could see the real project more clearly!

IMG_5946.jpeg

IMG_5945.jpeg

Nothing sharpens your focus on a project like removing the dead wood….

Unfortunately, the swingarm hasn’t gotten any prettier in the light of day. I just hope I can salvage it, as the summer holidays are fast approaching, and I’ll have to put off replacing it until the autumn if can’t bring it back from the brink.

IMG_5941.jpeg

IMG_5939.jpeg

IMG_5942.jpeg

the shock spring isn’t looking too healthy either!

IMG_5940.jpeg

Anyway, tomorrow I’m hoping to get the radiator off, get the clutch plates out, drop the front end out and remove the rear caliper. In readiness I elected to drain the oil tonight and leave it dripping overnight.

IMG_5959.jpeg

It’s a lot darker than I’d like, slightly burned smelling but it’s not milky, which is good.

I’ll save the ‘what oil should I use?’ question for another day…..

Mike
 

ST1100Y

Site Supporter
Joined
Dec 4, 2012
Messages
5,036
Age
59
Location
Vienna, AuSTria
Bike
ST1100Y, ST1100R
STOC #
637
And yes, I’m ordering a 17mm Allen key socket! I’ll need it for for reassembly anyway…
I wonder why folks slam those fork caps on so tight...
That's an O-ring seal, I do them finger tight till the head touches the tube-rim... since the upper clamp squeezes the tube slightly oval they won't go anywhere...
 
OP
OP
Joined
May 21, 2023
Messages
63
Age
44
Location
Rossendale, UK
I wonder why folks slam those fork caps on so tight...
That's an O-ring seal, I do them finger tight till the head touches the tube-rim... since the upper clamp squeezes the tube slightly oval they won't go anywhere...
i think it’s part overtightening, part the spring inside being under compression as the cap winds down. Still, it was damn tight! I’ll be loosening my original pair before taking them off the bike today for sure
 

Sadlsor

Site Supporter
Joined
Jan 15, 2020
Messages
4,289
Age
66
Location
Birmingham, Alabama
Bike
2008 ST1300A
STOC #
9065
I wonder why folks slam those fork caps on so tight...
That's an O-ring seal, I do them finger tight till the head touches the tube-rim... since the upper clamp squeezes the tube slightly oval they won't go anywhere...
I had never equated fork tube caps with an oil filter, but that's how I tighten all my oil filters.
Hand right, another fraction of a turn, and done. I've never lost an oil filter when I change my oil, and I don't have to risk a hernia the next time I remove the filter.
But I have had to pierce pre-existing oil filters at the first oil transfusion, and endure other histrionics on several of my pre-owned vehicles, 2-wheeled or 4.
 
OP
OP
Joined
May 21, 2023
Messages
63
Age
44
Location
Rossendale, UK
Made quite a bit of progress on Project Pan today!

Managed to sneak an hour or so in the garage this morning before Mrs Goblin and the goblin horde took me out for an early fathers’ day meal.

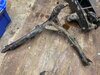
Before we headed out I managed to remove the clocks and fairing A-frame. It’s in good condition, but I’ll tidy it up a bit before it goes back on.

IMG_5988.jpeg

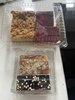
We returned with cake from the local Polish bakery, so a pre-garage session brew-and-cake was requisite. Would have been rude not to! Gotta love having Polish heritage…

IMG_6001.jpeg

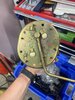
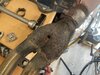
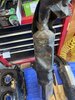
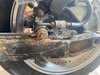
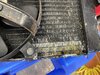
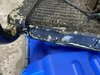
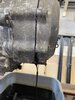
Now full of tea and cake, and with no other commitments for the day, I resolved to get stuck in. First up, the radiator! After fighting the cheesed-on hoses, using a bit of silicone spray to assist, I managed to eventually get the rad off.

IMG_6025.jpeg

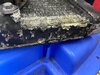
It’s every bit as ugly as I expected.

That cheesed-solid section to the bottom right has me concerned the core may have rotted. Another worry is the state of the top and bottom edges of the core - they seem to have swollen and delaminated like thick tin foil. If anyone has any advice here, please let me know!

IMG_6026.jpeg

IMG_6027.jpeg

IMG_6028.jpeg

Putting the radiator to one side for now I pressed on with my list. Knowing my aim was to get the front end out today, I took the handlebars and ancillaries off, which took longer than expected as I stopped to photograph every cable and hose route in detail. I know they’re in the workshop manual, but photos show bolts too, which is VERY useful come reassembly time!

Next, I set to loosening every bolt I might need to put weight on at some point, whilst the front wheel was still in. Wheel spindle, forks, steering stem bolt frame rail… anything that might destabilise an unstable bike sitting two feet off the floor on a workbench.

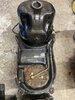
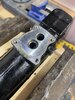
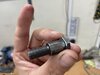
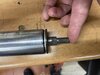
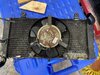
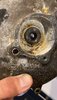
The next job was to take out the three bolts holding the clutch slave cylinder into the cover. Now, it’s worth pointing out the clutch didn’t work on the bike when I brought it home. I figured it might need bleeding, but thought taking a look was prudent. I also wanted to remove the clutch cover and give it a good polish.

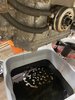
The slave cylinder took half an hour, with a rubber mallet and careful prying (without damaging the seat!) to remove. What I found shows bleeding it was the least of my concerns….

IMG_6042.jpeg

IMG_6043.jpeg

IMG_6044.jpeg

IMG_6045.jpeg

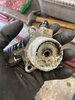
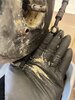
Yummy! I guess that’s why the clutch didn’t work…

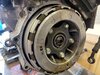
Another half an hour and I had the clutch cover off (it was gummed on and incredibly tight on the dowel pins). The good news is the clutch itself looks pretty mint.

IMG_6046.jpeg

IMG_6048.jpeg

At this point I stopped for a brew, and while doing so dropped a whole £4 on a 17mm hex socket via eBay to loosen the fork tops.

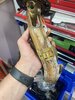
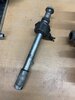
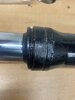
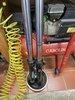
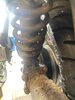
I then, being impatient, immediately grabbed Goblin tool mk1 from the other day, a 17mm spanner and a fork stanchion from a CB900 Hornet (a previous restoration, ultimately really disappointing and quickly sold) and did this…

IMG_6057.jpeg

…to quickly loosen both caps. I promise I’ll use the proper socket when it arrives! Fork tops loose I then removed the ignition barrel and popped the top yoke off.

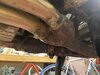
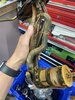
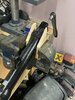
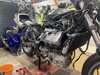
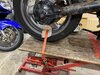
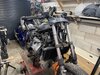
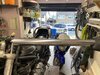
Sensing victory was near I put a jack under the engine, with a piece of wood, and gently lifted the front of the bike until the back wheel came against the bench…

IMG_6067.jpeg

…before ratchet-tying the wheel to the bench frame itself as some insurance should the jack go down for any reason.


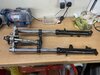
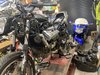
the front end could then come out

IMG_6070.jpeg

I was very pleased I’d loosened those bolts earlier - putting weight down on them with the bike like this would be tempting fate. It’s pretty solid - It’s the way I’ve done front ends for years now. I do have a headstock paddock stand for fork removal, but it doesn’t work if you need the yokes out too.

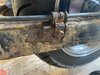
The last job tonight was to remove the left frame rail ready for prep and paint..

IMG_6088.jpeg

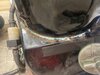
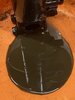
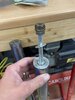
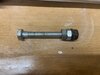
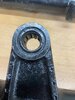
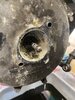
Before tidying up I investigated the clutch cover oil seal. It looked a bit iffy…careful prodding confirmed this. It’s cheap to replace - I just hope the cover isn’t too badly corroded where it sits.

11D0F39A-2E52-4D32-A60D-0B36E6C2A22D.jpeg

6A7686F0-E327-4140-B96F-1189793C3CA8.jpeg

1A4AFC6E-2FEF-4758-BF6E-FBAD5F693089.jpeg

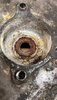
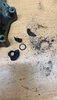
It had glued itself in and was utterly knackered.

Anyway, having neglected The Horde for a day, I tidied up and retired for the evening for a well deserved beer and a game of Yahtzee

70872520962__EB2D9C81-2515-4394-92C8-58752FC606B4.jpeg

Yes, I’m also a board game geek, I make no apologies!

Off to see my dad tomorrow. It’s Father’s Day after all. And he has a paraffin parts washer….

Mike
 

Attachments

Top Bottom