Due to work commitments over the last few weeks progress has been slow, but steady! I’ll try to keep this update brief (ish)… and hopefully in order (although time gets freaky when you’re into a rebuild!)
With the front end out I could start some more concerted work. ‘Repair, Rebuild, Replace’ was my Dad’s mantra, and it’s served me well so far. I’ve managed to strip and refurbish everything I’ve worked through so far, which is positive, and have a significant stash of new seals and bolts squirrelled away ready for reassembly.
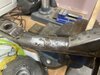
Lets start with the frame. As I simply can’t afford to get it powder coated, I’ve opted for the budget option - sanding it back to good metal, priming and spraying with hammerite gloss black.

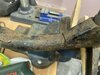
The left-hand frame rail received the same treatment - it wasn’t pretty to begin with.


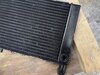
I then looked at the radiator. It’s in poor condition, and may still get replaced with a stainless pattern one before I put all the plastic back on. I’m still weighing that one up, but, for now, it looks much better….
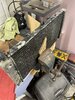
I actually cleaned all the corrosion off using a brass wheel before priming and painting it outside.
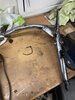
The bottom yoke cleaned up nicely and was sprayed in the same way.
You may have noticed there’s a pattern developing - I’ve been saving up all the spraying to do as close together as possible.
You may have noticed there’s a pattern developing - I’ve been saving up all the spraying to do as close together as possible. Unfortunately the weather over here has turned pretty awful for the past week or so - raining daily and too windy during dry spells to spray outside!
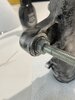
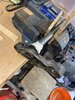
Inside, I decided to tackle the timing belt. I read the workshop manual until I knew the procedure by heart. Then I watched the videos on YouTube (one, narrated by a Scottish fella, is superb). Then I tackled the job.
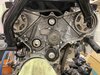
Now, I’m not going to labour this one, but I’ll say this - it was fine up until the point where, when putting the new belt on, the right pully (as you look at it) rocked off the cam and turned. At that point a straight forward job became much more tense.
after thinking very hard about the whole engine timing setup, I elected to rotate the pully back anti-clockwise to its mark, and proceed as normal.
This may, or may not, prove to be unwise. But mechanically I couldn’t think of any reason not to. Once i’d finished installing the new belt I tentatively turned the engine four times on the crank, waiting for resistance as a valve destroyed itself against a piston crown…but it didn’t happen. Right, let’s keep going…eight, sixteen, thirty-two rotations and nothing untoward happened.
Lets just say I slept much better after that.
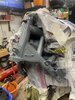
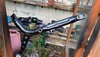
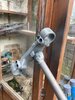
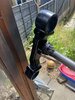
Next up, the original fork bottoms. The legs came apart with no fuss, and I stripped them with a soft brass wheel on a drill.
The anti-dive roller bearing in the left leg seems in very good condition, and I really didn’t want to remove it. A quick bit of work with two stainless washers in my drill, working against my grindstone turned them down into perfect blankers to mask it off.
…before priming them with etch primer ready to be sprayed satin black!

Clothes airers make great painted-parts drying racks. Mrs Goblin is very understanding….
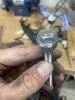
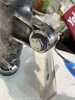
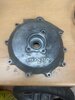
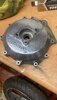
The final bit I think I’ve done is to clean up and polish the clutch cover. It was in an awful state, and I did consider painting it silver, but I believe they should be polished - even if it can’t be seen, I’ll know it’s been done, which is great.
I think that’s about it for now!
I’m a bit busy over the next week or so, but I’m hoping to get the forks bottoms sprayed this week, then maybe get the forks and front wheel back in. I’ve still got the brake callipers, clutch slave cylinder and clutch and brake master cylinders to refurbish though, so plenty to be getting on with - just hoping for some decent spraying weather!
Mike