I think I need a new transmission on my 2009 st1300 i just bought...

OP
OP
James Barnett
Joined
Oct 18, 2021
Messages
37
Age
60
Location
Seattle, WA
Wow! That's a lot of faith in a thin piece of steel and a couple of 6mm threads in aluminum! I would have maybe wrapped a sling around the whole steering neck? Looks like it's done though. Let us know shortly how things turned out. :thumb:
for what it's worth it's the good pipe tape not the cheap home depot stuff! I thought the pipe tape might bend the bolts and was willing to deal with that, but they are still straight. Getting that lower gas tank in and out without destroying the brake lines and wire harness might have been the hardest part of the job. Or close to it anyway. Still working on assembly.
 

SupraSabre

48 Years of SoCal Lane Splitting/Commuting-Retired
Site Supporter
Joined
Nov 20, 2005
Messages
9,519
Location
Cedar City, Utah
Bike
12/04 ST 1300s
2024 Miles
000420
STOC #
5901
Dang, I've been seeing this thread, since you started it, but I've been avoiding it!

You pretty much swapped the engines how I would have...lifting the frame up away, and then back down on the engine.

But, if you decide you need to pull off the throttlebody again, get ahold of me. I have a method that I've used several times that works great. Without damaging anything.

Hang in there, hope you get it running soon.
 
OP
OP
James Barnett
Joined
Oct 18, 2021
Messages
37
Age
60
Location
Seattle, WA
Dang, I've been seeing this thread, since you started it, but I've been avoiding it!

You pretty much swapped the engines how I would have...lifting the frame up away, and then back down on the engine.

But, if you decide you need to pull off the throttlebody again, get ahold of me. I have a method that I've used several times that works great. Without damaging anything.

Hang in there, hope you get it running soon.
I was trying to pull the throttle body all off at once, and when I finally tried working one corner off it wasn't as difficult. Getting it back on again I thought would be really difficult, but I oiled it up and heated it with a heat gun (it's freezing in my garage!) and it went on fairly easily. I'm pretty close now, assuming the junkyard engine I put in isn't junk...
 

Attachments

Joined
Sep 4, 2013
Messages
8,198
Location
Cleveland
Bike
2010 ST1300
Wow! That's a lot of faith in a thin piece of steel and a couple of 6mm threads in aluminum! I would have maybe wrapped a sling around the whole steering neck? Looks like it's done though. Let us know shortly how things turned out. :thumb:
That's just the frame he is lifting. No motor and I'd guess the rear wheel, swingarm, tanks, throttle bodies, etc. are gone too. I've used a lot of that strapping metal and it comes in various thicknesses depending on brand (and age - older was thicker). The stuff is pretty strong.
 

Igofar

Site Supporter
Joined
Jan 8, 2011
Messages
7,122
Location
Arizona
Bike
2023 Honda CT125A
I was trying to pull the throttle body all off at once, and when I finally tried working one corner off it wasn't as difficult. Getting it back on again I thought would be really difficult, but I oiled it up and heated it with a heat gun (it's freezing in my garage!) and it went on fairly easily. I'm pretty close now, assuming the junkyard engine I put in isn't junk...
You do know not to tighten the Clamps right?
You only snug the to the correct measurements from flat to flat.
 

SupraSabre

48 Years of SoCal Lane Splitting/Commuting-Retired
Site Supporter
Joined
Nov 20, 2005
Messages
9,519
Location
Cedar City, Utah
Bike
12/04 ST 1300s
2024 Miles
000420
STOC #
5901
I was trying to pull the throttle body all off at once, and when I finally tried working one corner off it wasn't as difficult. Getting it back on again I thought would be really difficult, but I oiled it up and heated it with a heat gun (it's freezing in my garage!) and it went on fairly easily. I'm pretty close now, assuming the junkyard engine I put in isn't junk...
BINGO!

You figured it out. The only thing I would add, remove two of the bolts in the back, connecting the rightside throttlebody, to the brace. Tricky, but do able. Then start with the rear right corner.

When reinstalling, put the bolts back in, but not tight. I Lube the insulators with Plumber's grease. They slip back on pretty easy that way.

I would be surprised if that engine doesn't work for you. I've bought several things from the place you got the engine, and the parts have all been good so far!
 
OP
OP
James Barnett
Joined
Oct 18, 2021
Messages
37
Age
60
Location
Seattle, WA
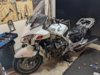
So I filled it with fluids and started cranking it over with a new battery. I didn't put any of the plastic fairing back on. No spark at any plug. Seems like there's a nice fine mist of fuel coming out of the empty spark plug hole, so at least fuel/air probably isn't an issue. I mentioned earlier the wiring was frayed in many places around the engine: I think this motorcycle got really hot, and experienced a bit of road salt as well. I ordered a peak voltage adapter for my multimeter, and will go through the procedures listed in the troubleshooting section of the service manual. If you guys have any ideas of what to do besides what it says in the book, I'd love to hear it. I've already cleaned the connectors I could reach and put them back together again. I cleaned and reconnected the ckp sensor, the wiring to it doesn't seem bad. Also, I don't know if this is important, but when the motorcycle ignition is off, the little supply wires to the ignition coil have zero volts when I make a circuit with one wire and ground. When the ignition is on, they have 12 volts, and when starter is cranking, their voltage is around 11 and fluctuating. So something is happening at the coils, just not enough...
 
OP
OP
James Barnett
Joined
Oct 18, 2021
Messages
37
Age
60
Location
Seattle, WA
You also know that there are TWO different measurements right?
the clamps on the cylinder head side were secured by Honda is my guess, as they were included on the (newer) engine I bought. I didn't touch those. 10 mm though. As an interesting aside, I totally destroyed a knock sensor by removing it with way too much torque, and then trying to reinstall a practically destroyed sensor, and ripping it in two. 108 dollars...
 
OP
OP
James Barnett
Joined
Oct 18, 2021
Messages
37
Age
60
Location
Seattle, WA
I got my bike running today! after cranking it over and getting an error code 18 (CMP) Igofar and Paul suggested I swap CMP sensor wires with purge valve sensor wires and try again, and lo and behold that worked! Then I got another error code (error code 2) and had to dig down again into the throttle body this time for the map sensor. I traced the vacuum tube from the map sensor back into a 5 way tee, traced all of those tubes back to their sources and found a tube had slipped off cylinder 3 throttle body. Put that back on and now the engine sounds really good. I took it out for a spin and shifting was smooth, and I got into all gears. Problem solved! Thanks you guys for all your help.
 
Top Bottom