Motorcycle Larry ST1300 seat raising brackets

Joined
Oct 13, 2021
Messages
148
Location
Northern California
Just did a review on these. https://www.st-owners.com/forums/showthread.php?133590-Review-of-MCL-seat-riser-brackets I had to take them off because of my 29" inseam was a little to short for them wth the russel seat on, otherwise very comfortable.

For those that are asking I sold these risers to another forum member that is going to try them out.
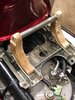
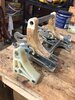
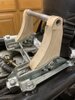
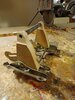
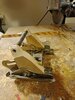
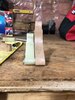
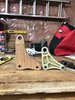
I just breezed through this thread and notice the quest for a flat seat that won't constantly slide you forward. But don't want to make it taller.
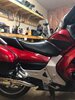
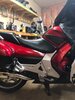
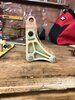
I was able to accomplish that via a different method. If interested, you can find it and some photos here:
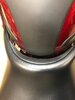
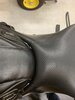
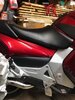
I customized my seat for touring
 

Kevcules

Site Supporter
Joined
Jul 16, 2016
Messages
1,404
Age
55
Location
NB Canada
Bike
2008 ST1300
Did a little seat height trial today with using some softwood. UHMW or Delrin isn't too popular locally at the thickness required. (19 mm or 3/4")
I raised the height 30 mm on my first try for now. My seat fit well and all the seat positions fit properly in the rear tabs at each level setting.
I managed to break one of the prototypes already just by sitting on the seat. I then noticed that each side was made with the grain in different directions. Softwood isn't strong at all, no surprise.
I still can use one as a template when I transfer it to a better stronger material.
I probably won't get any ride time in this season as we're starting to get seasonal weather. COLD!
I would guess that 30mm higher is the most I would try, then maybe back down to 25.4mm/1" higher might do ok as well.
Pictures below show the different heights and then shows what happened to the front when I raised the seat to it's highest position.
I'll probably get some clear paint protector material for the bottom of the tank as the seat seems to ride up now since the front is higher than stock.
The first seat pic is the middle setting, then lowest, then highest, then a lot of air flow created. :)
 

Attachments

Joined
Oct 13, 2021
Messages
148
Location
Northern California
Did a little seat height trial today with using some softwood. UHMW or Delrin isn't too popular locally at the thickness required. (19 mm or 3/4")
I raised the height 30 mm on my first try for now. My seat fit well and all the seat positions fit properly in the rear tabs at each level setting.
I managed to break one of the prototypes already just by sitting on the seat. I then noticed that each side was made with the grain in different directions. Softwood isn't strong at all, no surprise.
I still can use one as a template when I transfer it to a better stronger material.
I probably won't get any ride time in this season as we're starting to get seasonal weather. COLD!
I would guess that 30mm higher is the most I would try, then maybe back down to 25.4mm/1" higher might do ok as well.
Pictures below show the different heights and then shows what happened to the front when I raised the seat to it's highest position.
I'll probably get some clear paint protector material for the bottom of the tank as the seat seems to ride up now since the front is higher than stock.
The first seat pic is the middle setting, then lowest, then highest, then a lot of air flow created. :)
Kevcules, you can still use your softwood units. Soak them with epoxy and add some strips of carbon fiber tape.
It is called "Wood Epoxy Saturation Technique" WEST system. It is also known as "foam core construction". Super strong! You can alternatively use balsa wood or styrofoam. Once you capture all 6 sides of an object it won't break.
_ A quick cruise through this website will make it clear and simple. I use it a lot. I even made a sports car that way.
 
Joined
Aug 30, 2020
Messages
1,189
Location
Williamstown, ON
Bike
'06 ST1300A
The seat geometry on pic 7 looks just about right/perfect from a visual POV.
Hard miles testing will obviously be required to confirm. I’m in the camp that everyone’s posterior and body shape is different therefore experimenting and tweaking existing mods are important for each individual.
It took me a good 4K kms to get mine where I can go alll day without any pain anywhere. YMMV.
Good luck with your project!
 
Last edited:
Joined
Jun 23, 2020
Messages
681
Location
Barrie, Ontario, Canada
Bike
2004 ST1300
STOC #
9106
Did a little seat height trial today with using some softwood. UHMW or Delrin isn't too popular locally at the thickness required. (19 mm or 3/4")
I raised the height 30 mm on my first try for now. My seat fit well and all the seat positions fit properly in the rear tabs at each level setting.
I managed to break one of the prototypes already just by sitting on the seat. I then noticed that each side was made with the grain in different directions. Softwood isn't strong at all, no surprise.
I still can use one as a template when I transfer it to a better stronger material.
I probably won't get any ride time in this season as we're starting to get seasonal weather. COLD!
I would guess that 30mm higher is the most I would try, then maybe back down to 25.4mm/1" higher might do ok as well.
Pictures below show the different heights and then shows what happened to the front when I raised the seat to it's highest position.
I'll probably get some clear paint protector material for the bottom of the tank as the seat seems to ride up now since the front is higher than stock.
The first seat pic is the middle setting, then lowest, then highest, then a lot of air flow created. :)
This sounds like something I should try. I'm 6'4'' and find myself sliding toward the tank regardless of seat adjustment. A level seat would allow me to stay back on the seat and give me more legroom and feel less cramped.

On your prototype you moved the bar 30 mm higher. I presume that was straight vertically. You didn't have to move it fore or aft to compensate for anything? Do the three positions of the front raising bracket still function and is that what you are showing in the seat height adjuster (4), (6) and (7) photos?

Fred
 

Kevcules

Site Supporter
Joined
Jul 16, 2016
Messages
1,404
Age
55
Location
NB Canada
Bike
2008 ST1300
On your prototype you moved the bar 30 mm higher. I presume that was straight vertically. You didn't have to move it fore or aft to compensate for anything? Do the three positions of the front raising bracket still function and is that what you are showing in the seat height adjuster (4), (6) and (7) photos?

Fred
Hello Fred

I showed the seating position of all three heights and each one fit in place properly. I was concerned that the rear tabs wouldn't align properly if I changed where the front bar position was, relative to them. (forward, backward) Picture #4 (lowest seat position) seems to fit the contours of the gas tank the best. I'll leave it there probably if that suits my knees and hips, otherwise I'll use the middle position like I've been using mostly.
My seat was already modified (previous owner) so I sit down a little in the rear of the seat already, now with the 30mm raised front, much better! In hind sight, 25mm may have been enough rise, time will tell with some seat time.

If you look at pic # 1, I made marks on the OEM assembly while it was on the bike with a 90 degree straight edge as I placed it in the high/low positions. Then I went right between them both and drew my line straight up. It's not quite vertical as the piece lays flat on a table, but close.
Once you look at the seat adjuster and place it in each position, you can imagine the new raised hole position and how it changes the angle. I also thought about slightly elongating that new higher hole, just to make sure the rear tabs always fit in place but luckily I didn't need to. May still be a design of the finished piece.

The highest seat position leaves quite a gap between the seat and the tank. If that was my desired seat height and didn't like the gap or it caused a problem, I would make another piece and try changing the angle of the raised hole slightly more forward, or lower the new raised hole position slightly.

I think I can get some UHMW (white or black) through work or online in a 6"x 6" piece which would yield two pieces. I'm still wondering what tool I can use to make nice clean cuts/edges. I may end up using our milling machine at work. I think I can use straight lines instead of following the curved original plastic pattern and still be fine. I'll have to have a few more looks at how the seat fits onto the adjuster assembly.

We didn't get hit too hard from the storm this weekend, just lots of rain with mild wind, but you can feel the cold in the air now. Snow is coming soon. I think my riding days are done for this year....
 
Last edited:
Joined
Jun 23, 2020
Messages
681
Location
Barrie, Ontario, Canada
Bike
2004 ST1300
STOC #
9106
Hello Fred

I showed the seating position of all three heights and each one fit in place properly. I was concerned that the rear tabs wouldn't align properly if I changed where the front bar position was, relative to them. (forward, backward) Picture #4 (lowest seat position) seems to fit the contours of the gas tank the best. I'll leave it there probably if that suits my knees and hips, otherwise I'll use the middle position like I've been using mostly.
My seat was already modified (previous owner) so I sit down a little in the rear of the seat already, now with the 30mm raised front, much better! In hind sight, 25mm may have been enough rise, time will tell with some seat time.

If you look at pic # 1, I made marks on the OEM assembly while it was on the bike with a 90 degree straight edge as I placed it in the high/low positions. Then I went right between them both and drew my line straight up. It's not quite vertical as the piece lays flat on a table, but close.
Once you look at the seat adjuster and place it in each position, you can imagine the new raised hole position and how it changes the angle. I also thought about slightly elongating that new higher hole, just to make sure the rear tabs always fit in place but luckily I didn't need to. May still be a design of the finished piece.

The highest seat position leaves quite a gap between the seat and the tank. If that was my desired seat height and didn't like the gap or it caused a problem, I would make another piece and try changing the angle of the raised hole slightly more forward, or lower the new raised hole position slightly.

I think I can get some UHMW (white or black) through work or online in a 6"x 6" piece which would yield two pieces. I'm still wondering what tool I can use to make nice clean cuts/edges. I may end up using our milling machine at work. I think I can use straight lines instead of following the curved original plastic pattern and still be fine. I'll have to have a few more looks at how the seat fits onto the adjuster assembly.

We didn't get hit too hard from the storm this weekend, just lots of rain with mild wind, but you can feel the cold in the air now. Snow is coming soon. I think my riding days are done for this year....
I think our riding days are likely done in Barrie and area. I was out Wed, Thurs and Fri, but it snowed over the weekend. The forecast doesn't look promising. Around here, even if there are a few nice days after the first snowfall they likely have put down enough sand on the road to ruin the riding.

I think I'll take the seat raising bracket off before I cover the ST up in the garage this week and maybe fashion something over the winter. I think I can find a piece of maple or birch around here and just use woodworking tools.

I can never get the back end of my seat down into the lowest position. Maybe I should move my raised hole slightly forward get the front of the seat closer to the tank and the back end into the lowest position.

Fred
 

Kevcules

Site Supporter
Joined
Jul 16, 2016
Messages
1,404
Age
55
Location
NB Canada
Bike
2008 ST1300
Hardwood may still be an option for me also. Less expensive for sure.
I used to be a hobby woodworker before my back started to be a "pain" :) and keep me out of the garage.
I've still got lots of wood saws/tools I haven't used in a while, I wonder if they miss being used? :)
 

woodybelle

Site Supporter
Joined
May 10, 2006
Messages
539
Age
72
Location
Sonora, California
Bike
2006 ST1300
I used ash that I had laying around. I made them 1" taller than stock. I have been using them for 10 years now. Due to the front being higher it is easy to get the rear of the seat in the lowest position and this is where I like it best. I am 6'3" with a 35" inseam. I can ride all day in comfort and no more sliding forward. I have a Bagster tank cover so I pad that out a bit where it meets the seat which takes up most of the gap as seen in the second photo.tempImagetC6wtH.jpgtempImage0GgnGA.jpg
 
Joined
Jun 23, 2020
Messages
681
Location
Barrie, Ontario, Canada
Bike
2004 ST1300
STOC #
9106
This is all good to know. Thanks @woodybelle and @Kevcules for the info, experience and pictures. Seems like the one inch rise is where I should start. This winter when my wife asks "What are you doing in the workshop?" and I reply "I'm making a part for the ST out of that old coffee table you wanted me to throw out." she'll just give me her normal look of disbelief!
 
Joined
Jun 23, 2020
Messages
681
Location
Barrie, Ontario, Canada
Bike
2004 ST1300
STOC #
9106
I took the seat off of the ST the other day just to take a look at the adjuster and get familiar with things. One thing lead to another and it wasn't long before the adjuster was taken apart and I was tracing the shape of the OEM riser onto a piece of wood.

I went with a 1.25 inch increase in height from the OEM bar position. The wood was an old piece of 3/4 inch thick birch, maple or ash (not sure which). I used the radial arm saw, belt sander and drill press. Anybody else have a 40 year old Sears Craftsman radial arm saw - they're great!

After installing the adjuster, I adjusted the seat to highest position on the front and the highest position at the rear. It wouldn't go into the middle or lower position at the rear but I think it will be okay like that. The fourth picture is that configuration. The gap at front is pretty much filled by the seal.

The only thing I don't like is the gap exposed at the bottom edge of seat. If I leave it in this configuration I might put a black rubber strip along the top edge of that panel to fill the gap. For now I'll leave things as they are until I get some miles on it in the Spring.

IMG_20221209_133303_971.jpgIMG_20221209_133233_954.jpgIMG_20221209_133111_125.jpgIMG_20221209_140410_411.jpgIMG_20221209_145811_707.jpg
 

Kevcules

Site Supporter
Joined
Jul 16, 2016
Messages
1,404
Age
55
Location
NB Canada
Bike
2008 ST1300
Finally got around to fabricating my risers with solid oak. ( light coat of verathane also. :) ) I went with 30mm higher as stated above.
I wanted to keep as much "meat" on the risers as I could, but when I went to install them and adjust to all three seating positions, you can tell where they needed to be close to the shape of the originals. The top and the bottom curves are the most necessary.
One thing I noted was that the seat has very little room when sliding in position on that round bar and because of the tight fit, may be causing others to struggle to get the seat in the proper rear tab location.
I have the seat in the middle position front and back. Can't wait for spring.
 

Attachments

Last edited:
Top Bottom