I am about to install a stebel. Since the major part of the job seems to be getting the plastic off and on, is there anything else I should be doing while under there? I was thinking a power adapter in the left locking glovebox would be handy to charge stuff on.

Just finished my Stebel horn install using the "Dana recommended" spot for the horn. I am grateful for those who go before me...it gave me the confidence to tackle this. Seriously, without this forum I NEVER would have tried this. I'd like to add my perspective on this procedure with the hope that someone finds this helpful. Sometimes saying the same thing with different words makes it "click" for someone. I am a pretty green mechanic, so if I can do this, you probably can as well.
For this project I decided to move my bike into my workshop so that I'd have a well lit and comfortable place to work. It also gave me the option of letting the process unfold over a period of days...so I was never rushed or uncomfortable. Once the ST was up on its stand and the music was playing, I began.
I started with the obvious...panel removal on the "battery side" of the ST.
I chose to take off:
-the Mirror Cover ("pops" off, two snap together electrical connections),
-the Mirror itself (two bolts),
-the Side Cover (the one with three bolts that covers the battery),
-the Inner Lower Cowl (triangular piece at the bottom of the front wheel well/two clips and two screws),
-the Right Inner Cowl (irregular shaped piece that sits above the Inner Lower Cowl and behind the Right Middle Cowl/numerous clips and one screw, disconnect the temp sensor),
-the Right Lower Cowl (several bolts) and
-the Middle Cowl (numerous clips and bolts).
In addition, as Dano points out, the Upper Cowl needs to be loosened on it's right side, but not removed...I think it takes 4-5 bolts/clips. Once loosened, as the Upper Cowl is slightly peeled open (near where the mirror bolted to the panel/frame), your new horn's mounting bracket is revealed...it's right behind where the mirror attached.
When removing all of these body panels you will be dealing with a lot of screws, bolts and clips that come in a variety of shapes and sizes. Unless you have a photographic memory, staying organized is important. I found the Shop Manual and some of the worksheets available on this forum to be essential; personally, I would not attempt this job (at this point in my learning curve) without these. I keep a set of the "body panel worksheets" (available on this forum) in my Shop Manual that have color photos of the panels and scale drawings of the attachment clips, screws and bolts...very helpful when its time to reattach the panels as the worksheets show which fastener goes in which hole of each panel.
One thing I've found really helpful is to keep the fasteners in a labelled zip lock bag...one bag devoted to each panel. Using these bags takes a few extra minutes when tearing it down, but it ultimately saves time and makes reattachment a LOT simpler. When the project is completed, I save the labelled bags for next time.
I also had to tip the gas tank up and clear a route for the wiring to travel from the horn and relay back to the battery.
Whew...that's a lot of work, trust me.
The spot Dano discovered is perfect for this horn...there's lots of room and a great bracket...predrilled no less. The bracket has two open holes...and in either case drilling the hole out to 5/16" (to fit the supplied bolt, which I suggest using since the bolt's head, which you cannot get a wrench on when tightening, will be locked into the horn's bracket and allow the nut to be tightened) was quick and easy. Dano suggests using the bottom hole which is easier to reach than the upper hole- Dr. Dano, I concur. Once attached, the "trumpets" face inward and the bottom of the horn, which houses the two electrical clips, is exposed making the process of attaching the electrical clips brain dead simple. It could not have been a better place to do the install.
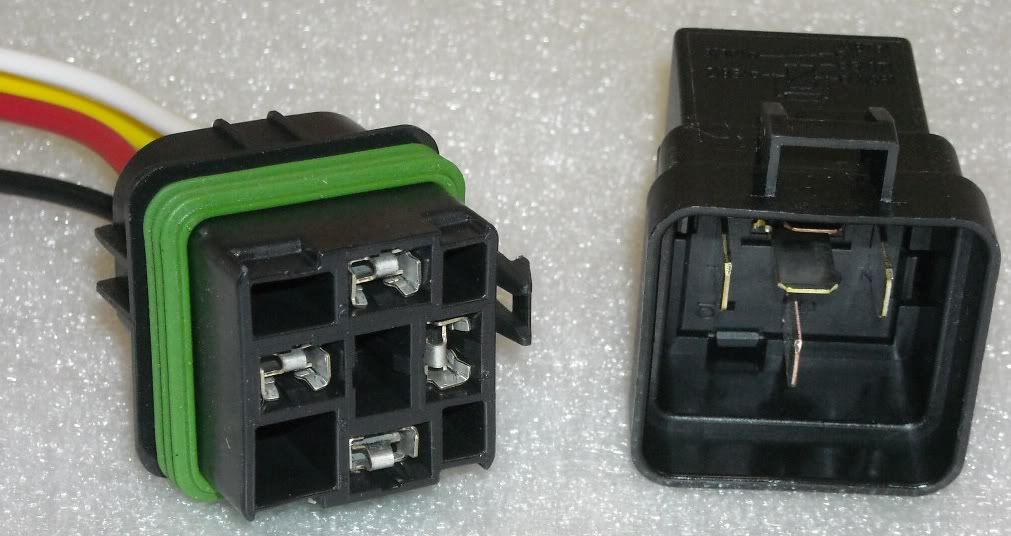
I chose to remove the OEM horn from the bike...I thought it was a cleaner install by plugging the OEM wires from the horn straight into the relay wiring. BTW, I used the Eastern Beaver relay kit for a "Single horn/Two wires." The relay kit is beautifully constructed...however, the battery attachment wires could have been longer. Because they were somewhat short, I was unable to actually mount the relay switch...it is simply resting on the frame of the bike. He makes a version of the relay kit with longer wires....I may replace the relay I used.
I found the Stebel instructions minimally useful in that they offer NO suggestions on mounting the horn...guess its impossible since they don't know on what bike you plan to install the horn. The instructions do cover installing the (included) relay, however, I took the experience to heart that several members had with the Stebel relay developing rust problems and elected to use the (waterproof) Eastern Beaver relay instead. It was another $40 or so...but I had confidence that this was a better built, more durable component.
I found the Eastern Beaver relay installation instructions to be very clear and thorough.
Not surprisingly, most of my time was spent dealing with plastic removal and reinstallation...mounting the horn (once the bracket was identified) took all of 5 minutes. Running the wiring and making those connections took maybe 30 minutes. Again, all the time is taken in unbuttoning and re-buttoning the ST's tupperware.
All in all, this was a fun project...just tough enough to be a challenge, but simple enough that I never felt like it was beyond me. Also, this project had another important characteristic (for me)...nothing's been done to the bike (other than drilling out the bracket) that can't be reversed if I chose to return the bike to OEM status....and I like that.
For this project I decided to move my bike into my workshop so that I'd have a well lit and comfortable place to work. It also gave me the option of letting the process unfold over a period of days...so I was never rushed or uncomfortable. Once the ST was up on its stand and the music was playing, I began.
I started with the obvious...panel removal on the "battery side" of the ST.
I chose to take off:
-the Mirror Cover ("pops" off, two snap together electrical connections),
-the Mirror itself (two bolts),
-the Side Cover (the one with three bolts that covers the battery),
-the Inner Lower Cowl (triangular piece at the bottom of the front wheel well/two clips and two screws),
-the Right Inner Cowl (irregular shaped piece that sits above the Inner Lower Cowl and behind the Right Middle Cowl/numerous clips and one screw, disconnect the temp sensor),
-the Right Lower Cowl (several bolts) and
-the Middle Cowl (numerous clips and bolts).
In addition, as Dano points out, the Upper Cowl needs to be loosened on it's right side, but not removed...I think it takes 4-5 bolts/clips. Once loosened, as the Upper Cowl is slightly peeled open (near where the mirror bolted to the panel/frame), your new horn's mounting bracket is revealed...it's right behind where the mirror attached.
When removing all of these body panels you will be dealing with a lot of screws, bolts and clips that come in a variety of shapes and sizes. Unless you have a photographic memory, staying organized is important. I found the Shop Manual and some of the worksheets available on this forum to be essential; personally, I would not attempt this job (at this point in my learning curve) without these. I keep a set of the "body panel worksheets" (available on this forum) in my Shop Manual that have color photos of the panels and scale drawings of the attachment clips, screws and bolts...very helpful when its time to reattach the panels as the worksheets show which fastener goes in which hole of each panel.
One thing I've found really helpful is to keep the fasteners in a labelled zip lock bag...one bag devoted to each panel. Using these bags takes a few extra minutes when tearing it down, but it ultimately saves time and makes reattachment a LOT simpler. When the project is completed, I save the labelled bags for next time.
I also had to tip the gas tank up and clear a route for the wiring to travel from the horn and relay back to the battery.
Whew...that's a lot of work, trust me.
The spot Dano discovered is perfect for this horn...there's lots of room and a great bracket...predrilled no less. The bracket has two open holes...and in either case drilling the hole out to 5/16" (to fit the supplied bolt, which I suggest using since the bolt's head, which you cannot get a wrench on when tightening, will be locked into the horn's bracket and allow the nut to be tightened) was quick and easy. Dano suggests using the bottom hole which is easier to reach than the upper hole- Dr. Dano, I concur. Once attached, the "trumpets" face inward and the bottom of the horn, which houses the two electrical clips, is exposed making the process of attaching the electrical clips brain dead simple. It could not have been a better place to do the install.
I chose to remove the OEM horn from the bike...I thought it was a cleaner install by plugging the OEM wires from the horn straight into the relay wiring. BTW, I used the Eastern Beaver relay kit for a "Single horn/Two wires." The relay kit is beautifully constructed...however, the battery attachment wires could have been longer. Because they were somewhat short, I was unable to actually mount the relay switch...it is simply resting on the frame of the bike. He makes a version of the relay kit with longer wires....I may replace the relay I used.
I found the Stebel instructions minimally useful in that they offer NO suggestions on mounting the horn...guess its impossible since they don't know on what bike you plan to install the horn. The instructions do cover installing the (included) relay, however, I took the experience to heart that several members had with the Stebel relay developing rust problems and elected to use the (waterproof) Eastern Beaver relay instead. It was another $40 or so...but I had confidence that this was a better built, more durable component.
I found the Eastern Beaver relay installation instructions to be very clear and thorough.
Not surprisingly, most of my time was spent dealing with plastic removal and reinstallation...mounting the horn (once the bracket was identified) took all of 5 minutes. Running the wiring and making those connections took maybe 30 minutes. Again, all the time is taken in unbuttoning and re-buttoning the ST's tupperware.
All in all, this was a fun project...just tough enough to be a challenge, but simple enough that I never felt like it was beyond me. Also, this project had another important characteristic (for me)...nothing's been done to the bike (other than drilling out the bracket) that can't be reversed if I chose to return the bike to OEM status....and I like that.
Great information. I pulled all the plastics off...and thought I know they said there was an extrao hole in a bracket...but couldn't find it...went to the pictures and there it was, I just had not dug far enough. Physical install went smooth after that. Had to troubleshoot a bad relay (fortunately the local autozone had a replacement unit), works like a champ. Thanks to all the guys who contributed and added pictures.
fiziks
I brake things.
Just installed my Wolo BadBoy (depending on who you talk to, it is the same as the Stebel or slightly different, but made in the same factory in Italy... still just as loud) yesterday by removing the OEM horn and bracket and bending the sub-frame extension up. A note on bending it up... I don't know how you guys brute forced it, but I had to put a blow torch to it to get it just soft enough to bend. The heat will also help prevent the metal from tearing/splitting/cracking as you bend it. Also, you don't need to drill a new hole. I found just slightly widening the existing hole was good enough. Finally, before the install, I hooked it up to the battery just to see how loud it was and yes, it was loud. But once it is mounted to the bike, it is even louder.
Dano, or anybody else who might know, I did not receive the gray spacer with my horn and mounting hardware. Is that something you made, bought or was it included? I've mounted my horn already with just the included bolt and it seems fine. But I did have to cut the bolt so it wouldn't protrude out too far getting in the way of other "stuff."
Last edited:
Just a quick thanks to Dano for the heads up on the Stebel install. I made up a 12ga harness and used a Hella waterproof relay I had laying around. Super easy, worked out great.
Tom Mac 04a
Site Supporter
Just think , now that you have a high current line installed, you can split it off for a high powered socket. Chances are few you'll be running a tire pump and honkin the horn at the same time! ")
PS nice install pic
PS nice install pic
I think you already answered a question I had: If I understand what your saying, I can pop in the 87A lead of that relay to run a powerlet, since 87A is closed, the only time I won't have power to that socket is when the horn in blowing? In other words, 87 is open and 87A is closed, Do I have that right?Just think , now that you have a high current line installed, you can split it off for a high powered socket. Chances are few you'll be running a tire pump and honkin the horn at the same time!
PS nice install pic
Last edited:
l84toff
Riding 2up around the world
My Stebel is in and WOW! It is amazing - couldn't ask for better/louder!
I couldn't mount it high up under the speaker area as I have a Seng light bracket in the way (for the PIAAs). The bracket uses the 2 bolt locations suggested for the Stebel. So rather than try to split the horn into 2 pieces (as suggested earlier) or to mount it on the left side of the bike, I decided to try to get it lower on the right side close to where the OEM horn sits.
Mounting the Stebel lower on the RHS allows its air outlets to sit directly adjacent to the slots of the inner cowl where the OEM horn sits - meaning the sound escapes beautifully from the enclosure of the fairings. To do this I first removed the OEM horn together with its mounting bracket.
This leaves the tubular subframe extension with a single bolt hole in its flattened end. I then used vice grips to crush/flatten another 30 or 40mm of this tube, allowing me to bend it up at a right-angle to take a bolt through the Stebel's mounting point. The trick is to end up with just the right length for bolting the horn the bracket.
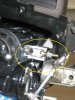
I cut the small locating tab off the end of the bracket (and filed it clean), then drilled another hole closer to the end of this bracket (between the existing hole and the end - so no excess bracket is sticking out past the side of the horn). A bit of black spray paint to touch it up, then bolt it all in place and attach the wiring. This first pic shows this and how I used a vertical bolt rather than the larger horizontal bolt that came with the horn:
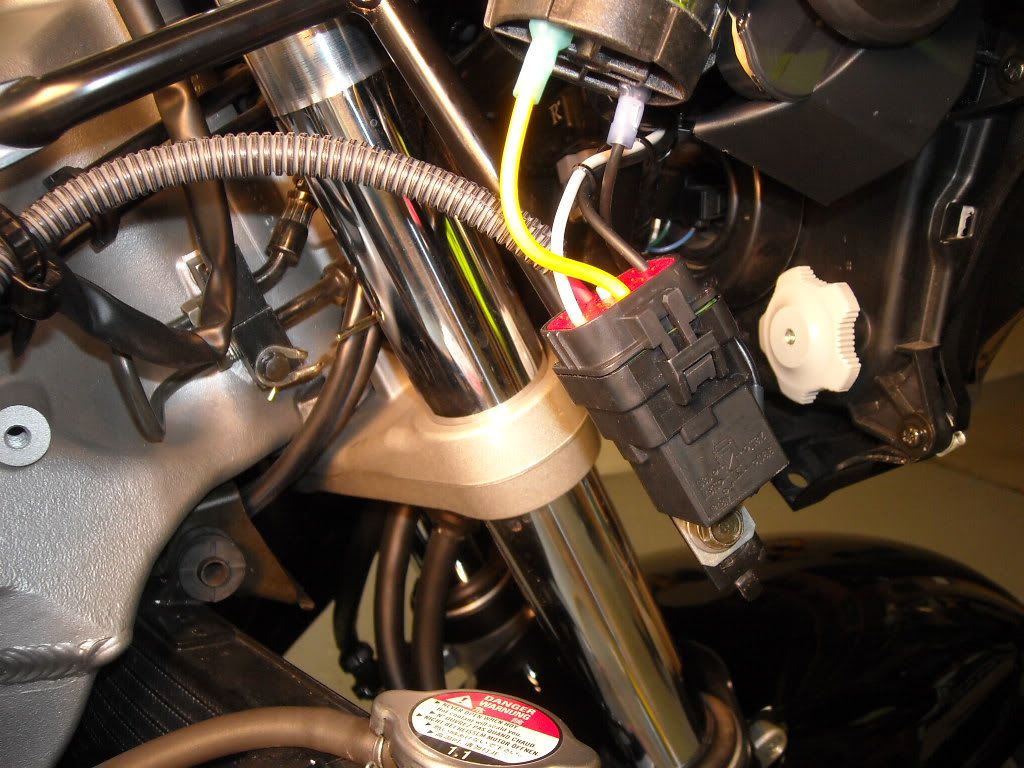
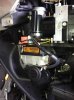
These two pics give a better overall view. Note the separate heavy gauge power (red) and ground (black) to the relay. The power wire to the relay feeds directly from the battery with a 20amp fuse located at the battery end.
As can be seen above, it is pretty crowded inside this left-side fairing, but I was reasonably confident the fairings would all slot back into place without any real problems - and they did
Just wanted to say thanks for posting this. I had installed an HID kit and have my ballasts in the other recommended spot and this worked like a charm. I only bent the bar, did not clip off the little tab, and used the existing hole. Picked up a new bolt, used a larger nut as a spacer as I could not find any spacers in the hardware store and everything seems to fit perfectly, sounds ?ber loud too. :capwin:
Dear Dano,
First of all the best wishes for 2013 with lots of save and nice rides.
I have a question.
Do you mind if i use the Stebel installation pictures to inform the users of our new forum www.st1100-1300.nl
This is a new forum and operative since november 2012.
I hope you agree.
With kind Regards,
Arno Plaisier, the netherlands
I have just installed my Wolo Bad Boy, using Dano's method, with a twist.
I didn't like the idea of having to drill the mounting hole to accept the 5/16" bolt. So, instead, I went to the local ACE Hardware and picked up a 1/4 x 1" bolt and nut, a lock washer, and a 1/2" outside diameter flat washer (in case the head of the bolt was too small to cover the mounting hole in the horn.).
By using the smaller bolt I did not have to enlarge the mounting hole, or remove the front fairing bolts. I did need to remove the two bolts that hold the mirror on. By removing the mirror, and flexing the fairing outward, I had enough room to put a 7/16" wrench on the nut. Since the bolt head I used is smaller than the 5/16" supplied bolt, I needed to use a flat bladed screw driver to hold the smaller bolt head from turning while I was tightening the nut. (I jammed the blade between the bolt head and the mounting boss while turning the nut).
I'm new here, but wanted to provide an alternative way of mounting the Sebal Air Horn, that will provide a louder blast, while providing more flexibility. In the original post, the horn may not be placed in the most ideal location for optimum volume, but may be located where there is simply space and mounting points. Let me first say that I've done this alternative methods not on an ST, but rather, on two BMW K1200 GTs, where mounting in a place where it can be heard is at a premium. The method used by many is to break the horn unit away from the compressor and use a tube to delivery the air to the horn. This way, you are provided a smaller package to locate the horn close to an area that is wide open to the front of the bike so you can direct the horn audio forward, and not have it bounce around in the bike's panels.
To do this, you use a flat blade and literally pry the horn away from the compressor. They are fabricated in in two major pieces, i.e. air horn, and compressor. It is merely held in place with glue. The horn side can then be mounted security with tie wraps. It's light and easy to secure.
Again, I'm only giving your guys a suggestion. Secondly, by using a relay and wiring the horn directly to the battery via a fuse of course, you can keep the original horn tap into the factory horn to trigger the relay. This way, you really get a loud *** horn.
Good suggestion on relocating the horn and air pump. Since I have a Wolo, and not a Stebel, I'm not sure I can do that. Mine does not have the fittings for the air hose to connect the two pieces.
robertpage
TourMaster
Perfect timing. I'm doing some work under the Tupperware and couldn't appreciate more not only the directions you provide, but great, high resolution images with arrows too! The Forum will make a mechanic out of me yet. Thanks a ton and happy spring. :biker:I just installed the compact Stebel horn on my ST1300 and it fits like a glove, so I thought I would share a few details on the install.
On the right side of the bike behind the mirror is a bracket used to support the mirror but it has an extra hole which is perfect for attaching the bolt that comes with the Stebel horn. The only modification required is drilling out the hole to 5/16" so the bolt supplied with the Stebel horn fits. The nice thing is that you can use the mounting bracket and bolts that came with the Stebel horn as it was intended.
The hardest part of the install is removing the plastic. Once the mirror and side panel have been removed you will need to remove the bolts attaching the front panel. You do not need to remove this panel completely, you only need about and inch or so in order to drill the 5/16" hole. Just be careful not to damage the plastic. The hole is only sightly smaller then 5/16" so the drilling is fairly simple.
I installed a relay and provided 12V/20Amp power to the horn and it is loud.
Look at the attached pictures for more details on the install.
Dano
Here's a tip I read elsewhere and I used with success. When drilling out the hole put a couple of inches of tube over the drill bit to stop it rubbing against the plastic faring. I used some garden hose and it worked fine.Just be careful not to damage the plastic. Dano
