I am so glad you pointed this out, I have read a lot of contradictory guidance on the lock nut and tab washer and little made engineering sense, this doesFrom the article, an important point that is often overlooked (don’t alter the preload you just carefully set) :
Understand that the tabs on the lock washer, folded into the slots on the adjustment nut, will keep the adjustment nut from backing off/loosening. The fork top bridge is locked to the stem, sandwiched between the locknut and the top steering stem nut.
John

steering head bearings - some queries
- Thread starter aSTerix
- Start date
what temperature do you suggest ? I am thinking maybe put it in an oven insteadAlternative: heating that inner race directly on an (old) electric cooking plate, welder's gloves and some juggling to get it on the stem, then some carefully placed bangs so it seats fully before cooling off/contracts again...
Is this an alternative technique to cutting a slot in the old bearing race or in addition to it ? thxUse the old bearing race to hammer in the new race. Give the old race a quick pass with a grinder to take a light amount off the O.D. so it doesnt stick in the bore and comes out easily after the new race is in tight.
do you have any recomendations for a protectant that is over the counter, I'm somewhat limited on what I can get over here5) no OEM cap on top. I’d clean it up and get some protectant in there
Alternative, no need to cut a slot. You are just trying to stop the old race from sticking in the steering head so you dont have to wrestle it back outIs this an alternative technique to cutting a slot in the old bearing race or in addition to it ? thx
I hadn't thought of greasing the seats before pressing in the races, would this not reduce the effectiveness of the interference fit which is based on friction ? I'm assuming not, if you have successfully done this and not had the races turn in the seatsI carefully clean all the seats and give them a slight smear of marine grease, eases installation.
Also, it would stop any rust forming, interesting idea
What about moly paste/grease or would that be too slippery
inside this document is a link to the insightful Honda service letter https://motorcycleproject.com/text/SL126.html
You assume correctly. If you've ever replaced steering stem bearing races you'd know that grease won't defeat the interference fit and the races won't turn in the frame. If they do it would likely be because the bearings somehow seized and welded themselves to the races and stem. I suppose that's possible in some alternate universe (and with wheel bearings) but you don't have a worry here. Possible and probably are very often two widely different things.would this not reduce the effectiveness of the interference fit which is based on friction ? I'm assuming not
I can't imagine any grease being too slippery for this particular situation (unless it's too slippery to pick up and hold
 ) but moly is unnecessary and might be messier to work with than some simple wheel bearing/lithium/silicon/marine/dielectric grease - probably anything you have handy is fine. It just has one job - ease the installation of the bearing race. I put outer races in the freezer over night and quickly installed them. Seemed to help but who knows. Easy clean up of the excess would be nice.
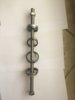
I just made up a compressor for the outer bearings races using parts from the local hardware store; basically 16mm (3/4") SS stud , large washers and the old races with a cut in them
WIll update after I use it in next day or so (need to put it in the freezer along with the new races )
There is one obvious problem I may encounter, without anything to keep the stud centred in the steering head , its possible it will slip to an off-centre angle and therefore compress the new races also at an angle, I'm looking at options to create a rubber bung that may minimise this.
Last edited:
I used a slightly smaller diameter socket and it worked very well. Your compression concept is brilliant.
ST1100Y
Site Supporter
Ingenious concept, might not be sufficient to fully seat those races though... a few firm tabs with a hammer on an appropriate driver will solve that...I just made up a compressor for the outer bearings races using parts from the local hardware store; basically 16mm (3/4") SS stud , large washers and the old races with a cut in them
You might also put the races into the freezer plus warm the frame head tube a bit to ease the process.
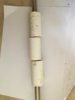
I found a piece of wooden rod that is slighty smaller than the ID of the stem head and tried to drill a 16mm hole through the middle by hand (I kind of knew this wasn't likely to have a successful outcome !)
After finding that the 16mm stud wouldn't pass through I cut it into 3 parts, all of which are eccentric relative to the stud, having a coffee and looking at it I then realised that I could strategically rotate the 3 pieces of wood to perfectly fill the stem head ID and also to perfectly align the stud in the centre. Having done this I then put some tape around the joints and its ready for deployment tomorrow.
Talk about Heath Robinson !! If this works no-one will be more surprised than me, however, I will then just resort to the hammer a pin punch
Last edited:
John OoSTerhuis
Life Is Good!
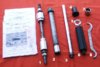
Nice job, STeve! George Catt’s DIY idea from 1994 lives on.") Your wood spacers/positioners are a new wrinkle, ingenious! BTW, here’s the tools in the STOC loaner R&R kit, FWIW. Note the custom drivers for races, and the tapered roller bearing driver for the install on the steering stem.
Your wood spacers/positioners are a new wrinkle, ingenious! BTW, here’s the tools in the STOC loaner R&R kit, FWIW. Note the custom drivers for races, and the tapered roller bearing driver for the install on the steering stem.
John
Your wood spacers/positioners are a new wrinkle, ingenious! BTW, here’s the tools in the STOC loaner R&R kit, FWIW. Note the custom drivers for races, and the tapered roller bearing driver for the install on the steering stem.John
Last edited:
I so wish I could have got my hands on this kit ! Are those instructions shown available online , they may give me some more tipsNice job, STeve! George Catt’s DIY idea from 1994 lives on.
John
Last edited:
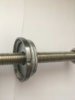
My plan is to use my electric impact driver to rotate the nuts and I have created a grease bearing (pair of washers with lithium grease in between) to allow the nut to rotate more freely against compressorIngenious concept, might not be sufficient to fully seat those races though... a few firm tabs with a hammer on an appropriate driver will solve that...
You might also put the races into the freezer plus warm the frame head tube a bit to ease the process.
and ..... Success !!
Both inner races successfuly installed in the steering head
Initially I partially tapped the races into the frame using a copper mallet, just to get them aligned nicely, then fitted the compressor and applied the impact driver, they just popped into the frame.
Afterwards, I removed the compressor and using the old race I tapped with my mallet just to make sure I got the metallic ringing sound
Having done it, I would say that it is probably possible to achieve this using only the following :
1) Old race with cut in it
2) Frozen new races
3) Heated frame where races fit
4) grease where races fit
5) Mallet
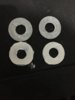
The compressor was not essential but did make it very easy. The grease bearings (two washers with lithium grease in between) worked well (prevented the nut turning the old race), the wooden centering spacers not really necessary, I did also use a long bar on the socket to do a final tightening of the compressor but didn't get much further than I achieved with the impact driver.
My plan is to use the compressor on the inner race but that will be a week away, need to wait to get the stem back from the blasters
Thankyou to everyone for your pointers, helped enormously
Both inner races successfuly installed in the steering head
Initially I partially tapped the races into the frame using a copper mallet, just to get them aligned nicely, then fitted the compressor and applied the impact driver, they just popped into the frame.
Afterwards, I removed the compressor and using the old race I tapped with my mallet just to make sure I got the metallic ringing sound
Having done it, I would say that it is probably possible to achieve this using only the following :
1) Old race with cut in it
2) Frozen new races
3) Heated frame where races fit
4) grease where races fit
5) Mallet
The compressor was not essential but did make it very easy. The grease bearings (two washers with lithium grease in between) worked well (prevented the nut turning the old race), the wooden centering spacers not really necessary, I did also use a long bar on the socket to do a final tightening of the compressor but didn't get much further than I achieved with the impact driver.
My plan is to use the compressor on the inner race but that will be a week away, need to wait to get the stem back from the blasters
Thankyou to everyone for your pointers, helped enormously
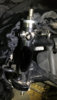
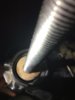
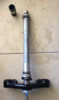
Finally got my stem back now that lockdown is lifted, here is the home made "compressor" installed on the stem. Its basically the old ball bearing race with a Dremel cut, then a suitable pipe and coupling (that fits over the wider part of stem) then big washers and my 'lithium bearing' .
Now have the stem in freezer and bearing in plastic bag on balcony in 42C sunshine
I will use the suggestions provided here :
1) applying NLGI#2 grease to both sides of the seal before I press on the bearing
2) apply grease to the stem to ease the bearing fitment
3) Making triply sure the taper is facing in the correct direction
4) and of course the freezing/heating !
Last edited:
GGely
Site Supporter
- Joined
- Oct 28, 2018
- Messages
- 709
- Location
- Oshawa, Ontario, Canada
- Bike
- 2001 ST1100 Non ABS
- STOC #
- 8997
Hi Asterysk, I use a similar contraption when doing steering head bearings but I use the tube as a driver with a mallet providing the persuasion. I do this on upper and lower races.
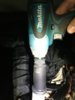
Successfully installed but this was not as easy as the head race pressing ! I am glad I followed all the tips I received and even then it was a tight fit, I finished off with a long ring spanner then a hammer and drift.
Major mistake was not using a single piece of thick walled pipe, the coupling I used started sliding across the threads of the pipe.
I sure hope I never have to take it off again !
Major mistake was not using a single piece of thick walled pipe, the coupling I used started sliding across the threads of the pipe.
I sure hope I never have to take it off again !