ST1300 Clutch Lever and Pipe Leak

Joined
May 19, 2018
Messages
1,205
Location
Southern California
Bike
2005 ST1300 PA
Yesterday I backed the BeaSTie down the drive way and was ready to go to LA, pulled the clutch and hit 1st gear and she just lurched to a stall. Then I realized the clutch lever had no resistance or effect. Thank God this didnt happen out there on the roads.

Upon closer examination, I could see some fluid spray from the lever master cylinder area and also maybe some decayed gasket. So off i go to get a rebuild kit for around $50. Buying a new whole lever and reservoir assembly (as the Honda mech suggests) is over $200 Shouldnt be that bad to DIY as long as I find the right ring clip pliers, yeah?

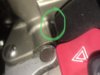
So while squeezing the lever a few times more to show the problem to a friend, there now was a small puddle under the bike below the upper fork area. With a flashlight, i could see fliud ooze out at the metal to hose junction to the right of the left glove box and left fork head area. Could barely touch it with my fingers. No fliud dripping down from the reservoir or its banjo bolt, but just at the metal to hose junction down stream from it.

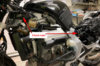
This is a bigger problem. They only sell the “clutch pipe” as a whole unit for ~ $160. Which is fine, but how do I get in there and replace this thing? Hopefully its in the Service Manual or one of youz guyz has firsthand experience to share. My thick hands and arms will not likely fit in there to where the pipe is clamped and i hope this isnt a left upper Tupperware issue or gas tank removal. Else it maybe take to a bike shop affair.
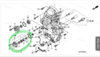
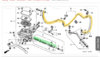
The parts:
  • green is master cylinder rebuild kit
  • yellow is clutch pipe
238011


The rebuild kit i picked up
238012

Still waiting on the clutch pipe. Some time this weekend
 

CYYJ

Michael
Joined
Jun 10, 2013
Messages
2,399
Age
69
Location
Toronto & Zürich
Bike
None any more.
STOC #
2636
Hello:

I can't comment on the level of difficulty involved in replacing the "clutch pipe" (hose & pipe assembly leading from the clutch master cylinder to the clutch slave cylinder), I've never done it and I'm not familiar with how it is routed.

Rebuilding the clutch master cylinder is pretty easy - only suggestion I offer is to remove the whole assembly, lever and all, from the motorcycle and take it to the bench and do the work on the bench. Also, examine the two "wear parts" in the clutch lever itself (the parts that go through the holes in the lever - for excessive wear - in particular, take a close look at the inside of the small round brass bushing, that is a known 'wear part'.

When it comes time to put fluid back into the whole assembly, after all the work is done, there is a trick to priming the master cylinder. See this post (it's a ST 1100 post, but the same concepts apply to the 1300) - start reading at the third paragraph below the second last picture (picture of the green clutch slave cylinder gasket). I had an awful time trying to get the clutch hydraulic system primed and working until others gave me some advice, which is listed there. See also this post, starting from the bottom of page 1, which addresses the very same problem, but in the context of a brake lever master cylinder.

Michael
 
Last edited:

Igofar

Site Supporter
Joined
Jan 8, 2011
Messages
7,123
Location
Arizona
Bike
2023 Honda CT125A
Sounds like your hose split at a junction, if that is the case, the rebuild kit will be of no use to you at all.
More importantly, I would get an empty bottle of dish washing liquid (squeeze type with flip up lid) put a little soap in it, and fill it up with water, then spray the soapy water all over your tank, forks, and more importantly body panels, as the DOT 4 brake fluid will destroy/damage your paint/plastic!
If it is in fact, your hose that split, you will need to remove most of the body work on the left side of the bike and front cowl area to remove and replace it.
You'll also need some good quality tools, as in a proper fitting line wrench, or you'll damage more stuff trying to replace the damaged hose.
This type of damage is commonly seen when folks install handlebar risers, or route hoses incorrectly etc.
If your going in this deep to repair the clutch line, I would also strongly recommend you inspect/replace the clutch slave cylinder as well.
Question...were you not having clutch/shifting issues lately? Perhaps you found the cause.
Don't forget, you'll also need to order (5) crush washers along with the new line, as you cannot reuse the old ones.
 
Joined
Mar 13, 2012
Messages
5,071
Location
soCal
Bike
'97 ST1100
STOC #
687
Also consider the option of replacing the OEM Honda line with a stainless steel braided line. Not familiar with the routing on the 1300 so perhaps others who have converted may be able to comment on how practical that is to swap it out with a single hose.
 
Joined
Jul 14, 2006
Messages
980
Location
Nova Scotia
Bike
'07STA
STOC #
7235
This happened to my 07 4 years ago. I done a clutch bleed and all is great since

Sent from my SM-A520W using Tapatalk
 
OP
OP
AV8R
Joined
May 19, 2018
Messages
1,205
Location
Southern California
Bike
2005 ST1300 PA
A picture speaks 1000 words as the old proverb goes, and two pics...

Looks like full left on the bars put stress and a kink at this hose to metal pipe junction that eventually gave way
238022

You can see part of the seal gasket here
238021

Thanks for the heads up in the caustic fluid on paint. Glad i wiped it off yesterday, but some fork area dripping got to the bottom if the radiator plastic grill lower point and did some disolving. Will have to repaint that later. Put Protection on the tank which is below the clutch master cylinder
 
OP
OP
AV8R
Joined
May 19, 2018
Messages
1,205
Location
Southern California
Bike
2005 ST1300 PA
Bought the clutch pipe and all the crush washers and banjo bolts.

Im hoping i can snake this pipe thru this fork area and to its end point. If not, ill get help.
 
Last edited:

Igofar

Site Supporter
Joined
Jan 8, 2011
Messages
7,123
Location
Arizona
Bike
2023 Honda CT125A
Get Help....
Before you start tearing stuff apart, you'd better make sure you read the article on replacing the clutch slave cylinder, paying close attention to the special tools (flex head ratcheting wrench) before you start, or you'll end up with the system open, and leaking all over everything, and not be able to continue, or put it back together etc.
Again, since you have to remove the line from the slave cylinder, this would be a perfect time to replace the entire unit, its only 3 bolts and a gasket, at that point.
With the history your bike has, the way you use it, I'd bet you a nickel that the slave cylinder is probably close to going south on you soon, if not already.
If you need to call me, I can explain in a little more detail at what your looking at.....
 
OP
OP
AV8R
Joined
May 19, 2018
Messages
1,205
Location
Southern California
Bike
2005 ST1300 PA
I see that the Slave Cylinder is on the rear crank case
Part #3. $61

Im not seeing where the clutch pipe connects at its lower end.
This is getting expensive now that shop labor is involved

238024
 
Last edited:

CYYJ

Michael
Joined
Jun 10, 2013
Messages
2,399
Age
69
Location
Toronto & Zürich
Bike
None any more.
STOC #
2636
I'm not seeing where the clutch pipe connects at its lower end.
The clutch pipe connects to the slave cylinder housing at the point directly underneath the reference to drawing F6. That's about 10 o'clock on your green circle. Follow that line that points to F6 downwards and you will see where the hose line connects.

Michael
 
OP
OP
AV8R
Joined
May 19, 2018
Messages
1,205
Location
Southern California
Bike
2005 ST1300 PA
Ok i think i see how the mechanical drawings E6 and E9 are named and linked. (Nuthin like electronic schematic drawings im used to). At the Honda shop I believe these where hyperlinked.

So this is a compressed picture in that its not showing how long this pipe is so it reaches from the forks to the rear of the engine. Which means the whole dang left side has to come off. Geez i was hoping not to have to go through this.
 

Igofar

Site Supporter
Joined
Jan 8, 2011
Messages
7,123
Location
Arizona
Bike
2023 Honda CT125A
This would be where I say "I told you so" :well1:
On the diagram, the F-6 is referring you to the continuation of the parts on a different diagram.
When several parts are enclosed in a box, look for a single number with a line going to the surrounded area, that would be the whole unit, not just pieces of it.
Something else to think about...since you don't know how long your clutch line has been leaking, and most of your electrical stuff is under the front portion of the left side cowling, I would suggest you carefully check all your connections to make sure the brake fluid didn't damage any of them, or dissolve the grease protecting them :nuts:
You've been dragging your feet repairing several issues on your bike, looks like it may be time to start correcting some of them before it starts getting out of hand :shrug2:
 

Igofar

Site Supporter
Joined
Jan 8, 2011
Messages
7,123
Location
Arizona
Bike
2023 Honda CT125A
Just a word of warning, if they have not told you yet.....the dealership will tell you the engine must be dropped to remove the clutch slave cylinder, and the cost will be close to $1500.00 dollars! Please don't let them do that to you! If you follow the instructions in the Articles section, you can remove it yourself, by working with the bike on the side stand without too much trouble. I'm sure you can find a forum member close by you that may be willing to help if you ask.
The Article will explain in detail what tools you will need before hand.
Remember to clean up Everywhere you spill brake fluid to save your paint and plastic.
And please don't try to ride it before you fix it this time....everytime you pull the lever, you'll be spraying brake fluid on your tank etc.
 
OP
OP
AV8R
Joined
May 19, 2018
Messages
1,205
Location
Southern California
Bike
2005 ST1300 PA
I’m going to get a quote from Honda on the pipe replacement and do the slave myself. I just don’t have the time or desire to mess with this level of operation. Flat bedding this baby 40 miles is covered by my AAA ATV, but what a PITA. Yet still, oh how happy I am this detonated at home.

Thanks IGO and others for the advice, I’ll not let them take me to the cleaners if at all possible.

Stay tuned to the same Bat channel...
 
OP
OP
AV8R
Joined
May 19, 2018
Messages
1,205
Location
Southern California
Bike
2005 ST1300 PA
I built myself a pdf file of aĺl of the fiches with hyperlinks between labels like E6 and E9 , and an index page. The images are better quality than most.

I can't post it here - the file is nearly 20mb - but if you pm me with an email adress that can accept big files .....

The fiches are for a USA ST1300 ABS. No part numbers.
Google docs or DropBox?
 

CYYJ

Michael
Joined
Jun 10, 2013
Messages
2,399
Age
69
Location
Toronto & Zürich
Bike
None any more.
STOC #
2636
I’m going to get a quote from Honda on the pipe replacement and do the slave myself. I just don’t have the time or desire to mess with this level of operation.
None of us (except possibly Larry) know how much - or how little - work is involved in replacing that clutch hose/tube assembly. I looked through my photo archive, and found a photo that shows part of where the hose/tube assembly goes. Based on that photo, I think you would need to remove the left side Tupperware (as seen in the photo), and also remove the upper (large) fuel tank.

Perhaps you could hedge your bets by ordering the hose/tube assembly from your local dealer, then taking it home and sort of "holding it up against the left side of the bike". That would give you a good idea of where the hose/tube runs, and what you would need to take apart in order to replace the hose/tube. You could then decide whether to do it yourself (perhaps with another forum member from your neighborhood), or whether to take the bike to the dealer and have them do it for you.

Michael

Left Side of Motorcycle
238056
 

ST Gui

240Robert
Site Supporter
Joined
Sep 12, 2011
Messages
9,284
Location
SF-Oakland CA
Bike
ST1300, 2010
How much fuel is in the upper tank? You've lost the opportunity to run it down to empty. If it's to come off it might be worthwhile to see if the hose connecting the two tanks should be replaced.
 
OP
OP
AV8R
Joined
May 19, 2018
Messages
1,205
Location
Southern California
Bike
2005 ST1300 PA
@CYYJ
Thank you for this picture, it confirms my choice to get this done by a real mechanic.

@ST Gui
Its down to 3 bars. Think ill have those lines replaced as well as a new air filter
 
Top Bottom