2001 ST1100 Timing Belt Challenge

OP
OP
GGely

GGely

Site Supporter
Joined
Oct 28, 2018
Messages
709
Location
Oshawa, Ontario, Canada
Bike
2001 ST1100 Non ABS
STOC #
8997
Sorry Larry, just throwing out a number based on nothing more than looking at the end of the camshaft but looking at the line, not the punch mark.

dwalby is suggesting that I have something to learn in all of this, which is, unfortunately correct...

Good news is that the PUNCH MARKS on the LH cams are in line with the case edge. Hence the lack of damage etc. This would have been over WAY earlier had I read the drawing correctly.

236920

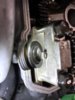
The picture of the other cam didn’t turn out well but the punch mark is also aligned correctly.

Maybe Mom was wrong and I’m not perfect?

So assuming I’m not missing anything here, I can put a Sharpie mark on the sprocket and the metal cover and move on with my life. Correct?
 

kiltman

Site Supporter
Joined
Apr 27, 2013
Messages
3,282
Age
68
Location
Stratford, Ontario Canada
Bike
2002,ST1100ABS
STOC #
8826
I don’t have a car in this race but have been refreshing my screen every few minutes for updates. For some reason I brought my Clymers with me to Winnipeg and just cracked it open to connect the dots in my mind. ;). I’ve owned two St1100s and both needed timing belts. I opted to get the dealer to do it. For 2.5 hours shop time it was worth it....but I digress.
I’m trying to follow along and understand the process, if for some reason I acquire another ST1100 and attempt the change myself.
I’m rooting for your success in getting this done......hell there’s nothing else to do on my day off in Winnipeg.....my apologies to the peggers. ;)
 
OP
OP
GGely

GGely

Site Supporter
Joined
Oct 28, 2018
Messages
709
Location
Oshawa, Ontario, Canada
Bike
2001 ST1100 Non ABS
STOC #
8997
Kiltman, this is easy stuff to do, though it’s clear that knowing the difference between punch marks and PUNCH MARKS helps a great deal!

dwalby, Larry and everyone else, thanks for your help and patience in getting this done. And dwalby, I appreciate that you must have worked hard at keeping your temper! Next time throw a rock...

Now everyone sing along:

“Hello Sharpie my old friend, I come to you once again...”
 
OP
OP
GGely

GGely

Site Supporter
Joined
Oct 28, 2018
Messages
709
Location
Oshawa, Ontario, Canada
Bike
2001 ST1100 Non ABS
STOC #
8997
I should have noted that it’s easy stuff to do with the right attitude, some tools, a place to work with appropriate lighting and the support of those who know more than I’ll ever know.

Thanks again, everyone!
 
Joined
Mar 13, 2012
Messages
5,071
Location
soCal
Bike
'97 ST1100
STOC #
687
And dwalby, I appreciate that you must have worked hard at keeping your temper!
nah, it just took a couple times before you read it and really understood what you read. Like I said before, I can't comprehend why Honda chose to use two different marking schemes on them since each cam is a unique part (or at least has a unique number, so I assume they're each a little different).

BTW, now that you have the covers off, check your valve clearances. If you have to pull the cams on the left side anyway to do an adjustment, you might as well re-align the pulley while you have the chance.
 

fnmag

R.I.P. - 2020
Rest In Peace
Joined
Mar 21, 2009
Messages
1,417
Location
Desert Southwest
Bike
'06 ST1300/Burgmn400
I should have noted that it’s easy stuff to do with the right attitude, some tools, a place to work with appropriate lighting and the support of those who know more than I’ll ever know.

Thanks again, everyone!
You definitely have the right attitude for this job.
I would have lost my mind with this job long ago.
Congrats and I look forward to a successful outcome.
 

Erdoc48

Site Supporter
Joined
Jan 25, 2009
Messages
1,441
Age
59
Location
Myrtle Beach, SC/ Sometimes Colorado
Bike
94/00/04 STs, FSC600
I’ll tell you of my experience with this (with the 94 ST): when I did the TB with the old TB still on (and previously, bike running perfectly), my cam marks on both sides were lined up (with each other), but the punch mark on the crank gear/ pulley, was I believe ahead (more to the right rotationally) of where it should have been. What I did (after a lot of conjecture here), was to make sure cyl. #1 was at TDC, make the appropriate mark on the crank gear (the right thing to do would have been to use a impact wrench to take off the indicator cover and realign it with the true TDC mark, however, I did not have an impact available), and made sure all was well before reinstalling the new belt. I checked the alignment of the 2 cam marks with the ‘new’ mark on the crank pulley multiple (read many, many, many times) before I was satisfied with the alignment and happily, it fired right and all was well. I cannot be certain as to why the mark on the crank indicator was off as the bolt to that was nice and tight (of course, unless someone was in there before and didn’t replace it properly). I used a straw to determine TDC on cyl. #1 (cranking with a 1/2” ratchet of course) and that’s how ultimately I realized the issue.

Basically, if it ran fine before and you’ve made very sure all is non interfering before re-start, you should be good. What I would do is see if you get both cam marks to line up but the crank mark doesn’t and then see if #1 is at TDC.
 
Joined
Aug 21, 2018
Messages
6,775
Location
Richmond, VA
Bike
'01 & '96 ST1100s
STOC #
9007
From what he's said, he can't get both cam drives to line up simultaneously. One head matches the crank, the other doesn't.

Added: He sad started saying the discrepancy was five teeth, then said five degrees, the latter of which could be a single tooth.

It's possible that one tooth might still let the engine run, but he also said the cam markings were correct, just not the pulley.
 
Last edited:
Joined
Aug 11, 2013
Messages
3,559
Location
kankakee
Bike
R1200rt
Is it possible when removing the cam sprocket guide bolt that the belt jumped ?? Put the cam bolt back in and see if the bike starts and runs normally. If you cranked the engine over many times we know the valves are not hitting and 20 second of running with no coolant is fine
 
Joined
Aug 21, 2018
Messages
6,775
Location
Richmond, VA
Bike
'01 & '96 ST1100s
STOC #
9007
No, because the cam sprocket is keyed to the shaft it slips on.
I believe we're both thinking of the pulley being only one belt tooth off from the correct position.

When the OP started by saying "five teeth" off, we all knew it couldn't run if the cams were actually that far off, but a guesstimate of five degrees could correspond to a single pulley tooth.
 
Joined
Mar 13, 2012
Messages
5,071
Location
soCal
Bike
'97 ST1100
STOC #
687
guys, this problem was solved hours ago.

Just to recap, the cams were verified to be in the correct orientation at #1 TDC, but the left cam pulley was off by 5 teeth from where it should be (not 5 degrees, 5 full teeth). This is not a problem because of the gear driven cam arrangement. If the cams are out, you can orient the cam sprocket in any orientation, as long as you put the cams back in with the correct orientation. He said the engine was rebuilt, so apparently during the rebuild process the sprocket got put back in an oddball orientation, but because the cams are properly aligned at #1 TDC the engine runs normally.

We've never seen this kind of thing before, so it took a few minutes to wrap our heads around the possibility that the sprocket was so far off, but the cams were correct.
 

John OoSTerhuis

Life Is Good!
Joined
May 10, 2005
Messages
5,221
Location
Bettendorf, Iowa
Bike
1991 SSMST1100
STOC #
1058
OK. I wasn’t going to weigh in on this one.... but...

Yes, in all my years with the ST1100, and on the forums, this is a new one.

What threw me was the fact that the driven pulleys are installed with a woodruff key. So.... after a lot of discussion we’ve arrived at the probable cause of why the OP’s ST was found in that (confusing!) condition:

someone (re?)installed the cam reduction gear oriented so that when the driven pulley would be installed onto its shaft, the pulley’s index line would NOT align with the index mark on the cam reduction holder. HOWEVER, the cams on that side were then subsequently installed correctly!

So... mark the driven pulley with a Sharpie and do your belt R&R. Tip: before you pull the old one, count the number of belt teeth between the driven pulleys’(new) index marks and duplicate that when installing the new one.

If you ever have to pull the cams like for shim(s) R&R, you could put the driven pulley “right” then... but why bother (mess with belt removal again).

My 2cents. Good luck.

Regards, John
 
Last edited:
OP
OP
GGely

GGely

Site Supporter
Joined
Oct 28, 2018
Messages
709
Location
Oshawa, Ontario, Canada
Bike
2001 ST1100 Non ABS
STOC #
8997
Allow me to summarize the situation:

1. When I pulled the timing belt covers and put the crank at #1 TDC, the LH camshaft pulley was off by 5 teeth

2. It appeared that the LH camshaft was 5 degrees or so out of position but ONLY because I was not listening to dwalby. Check the PUNCH MARK on the LH camshaft! The camshaft is in the correct position

3. All the correct marks line up in the correct position except the LH pulley

4. A Sharpie will give me a mark to use for replacing the belt, assuming the valves don’t require adjustment

5. The engine is a replacement, not a rebuild. It’s an American engine with the PAIR bits installed

6. I like “Gabe” or “GGely” better than OP. Never been to Mayberry... :)

Had I paid attention to dwalby, this would have been put to bed way earlier and for my part in misleading the hive, I apologize.

I did a quick check of the intake and exhaust valves on #1 and they are tight, .004” and .007”, if I recall correctly. So the camshafts will be coming out and the LH pulley put in the correct position, Sharpie not required (that I am aware of). Valve adjustments, here I come!

I’ll post the valve job and cam pulley separately, if required, to not muddy the waters further, if possible!
 
Joined
Sep 10, 2011
Messages
2,210
Location
West Michigan
Bike
'98 ST1100
STOC #
8470
Allow me to summarize the situation:

SNIP ......

I did a quick check of the intake and exhaust valves on #1 and they are tight, .004” and .007”, if I recall correctly. So the camshafts will be coming out and the LH pulley put in the correct position, Sharpie not required (that I am aware of). Valve adjustments, here I come!

I’ll post the valve job and cam pulley separately, if required, to not muddy the waters further, if possible!
.

I'm glad the valve clearances need adjustment. It just wouldn't be right to leave it as it is -with the cam position not correctly oriented to the camshaft sprocket on the L side. Get everything oriented correctly as shown in the above diagram. Your ST1100 deserves to be treated better than that.
 
OP
OP
GGely

GGely

Site Supporter
Joined
Oct 28, 2018
Messages
709
Location
Oshawa, Ontario, Canada
Bike
2001 ST1100 Non ABS
STOC #
8997
It sure does, Jim. Even if it didn’t, I couldn’t leave it that way, it would have driven me crazy.

John, I’m assuming that your tip regarding counting the teeth on the belt between the two pulley marks isn’t necessary now that I’m pulling the camshafts. Correct me if I’m wrong.
 

John OoSTerhuis

Life Is Good!
Joined
May 10, 2005
Messages
5,221
Location
Bettendorf, Iowa
Bike
1991 SSMST1100
STOC #
1058
No Gabe, it still applies. Count the teeth between index MARKS on the cam reduction holders before you pull the old belt. Then when you mount the new belt, start with the crank pulley, then over the water pump to the left driven pulley. Then count the teeth to the right driven pulley’s index LINE and put it on there. You will probably have to rotate the right driven pulley slightly clockwise towards the left one to do that, which appears to move the right’s index line from alignment with the mark. That’s OK, it will align when you do your final tensioning of the belt. This works. BTDT x 2 [51 belt teeth ‘between’ the index lines]

Edit: carefully follow the last instruction in the Honda Service Manual for installing a new belt (last sentence: “Then turn the crankshaft clockwise 3 teeth further and tighten the tensioner bolt.”)

“OP” stands for original poster. Sorry, I do always prefer to use real names when addressing folks in our community; however, I somehow have missed seeing yours used before this thread.

John
 
Last edited:
Top Bottom