Here is an inside look at the Rage. I opened it up to see what could be done about my micro SD card socket that would not latch. The last thing I found when buttoning up the case was a tiny, tiny bit of metal debris that I could have easily overlooked if it had not slid into view as I tilted the case. That "debris" is about 1 mm x 2 mm x 3 mm and has cast and cut features on it, so I am thinking it is the latch. I didn't take a picture of it but I have kept it for later examination. By then I had my own fix in place and doubted it would be worth the bother to find out where it belonged and if it was missing part of its shape in order to function.
A few comments:
Every one of those little 3 mm (1/8") diameter black rubber buttons, or plugs, on the back is covering a screw that will need to be backed out to open the case. Every screw threads into a metal insert on the front of the case. Nice. I like that they took the trouble to use inserts instead of just threading into plastic. The two black screws that hold the rubber cover for the ports are threaded into the plastic case, no metal inserts for those.
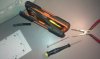
I pried into the buttons with a tiny screw driver with a flat blade of about 1.5 mm (1/16") across (shown). I teased up a bit to raise it and then used fine smooth jawed pliers (shown) to pull the plugs up. The screws were no trouble to back out as long as firm pressure down on the head is used to avoid rounding out the heads. You can see the screw driver I used. About half of the screws would not come out of the recesses but they were not an obstacle to getting the case apart as long as they were reversed as much as possible. They are deep in the recesses.
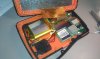
The case halves are nice and tight for sure. I started to split them by putting a large, broad flat screwdriver in the recessed gap at the top center edge of the case - the hard plastic. Probably a small coin would work too. Rotate or twist and that's enough to get it to split. Go easy and check for any screws that are not all the way out of their threads. I only had 1 of the 12 screws that needed to be backed out more with some help from holding the case halves apart. All 12 of the screws for the case are the same size so no need to lay out an illustrated card to arrange them for reassembly like I did.
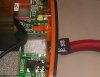
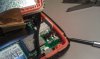
There seems to be a lot of empty space inside. Not much to see and plenty of room to operate. Right away I could understand why the card has to be inserted so deep. Simply because the circuit board was left with a straight edge in a curved case. That gap between the inside of the case and the micro SD socket must be about 6 or 7 mm (1/4"). That actually worked in my favour because I used that gap to insert a plastic shim which retains my card in the socket (the white plastic strip in the last image). Since I can read and write to card via USB to my computer, this is a satisfactory solution.
The perimeter sealing gasket is a nice piece of work too. It is soft, probably silicone. It has a fine slit so there are actually two sides that slip over the thin raised edge of the plastic case. The parts where it runs over a screw insert are cupped so they fit over the insert "towers" and everything lines up correctly before it is time to close the case.
I turned on the Rage while I had it apart to make sure the card was being read before I closed it up. I'm pretty happy with the results for an hour's easy time.

")