Shuey
Site Supporter
- Joined
- Jul 3, 2007
- Messages
- 2,100
- Location
- Niceville, FL
- Bike
- FJR1300 ES, 2018
- SPOT
- LINK
- STOC #
- 7005
In mid-December, 2023, IGOFAR (who needs no introduction here  ) posted up that his personal 2007 ST1300 was for sale. 16 year old bike with over 102k miles for $4,500 . . . insanity! I was having difficulty not buying it as I started my touring adventures on a 2007 ST1300. No immediate takers, so he lowered the price to $4,000. Dang you Larry . . . I bought it! The one sale condition was that I wouldn't fly out to pick it up until the end of Januay'24. No problems.
So, what follows is my journey in transforming MY bike to meet minimum long distance needs. Note that even after I picked up the bike in Tucson, rode it back to Niceville, FL, to reside in my garage, it was only until very recently that Larry finally stopped referring to it as HIS bike! It's a treasure that's been well cared for.
I expect this thread will be lengthy and grow over time as upgrades/adjustments are made. I've relied on the sage advice of this forum's members and the wealthy of knowledge on the site and not been disappointed. Thanks to all.
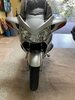
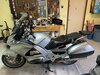
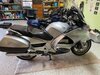
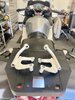
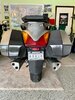
So, to start, here's what arrived in my garage 29Jan24.

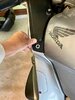
Before I flew out to spend a few days with Larry and Christy (Sadie, Piper and unnamed security guards) we're texting and talking on the phone almost daily. I wasn't looking forward to a possibly cold and wet ride back to Florida so discussed adding a PowerLet Port so I could use my heated gear since the bike was pretty much STock; no heated grips or seat. Larry's emphatic immediate answer was that he doesn't do electrical! A couple of days later he noted he had two PowerLet ports in his garage and a few days after that, with some outside advice, he proudly sent pictures of the installed port noting it killed him to drill a hole in his beautiful bike.
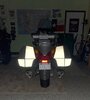
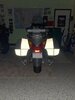
Another day, Larry texted that he found a set of Rear Reflective Side Bag Decals, thought I might need them and . . . put them on. They look great!
Over the years Larry has maintained a rather large fleet of ST1300Ps for a local company that provides escorts for funerals. We're talking one day and he notes the company owner was getting rid of some of his overstock of parts and Larry picked up a pair of police model over-the-mirror light brackets. Did I want them? For sure!
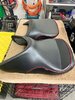
A couple of days before flying out, Larry calls and asked if I want to buy a Sergeant seat set that he bought from SupraSabre? Absolutely! I already have a Sergeant set on my FJR and really like it.
I flew out to Tucson on Sunday, 21Jan24 with my riding gear and some accessories to add for the trip.
On arrival, Larry picked me up and we went to his house to look at the bike and drop off my riding gear and accessories.
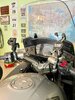
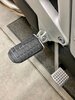
The first two additions I'd install the next day were RAM mounts for my Garmin XT GPS and my iPhone. Nothing powered as I'd just run them on their own battery power an recharge them at night. Additional I'd swap out the OEM foot pegs for GW pegs which are wider and more comfortable.
I had a good rest at the hotel and Larry picked me up in the morning and we headed to his garage.
Larry explained he couldn't sleep, so . . . he installed the reservoir RAM mounts and the GL foot pegs!
If you go back to the beginning and look at the bike photos you'll see the "Wolf" logs displayed on the sides. Just to be clear . . . I PUT THOSE ON MYSELF!
Finally, before I could depart his garage, Larry gave me a tool set complete with a Slime air compressor and a new tire plugging kit. He insisted I take it as he and Chisty didn't want me and "his" bike being stranded along the side of the road for something I could fix!
My sincere thanks to both Larry and his wife Christy for treating me like royalty.
So, that's the prelude. Updates, at a slow pace continue . . .
Saturday, 17Feb24
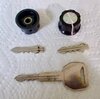
Spent some time examining and re-familiarizing myself with the ST1300 I got tired of constantly using the ignition key to open things up. Easy solution . . . make some short keys using some Radio Shack knobs I've had on the shelf for over 10 years.
Larry had provided several extra non-OEM keys which were perfect for this job. I sacrificed two of them developing what I needed, then fabricated two finished ones. Using my Dremel (really like this thing) I cut the heads off and trimmed a small amount from the both sides of the top of the key so it would fit in the knob's mounting hole. I used the set screw to snug in the inserted key shaft and epoxeyed them in. They work great. They're not for permanent placement, just for use while garaged or short term use at destinations or when I want to access something while the bike is parked and running.

Sunday, 18Feb24
With a lot of advice here on st-owners I managed to replace the OEM Turn Signal Relay with one suitable for the future transition to LED bulbs through the bike.
Special thanks to willsmotorcycle, Hound, dduelin and STRider . . . pictures ARE worth a thousand words.
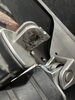
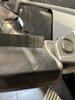
One of the guidance photos provided.
OEM relay on the left, replacement relay on the right.
Front
Back
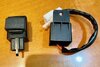
Note the rubber sleeve on the OEM Relay. I was unsure if I needed to cut off the mounting tap on the new Relay, but decided to try transferring the rubber sleeve first. Tight, but with a little stretch, it fit.
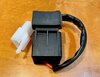
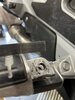
Plugged the new Relay in.
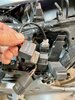
With a little effort, some patience, and a flat blade screwdriver for nudging, the new Relay was seated in place and again nearly hidden from view by the other taller relays mounted in front of it.
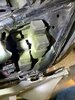
Turned on the bike and . . . turn signals still work, just fine. Hopefully, none of the other relays I disturbed were disabled! Time will tell.
Awaiting more parts. Stay tuned for what comes next.
Shuey
) posted up that his personal 2007 ST1300 was for sale. 16 year old bike with over 102k miles for $4,500 . . . insanity! I was having difficulty not buying it as I started my touring adventures on a 2007 ST1300. No immediate takers, so he lowered the price to $4,000. Dang you Larry . . . I bought it! The one sale condition was that I wouldn't fly out to pick it up until the end of Januay'24. No problems.So, what follows is my journey in transforming MY bike to meet minimum long distance needs. Note that even after I picked up the bike in Tucson, rode it back to Niceville, FL, to reside in my garage, it was only until very recently that Larry finally stopped referring to it as HIS bike! It's a treasure that's been well cared for.
I expect this thread will be lengthy and grow over time as upgrades/adjustments are made. I've relied on the sage advice of this forum's members and the wealthy of knowledge on the site and not been disappointed. Thanks to all.
So, to start, here's what arrived in my garage 29Jan24.
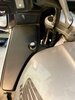
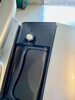
Before I flew out to spend a few days with Larry and Christy (Sadie, Piper and unnamed security guards) we're texting and talking on the phone almost daily. I wasn't looking forward to a possibly cold and wet ride back to Florida so discussed adding a PowerLet Port so I could use my heated gear since the bike was pretty much STock; no heated grips or seat. Larry's emphatic immediate answer was that he doesn't do electrical! A couple of days later he noted he had two PowerLet ports in his garage and a few days after that, with some outside advice, he proudly sent pictures of the installed port noting it killed him to drill a hole in his beautiful bike.
Another day, Larry texted that he found a set of Rear Reflective Side Bag Decals, thought I might need them and . . . put them on. They look great!
Over the years Larry has maintained a rather large fleet of ST1300Ps for a local company that provides escorts for funerals. We're talking one day and he notes the company owner was getting rid of some of his overstock of parts and Larry picked up a pair of police model over-the-mirror light brackets. Did I want them? For sure!
A couple of days before flying out, Larry calls and asked if I want to buy a Sergeant seat set that he bought from SupraSabre? Absolutely! I already have a Sergeant set on my FJR and really like it.
I flew out to Tucson on Sunday, 21Jan24 with my riding gear and some accessories to add for the trip.
On arrival, Larry picked me up and we went to his house to look at the bike and drop off my riding gear and accessories.
The first two additions I'd install the next day were RAM mounts for my Garmin XT GPS and my iPhone. Nothing powered as I'd just run them on their own battery power an recharge them at night. Additional I'd swap out the OEM foot pegs for GW pegs which are wider and more comfortable.
I had a good rest at the hotel and Larry picked me up in the morning and we headed to his garage.
Larry explained he couldn't sleep, so . . . he installed the reservoir RAM mounts and the GL foot pegs!
If you go back to the beginning and look at the bike photos you'll see the "Wolf" logs displayed on the sides. Just to be clear . . . I PUT THOSE ON MYSELF!
Finally, before I could depart his garage, Larry gave me a tool set complete with a Slime air compressor and a new tire plugging kit. He insisted I take it as he and Chisty didn't want me and "his" bike being stranded along the side of the road for something I could fix!
My sincere thanks to both Larry and his wife Christy for treating me like royalty.
So, that's the prelude. Updates, at a slow pace continue . . .
Saturday, 17Feb24
Spent some time examining and re-familiarizing myself with the ST1300 I got tired of constantly using the ignition key to open things up. Easy solution . . . make some short keys using some Radio Shack knobs I've had on the shelf for over 10 years.
Larry had provided several extra non-OEM keys which were perfect for this job. I sacrificed two of them developing what I needed, then fabricated two finished ones. Using my Dremel (really like this thing) I cut the heads off and trimmed a small amount from the both sides of the top of the key so it would fit in the knob's mounting hole. I used the set screw to snug in the inserted key shaft and epoxeyed them in. They work great. They're not for permanent placement, just for use while garaged or short term use at destinations or when I want to access something while the bike is parked and running.
Sunday, 18Feb24
With a lot of advice here on st-owners I managed to replace the OEM Turn Signal Relay with one suitable for the future transition to LED bulbs through the bike.
Special thanks to willsmotorcycle, Hound, dduelin and STRider . . . pictures ARE worth a thousand words.
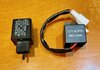
One of the guidance photos provided.
OEM relay on the left, replacement relay on the right.
Front
Back
Note the rubber sleeve on the OEM Relay. I was unsure if I needed to cut off the mounting tap on the new Relay, but decided to try transferring the rubber sleeve first. Tight, but with a little stretch, it fit.
Plugged the new Relay in.
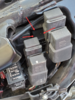
With a little effort, some patience, and a flat blade screwdriver for nudging, the new Relay was seated in place and again nearly hidden from view by the other taller relays mounted in front of it.
Turned on the bike and . . . turn signals still work, just fine. Hopefully, none of the other relays I disturbed were disabled! Time will tell.
Awaiting more parts. Stay tuned for what comes next.
Shuey
Attachments
-
 226.3 KB Views: 36
 -
 128.4 KB Views: 34
 -
 59.2 KB Views: 362
 -
 114.1 KB Views: 34
 -
 65.8 KB Views: 12
Last edited:

 Edited to correct "GL" to "GW". Thanks Willsmotorcycle!)