
Transforming IGOFARs ST1300 . . . to Shuey's!
- Thread starter Shuey
- Start date
Driving a car with the windows down, would have been a whole lot cheaper to purchase and maintain

Damn Shuey that's a transformation
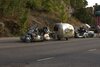
I assume you all saw the trailer, and the sidecar, but who noticed the pocket bike?
diferg
Dan & Ingrid
not me! 
OP
OP
Shuey
Site Supporter
- Joined
- Jul 3, 2007
- Messages
- 2,100
- Location
- Niceville, FL
- Bike
- FJR1300 ES, 2018
- SPOT
- LINK
- STOC #
- 7005
Update . . . thanks for the idea SupraSabre.!
Florida now fully automated and no longer does half spaces.
Shuey
Florida now fully automated and no longer does half spaces.
Shuey
- Joined
- Nov 20, 2005
- Messages
- 9,521
- Location
- Cedar City, Utah
- Bike
- 12/04 ST 1300s
- 2024 Miles
- 000420
- STOC #
- 5901
I'm very honored that you chose "close" to my suggestion!Update . . . thanks for the idea SupraSabre.!
Florida now fully automated and no longer does half spaces.
Shuey

You're very much welcome!

OP
OP
Shuey
Site Supporter
- Joined
- Jul 3, 2007
- Messages
- 2,100
- Location
- Niceville, FL
- Bike
- FJR1300 ES, 2018
- SPOT
- LINK
- STOC #
- 7005
Modifications have slowed down as I await my turn in the mechanics garage.
However, I did manage to prepare the replacement Cougar LED headlights. I'm sure about my modifications, not positive yet about how they're installed. Time will tell.
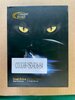
The Box
What's inside the box
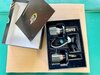
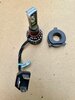
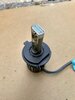
One of the lights out of the box
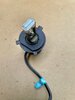
The mounting base is removed by twisting it counter-clockwise and sliding it up and over the LED light stalk.
(Thanks to Ashley for figuring this out for me.)
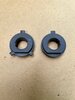
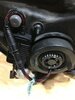
The adapter base bottom two tabs do not match/align with what our STs need, so they need to come off. Pictured eft is the OEM base with 3 tabs, right is the modified base, now with only one tab. (I used a dremel which easily cut off the tabs, then a small file to smooth out rough edges.)
Notice the two slots or cut-outs on the inside, one is wider than the other and line up with the base of the LED light.
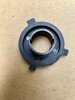
Slide the adapter base over the LED stalk, line up the inside tabs to fit the slots, then seat with a clockwise twist. Voila!
Now, installing. As I currently understand, the process is as follows:
- Unplug the stock bulb
- Remove the rubber boot
- release the metal spring retainer clip and flip it up and out of the way
- Remove the stock bulb
- Remove the adapter base from the Cougar bulb
- Seat the adapter base in the headlight socket
- replace the metal spring retainer clip, locking down the adapter base
- reseat the rubber boot
- poke the Cougar LED light down through the hole in the rubber boot, into the adapter base and rotate clockwise to lock it in place
- attach the female power plug to the short male power cord of the Cougar LED light.
- Done
Repeat for the other side.
So . . . corrections? Comments? Guidance? All will be welcome.
Shuey
However, I did manage to prepare the replacement Cougar LED headlights. I'm sure about my modifications, not positive yet about how they're installed. Time will tell.
The Box
What's inside the box
One of the lights out of the box
The mounting base is removed by twisting it counter-clockwise and sliding it up and over the LED light stalk.
(Thanks to Ashley for figuring this out for me.)
The adapter base bottom two tabs do not match/align with what our STs need, so they need to come off. Pictured eft is the OEM base with 3 tabs, right is the modified base, now with only one tab. (I used a dremel which easily cut off the tabs, then a small file to smooth out rough edges.)
Notice the two slots or cut-outs on the inside, one is wider than the other and line up with the base of the LED light.
Slide the adapter base over the LED stalk, line up the inside tabs to fit the slots, then seat with a clockwise twist. Voila!
Now, installing. As I currently understand, the process is as follows:
- Unplug the stock bulb
- Remove the rubber boot
- release the metal spring retainer clip and flip it up and out of the way
- Remove the stock bulb
- Remove the adapter base from the Cougar bulb
- Seat the adapter base in the headlight socket
- replace the metal spring retainer clip, locking down the adapter base
- reseat the rubber boot
- poke the Cougar LED light down through the hole in the rubber boot, into the adapter base and rotate clockwise to lock it in place
- attach the female power plug to the short male power cord of the Cougar LED light.
- Done
Repeat for the other side.
So . . . corrections? Comments? Guidance? All will be welcome.
Shuey
I can't recall if I pushed my bulb through the rubber boot or put the rubber boot on over top. I did have a different-ish bulb (the F2) but the procedure sounds about right.
If it doesn't work one way, try the other. As long as you get it to all fit together you'll be fine.
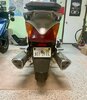
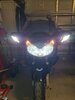
Here's what mine looked like in the end. No cutting of my boot was required with the F2 led bulbs.
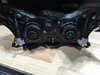
The only thing I can't remember is if the bulb needs to be installed with the beam "cup" on it's tip (that covers one of the LED chips) needs to be turned up or down.
If it doesn't work one way, try the other. As long as you get it to all fit together you'll be fine.
Here's what mine looked like in the end. No cutting of my boot was required with the F2 led bulbs.
The only thing I can't remember is if the bulb needs to be installed with the beam "cup" on it's tip (that covers one of the LED chips) needs to be turned up or down.
Sadlsor
Site Supporter
- Joined
- Jan 15, 2020
- Messages
- 4,284
- Age
- 66
- Location
- Birmingham, Alabama
- Bike
- 2008 ST1300A
- STOC #
- 9065
On my list of things to do, but not in a hurry.
The question on many minds, in all likelihood, will be "do you HAVE to take off the nose cowl?"
I know some who have got their hands up there without removing the plastic fairing, most with some difficulty, as it's right, and you're somewhat groping blindly.
Thanks for sharing the details.
(Don't look, Larry!!)
@Sadlsor it makes it easier if you do, but you can get at the bulbs easier if you at least take off the windscreen, the black cover under that, the dash bezel and instrument cluster. That way you don't have to remove the bottom, lower and upper side cowls/fairings. There was no way my hands could get the OEM style bulb in or out when trying to reach through the top of bottom of the triple tree to get access. Even for those who can manage to get the OEM bulb in & out with the Tupperware all on, I doubt they could get an LED installed.
- Joined
- Feb 11, 2006
- Messages
- 9,685
- Location
- Jacksonville
- Bike
- GL1800 R1200RT NC700
- 2024 Miles
- 008131
- STOC #
- 6651
It’s a 30 second job to change out a bulb from underneath, kneeling next to the front wheel, reaching up from below.
I replaced my front headlights by reaching from below. Make sure the bike is on center stand ofcourse!
I had to put the rubber boot after I got the tail of the bulb out from the back. Also be careful with it, as a buddy of mine managed to tear one off a few years ago as it was brittle.
I had to put the rubber boot after I got the tail of the bulb out from the back. Also be careful with it, as a buddy of mine managed to tear one off a few years ago as it was brittle.
Is there a special tool needed to pinch the release on the bulb wire? My hand can get to it from beneath, but I can't get the angle to release the wire.It’s a 30 second job to change out a bulb from underneath, kneeling next to the front wheel, reaching up from below.
Sadlsor
Site Supporter
- Joined
- Jan 15, 2020
- Messages
- 4,284
- Age
- 66
- Location
- Birmingham, Alabama
- Bike
- 2008 ST1300A
- STOC #
- 9065
Do you mean the steely wire bail that holds the bulb assembly in place, or the plastic wiring clip / connector to power the bulb?
The plastic wire connectorDo you mean the steely wire bail that holds the bulb assembly in place, or the plastic wiring clip / connector to power the bulb?
- Joined
- Feb 11, 2006
- Messages
- 9,685
- Location
- Jacksonville
- Bike
- GL1800 R1200RT NC700
- 2024 Miles
- 008131
- STOC #
- 6651
Two tabs on each side…… squeeze between thumb and forefinger and it easily pulls off.The plastic wire connector
You can use two zip ties, thick ends give you more squeeze.
Or forceps with a bit of rubber hose slid on each side, or needle nose pliers with nuts slid over each arm.
Or small bearings in the fingers of rubber gloves…
You just have to be creative
Or forceps with a bit of rubber hose slid on each side, or needle nose pliers with nuts slid over each arm.
Or small bearings in the fingers of rubber gloves…
You just have to be creative
- Remove the adapter base from the Cougar bulb
- Seat the adapter base in the headlight socket
- replace the metal spring retainer clip, locking down the adapter base
- reseat the rubber boot
- poke the Cougar LED light down through the hole in the rubber boot, into the adapter base and rotate clockwise to lock it in place
- attach the female power plug to the short male power cord of the Cougar LED light.
- Done
Repeat for the other side.
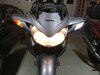
I completed the swap today. Had some time to kill waiting for a Fed Ex delivery. Took left side fairing off to confirm that the previous owner had installed a Honda quad connect harness for the switched power port and swapped the bulbs out while it was off.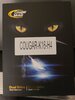
- Seat the adapter base in the headlight socket
- replace the metal spring retainer clip, locking down the adapter base
- reseat the rubber boot
- poke the Cougar LED light down through the hole in the rubber boot, into the adapter base and rotate clockwise to lock it in place
- attach the female power plug to the short male power cord of the Cougar LED light.
- Done
Repeat for the other side.
I completed the swap today. Had some time to kill waiting for a Fed Ex delivery. Took left side fairing off to confirm that the previous owner had installed a Honda quad connect harness for the switched power port and swapped the bulbs out while it was off.
OP
OP
Shuey
Site Supporter
- Joined
- Jul 3, 2007
- Messages
- 2,100
- Location
- Niceville, FL
- Bike
- FJR1300 ES, 2018
- SPOT
- LINK
- STOC #
- 7005
Thanks AIBIKRNC . . . confirms my post #68. Appreciated.
Shuey
Shuey