
OP
OP
Smudgemo
Intermodal Man of Mystery
So it's Mother's Day, my wife is sleeping in and I'm in the garage looking at the bike thinking, "You know, it would sure be easy to pull the valve covers and check the valve clearance. Or I could skip that and assume it's good. Besides, what am I going to do, go through the shimming process now?" And of course, I can't not bother now that it's in my head, so I pull the front wheel for a better view of the crank position and get to it.
I pull the right cover and everything looks okay..

Except, hey, who gooped all this sealer on this gasket?

Looking more closely at the block, I can see there's some left there I need to remove. Maybe this engine isn't as sensitive, but the SOHC4 guys would get worked up about excess or the wrong sort of sealer used which often blocks tiny oil passages. Some of this gray sealer was on the timing belt cover, so I don't think the mechanic was super-careful in any way. I tried to clean up the gaskets, but gave up and I'm ordering some new ones. That and some new oil donuts for the cover bolts.
And speaking of cover bolts, those sure are some funky bolts Honda designed. Mine were a bit rusty so I turned (again) to the aluminum foil and water before a quick bit of chrome polishing (all by hand.)


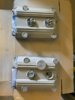
Then, because there never seems to be a rabbit hole I won't go down, I started cleaning up the covers. In a previous installment, I noted they were corroded. I just did a quick prep by scraping the corrosion, sanding with an abrasive pad, and High-temp primer paint.

I taped nickels and dropped them in the bolt holes.

Doesn't match, but at least the paint is okay. I'm going to skip painting the front cover because it's plastic.

Wait, what was I in there for? Oh right, valve check! Everything is in spec except two intakes were .001" too large of a gap. I'm going to leave it for now and assume the engine won't grenade.
Anyone have a preference for a gasket sealer for the new gaskets? I assume a small amount on both sides is appropriate? I have some Permatex Black Rubber Sealant, should that be suitable.
When I went to put the front wheel back on, I noticed the speedo gearbox looked like it had aquarium gravel inside it, so I took it apart and cleaned that out. I should probably use a heavy grease like wheel bearing grease? I don't see any mention in the manual.

The brake parts arrived, so I might start to tackle that soon. Bummer, I was hoping to fire it up and see how it runs, but I'm going to wait on the new gaskets.
I pull the right cover and everything looks okay..
Except, hey, who gooped all this sealer on this gasket?
Looking more closely at the block, I can see there's some left there I need to remove. Maybe this engine isn't as sensitive, but the SOHC4 guys would get worked up about excess or the wrong sort of sealer used which often blocks tiny oil passages. Some of this gray sealer was on the timing belt cover, so I don't think the mechanic was super-careful in any way. I tried to clean up the gaskets, but gave up and I'm ordering some new ones. That and some new oil donuts for the cover bolts.
And speaking of cover bolts, those sure are some funky bolts Honda designed. Mine were a bit rusty so I turned (again) to the aluminum foil and water before a quick bit of chrome polishing (all by hand.)
Then, because there never seems to be a rabbit hole I won't go down, I started cleaning up the covers. In a previous installment, I noted they were corroded. I just did a quick prep by scraping the corrosion, sanding with an abrasive pad, and High-temp primer paint.
I taped nickels and dropped them in the bolt holes.
Doesn't match, but at least the paint is okay. I'm going to skip painting the front cover because it's plastic.
Wait, what was I in there for? Oh right, valve check! Everything is in spec except two intakes were .001" too large of a gap. I'm going to leave it for now and assume the engine won't grenade.
Anyone have a preference for a gasket sealer for the new gaskets? I assume a small amount on both sides is appropriate? I have some Permatex Black Rubber Sealant, should that be suitable.
When I went to put the front wheel back on, I noticed the speedo gearbox looked like it had aquarium gravel inside it, so I took it apart and cleaned that out. I should probably use a heavy grease like wheel bearing grease? I don't see any mention in the manual.
The brake parts arrived, so I might start to tackle that soon. Bummer, I was hoping to fire it up and see how it runs, but I'm going to wait on the new gaskets.


.jpg")


