$300 '97 ST1100 Refurb Thread

OP
OP
Smudgemo

Smudgemo

Intermodal Man of Mystery
Joined
May 17, 2019
Messages
557
Location
Berkeley, CA
Bike
'08 GS / '78 CB550
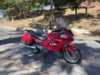
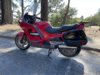
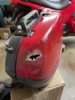
Sometimes I just can't stop working on something, and sometimes I can't stop thinking about working on something. So after a nap and some dinner, I hauled the luggage up from under the house to get a look at what I'm going to be working on soon. I'm just going to say it - I hate working with paint. I'll probably buy one of the kits with primer and the correct color, but there's a bunch of prep to do.

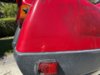
So I knew one case was damaged and the repair was just a quickie type of thing with some sort of soft bondo (like not enough hardener?) and fiberglass cloth. I punched a hole in it without much trouble, but removing all the material is going to take some time and some sanding wheels. Probably quite a few as it's a soft material.

Hole.jpg


Bondo.jpg

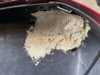
Okay, I get it. Just get back on the road, but the repair was cracking on the outside so I don't know how weatherproof it would be. The PO had just said it fell off on a ride and was damaged. I didn't think that much of it because a few weeks ago in Utah I ran all day with my right side not latched and thankfully nothing happened.

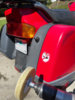
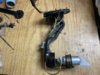
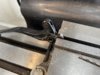
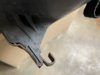
But then I noticed the hook was rather unhook-like..

Not Hook.jpg

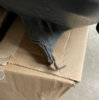
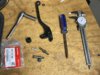
And I'm giving this some thought and I realized that somewhere along the way this case struck something at a high enough speed that it punched a hole in the abs plastic, straightened the hook and probably tore the bag off the bike. I grabbed a couple of visegrips and a channelock pliers and re-hooked it to some extent. Best would be to drill the rivets and do this on its own, but I think instead I'll see if I have a steel bar to hold in the vise like an anvil that I can work it back into shape with a hammer. It's actually not bad, but it lets the bag sit further rear that it should.

Hook.jpg

I guess I need to give the mount and the latch an inspection to make sure they are all in serviceable condition before I assume anything.

And actually, I was looking on eBay and I might just spend the $75 for a road-rashed case since I'm going to be painting both cases and both mirrors either way.
 
OP
OP
Smudgemo

Smudgemo

Intermodal Man of Mystery
Joined
May 17, 2019
Messages
557
Location
Berkeley, CA
Bike
'08 GS / '78 CB550
So my non-plan of putting it out there in the universe that I was thinking of just buying a new (to me) side case worked perfectly as my new local ST friend Jeff (aka @Slydynbye) pinged me to say he had a case he was willing to part with if I didn't mind black. And since I was looking at what is probably going to amount to a very mediocre-level repaint of the mirrors and bags no matter what, I figured hell yeah! So I ran down to his place, shot the ***** for 90 minutes or so until my 16YO daughter called demanding to know the whereabouts of "her" car. I should have crashed it into something made of concrete on the way home so I could say it's in the bone yard, but I like it and doing so would cost me money and I'm a cheapskate. Anyhow, Jeff is a great guy who I'm telling here and now that I'd ride with in the future, and I'm not exactly a people person, so be honored. Or warned.

But the bike, the $300 project that hasn't been on the road since Joe Biden was our #2 guy and my teenagers thought I was cool, is back on the road! It runs, and damned if it doesn't run damn well! I can't say for sure, but it almost makes me feel like it has more pep than my '96 with the Canadian style rejetted carbs. Thanks, neighbor.

So here's where we are. I need to do some freeway testing, but when asked if good to go, Magic 8ball says, "Concentrate and ask again." I'm thinking I'll just go ride it to Sacramento and see. Stupid novelty fortune-telling devices..

Silver mirror. So?

Right Side.jpg

Black bag. So?

Left Side.jpg

As a potential tool for you to add to your kit, 3M makes this giant eraser thing that mounts to a drill that removes stickers like Elizabeth Taylor removed husbands. Sorry Eric, your fish sticker is a memory.

Sticker Remove.jpg

Sorry, Soichiro you're gone too.

Removed.jpg

I don't think I have actually painted anything of consequence since high school when I painted my 1972 Oldsmobile Cutlass S in my folks' garage back in Wisconsin so may years ago and found out a lacquer paint doesn't play well with an enamel paint on a replaced fender, so I do hope this goes better. I do think in many cases that imperfection is perfection, which is convenient because I honestly don't care if it looks good from less than ten feet, and I think it will.

I hope your Saturday has gone as well as mine. Remember that a bad day of fishing is better than a good day of work.
 
Last edited:

sirbike

Site Supporter
Joined
Feb 26, 2007
Messages
858
Location
Cleveland OH
Bike
2006 ST1300A
2024 Miles
000540
Great to see the bike on the road.
I did work today, I was a good day due to riding to work, in the rain at that, instead of driving.
 
Joined
Jul 5, 2021
Messages
58
Age
59
Location
Brooklyn, NY
@Smudgemo
Great job! Thanks for chronicling your journey. It was interesting and could wind up being helpful for my journey.
Looking forward to seeing her all prettied up when you finish putting her makeup on.
 
OP
OP
Smudgemo

Smudgemo

Intermodal Man of Mystery
Joined
May 17, 2019
Messages
557
Location
Berkeley, CA
Bike
'08 GS / '78 CB550
This is a short post because there's not much to say about a worn out shock other than pogo sticks were fun when I was ten, but not so much when one is riding a 700lb rocket on less than perfect roads, so it was with great excitement that I received my care package from Alf's crew across the pond.

Hagon.jpg

I decided on no remote this time since I really haven't had cause to change the setting on my '96 other than when I fully load up and head out of town. I had it in place and buttoned up in a scant twenty minutes, so time to give it a whirl.

I guess I should order some paint for the mirrors and bags so I can wrap this project up, but maybe I should just hire a painter who actually has the place and tools to do the job properly. I'm just not keen on paint work..
 
OP
OP
Smudgemo

Smudgemo

Intermodal Man of Mystery
Joined
May 17, 2019
Messages
557
Location
Berkeley, CA
Bike
'08 GS / '78 CB550
Probably TAP Plastics? I got mine from Amazon and I have been using Oatley Medium Black ABS cement that I think I got from both Amazon (thinking it was something special) and from Ace Hardware. One can seemed to dry and become useless, the other is fine and seems to be working pretty well.

I think the sheet I got is 1/8" but maybe I'd try something thinner if available - I sure wouldn't do thicker in most cases. And you must remove the paint, of course.
 

ChriSTian_64

Site Supporter
Joined
Feb 5, 2020
Messages
871
Age
59
Location
Deux-Montagnes, Quebec, Canada
Bike
2000 ST1100Y
STOC #
9063
@Smudgemo , I'm curious about your Hagon shock.

Is it something they made custom for you (weight) or it's just a regular ST1100 shock ?

Also heard they are very famous, but also a bit more expensive than other brands ?
 
OP
OP
Smudgemo

Smudgemo

Intermodal Man of Mystery
Joined
May 17, 2019
Messages
557
Location
Berkeley, CA
Bike
'08 GS / '78 CB550
@Smudgemo , I'm curious about your Hagon shock.

Is it something they made custom for you (weight) or it's just a regular ST1100 shock ?

Also heard they are very famous, but also a bit more expensive than other brands ?
In the beginning, I did a little looking, and the guy who imports Ikon (and had done some vapor blasting for me) said they don't have one for an ST. Not sure why I settled on Hagon, but the importer for Hagon (Mark at British Cycle in Nova Scotia) was fantastic to deal with.

For this one, the shock that came with the bike was a Progressive and they blew me off when I asked about a rebuild (happy to sell a new one!), the OEM wasn't all that much cheaper, and while Wilburs was interesting, Hagon and British Cycle took care of me the first time so I knew what I was getting.

They know the design needed and then only need to know your weight and how much passenger/gear you'll ride with so they can select a spring. If you can swing it and change up your weight regularly, the external preload adjuster is THE way to go. This one will take more effort, but it shouldn't be horrible. They also take a month or two because they are bespoke, so you also can't just get one like OEM. But does OEM suit you? Got me, mine is dead.
 

rwthomas1

Site Supporter
Joined
Jun 6, 2020
Messages
1,149
Location
Rhode Island, USA
Bike
'01 ST1100 non-ABS
Here's a quick and dirty way to prep for cheap paint jobs. Take the parts, one by one, in a large tub with some water at the bottom. Use green scotchbrite pads and Comet cleanser to scuff the entire painted surface to give it some tooth. Rinse really well. Find a friendly bodyshop. Ask what they are painting in the next few weeks, color-wise. If there is a color you like, they will often simply shoot your parts at the same time. If you have done the prep, you are only paying for the paint and gun time. I've had wheels, RC boats, parts, etc. done this way. Pay cash, they like cash.

RT
 
OP
OP
Smudgemo

Smudgemo

Intermodal Man of Mystery
Joined
May 17, 2019
Messages
557
Location
Berkeley, CA
Bike
'08 GS / '78 CB550
That's a good idea. I might just buy a color kit for the mirror and to try and blend the red case paint, and leave the other case black or just get a similar color from the factory colors section for cars at the auto parts store. Shoot, I could even paint the red case black and give it an older bike's luggage look since the top case is black. Either way, it works and there's no rush to any of it.
 
OP
OP
Smudgemo

Smudgemo

Intermodal Man of Mystery
Joined
May 17, 2019
Messages
557
Location
Berkeley, CA
Bike
'08 GS / '78 CB550
Another quick update. I noticed the date code on the fuel pump that suggested original, but I hate working with fuel and I didn't really feel like doing the usual testing to see if it puts out the correct amount of fuel or starts to slow when warmed up, so I just went straight to the Quantum pump hack using the '96 pump/factory regulator rather than drop another $500 on a Honda replacement. You need a 1/8" pipe tap and die to join things, but it was pretty easy to accomplish. I carried this pump with me on my last trip, and in reflection, how in the world would I have managed to do an install?

Quantum.jpg


Obviously I can't tell if the join leaks at all, and I don't know about you but exposed electrical terminals inside a fuel tank gives me the willys, but nothing smoked, blew up or caught fire, and it seemed to ride fine over the course of a few miles including a half mile hill climb steep enough four guys couldn't push it ten feet.

I think for my next long tour I'll instead carry an external pump to get me to my hotel, if I carry anything. The other bike's pump is new Honda, and I find it hard to fathom not getting a good ten years out of it with no troubles. Maybe I will carry for this bike since I haven't seen much data on how long these pumps will last, but I don't know. So there you have it, two options. Buy new for $500 or hack n hope for $80. Or buy a second ST and do both.

Oh, and a local bike painter said $400 for the two cases and mirrors if he has paint he can color-match and there isn't any real prep work. Sounds like it might be the way to go rather than try to find a quiet day and rig up something to avoid overspray on everything.
 

Ron

Joined
Feb 5, 2005
Messages
1,680
Location
Orlando
Bike
ST1100s
STOC #
2432
If he doesn't use the "correct" paint, he could get it close. The original has both pearl and metallic components. I have a top box and have had a couple mirrors that were real close, close enough for me. :thumb:

You building a show bike or a rider?
 
Joined
Aug 10, 2015
Messages
2,013
Location
Fort Worth, Texas
Bike
91 ST1100/06 ST1300
Another quick update. I noticed the date code on the fuel pump that suggested original, but I hate working with fuel and I didn't really feel like doing the usual testing to see if it puts out the correct amount of fuel or starts to slow when warmed up, so I just went straight to the Quantum pump hack using the '96 pump/factory regulator rather than drop another $500 on a Honda replacement. You need a 1/8" pipe tap and die to join things, but it was pretty easy to accomplish. I carried this pump with me on my last trip, and in reflection, how in the world would I have managed to do an install?

Quantum.jpg


Obviously I can't tell if the join leaks at all, and I don't know about you but exposed electrical terminals inside a fuel tank gives me the willys, but nothing smoked, blew up or caught fire, and it seemed to ride fine over the course of a few miles including a half mile hill climb steep enough four guys couldn't push it ten feet.

I think for my next long tour I'll instead carry an external pump to get me to my hotel, if I carry anything. The other bike's pump is new Honda, and I find it hard to fathom not getting a good ten years out of it with no troubles. Maybe I will carry for this bike since I haven't seen much data on how long these pumps will last, but I don't know. So there you have it, two options. Buy new for $500 or hack n hope for $80. Or buy a second ST and do both.

Oh, and a local bike painter said $400 for the two cases and mirrors if he has paint he can color-match and there isn't any real prep work. Sounds like it might be the way to go rather than try to find a quiet day and rig up something to avoid overspray on everything.
I bought all the hoses and pump to rebuild mine with back in the Fall of last year. Don't ever look into the tank with a flashlight if you have any ocd at all. While cruising Ebay, I found a NIB Honda assembly for about half Partzilla's list price and had tucked it away for a spare. Disassembled my original pump and found too much rust on the metalwork for my liking so I put in the new assembly rather than rebuilding the original.
If I can treat my original adequately, I will assemble a spare much like yours^^^^.
 
OP
OP
Smudgemo

Smudgemo

Intermodal Man of Mystery
Joined
May 17, 2019
Messages
557
Location
Berkeley, CA
Bike
'08 GS / '78 CB550
Disassembled my original pump and found too much rust on the metalwork for my liking so I put in the new assembly rather than rebuilding the original.
Soak it in evaporust as a start. I found the '96 motor didn't seem to spin quite freely when it was liberated from the assembly, and even made a funny noise when I applied power a couple of times, so I'm pretty sure it was winding down its service. I still want to open it up and see if I can clean it out but the housing has a coupe of dimples that look like they hold the metal case on the inner works that I need to deal with to neatly disassemble things.
 
Joined
Aug 10, 2015
Messages
2,013
Location
Fort Worth, Texas
Bike
91 ST1100/06 ST1300
Soak it in evaporust as a start. I found the '96 motor didn't seem to spin quite freely when it was liberated from the assembly, and even made a funny noise when I applied power a couple of times, so I'm pretty sure it was winding down its service. I still want to open it up and see if I can clean it out but the housing has a coupe of dimples that look like they hold the metal case on the inner works that I need to deal with to neatly disassemble things.
Evaporust is a good product. I've used on parts I repainted. For a submersible part like this, I will bead blast is clean and get it plated. The new one's a swirly pale gold/brass color so I'm assuming it was zinc plated. This bike sat in the PO's garage for 20 years....I'm really impressed that tank corrosion overall was minimal....except on this part.
 
OP
OP
Smudgemo

Smudgemo

Intermodal Man of Mystery
Joined
May 17, 2019
Messages
557
Location
Berkeley, CA
Bike
'08 GS / '78 CB550
Turning from refurb work to modification work, I decided (again) that I hate the stock clutch action on the ST and decided to do something about it. Well, the rubber boot has seen better days and reeds a replacement, so I guess this is a hybrid post.

Anyhow, the clutch handle comes off easy as can be. It was harder to find the new boot in the box of parts.
Tools.jpg

I trimmed the rod to 15mm (ish) like the '96 because it seems to work just fine.
Lathe.jpg

I found the 5mm stock for the stopper blocking a vacuum line on my '96, and since I have leftover vinyl caps from doing this bike, it was a swap. I did M4 x .75 threads, and then filed some flats for a wrench after this photo.

Mill.jpg

I need to give it an actual road test to make sure the clutch is fully disengaged, but driveway testing says the action is beautiful and the clutch is grabbing hard. So I can't recommend anyone do this to their bike because I might be an idiot doing idiotic things with critical components on an inherently dangerous machine, but it sure feels a lot better than it did and the '96 has about 4,000 miles on the its mod, so..
 

Ron

Joined
Feb 5, 2005
Messages
1,680
Location
Orlando
Bike
ST1100s
STOC #
2432
"I trimmed the rod to 15mm (ish) like the '96 because it seems to work just fine."


I did a quick search of different years and ABS vs. Standard. The clutch push rod is the same part number for all. Did I miss something?

I realized you are trying to adjust the clutch pull engagement point. For those that don't have access to a machine shop or have the knowledge or ability to try it at home, I bought a set of adjustable levers. About $20 for a matching set. (The front brake lever already matched, so I have a spare now.)
 
Top Bottom